Xerox 5400DX Technical Reference
Xerox 5400DX - Phaser B/W Laser Printer Manual
 |
UPC - 042215476539
View all Xerox 5400DX manuals
Add to My Manuals
Save this manual to your list of manuals |
Xerox 5400DX manual content summary:
- Xerox 5400DX | Technical Reference - Page 1
Instructions Printers CORPORATE AUS 1 800 003. 100 Int'l +62 03 9561.8102 FAX 1 800 004.302 Int'l +972 5238.555.82 Xerox Phaser 5400/B Xerox Phaser 5400/N Xerox Phaser 5400/DT Xerox Phaser 5400/DX Photo 1 Photo 2 Photo Use a spring hook to remove the tension spring. (See Photo 1) Step 2 Using - Xerox 5400DX | Technical Reference - Page 2
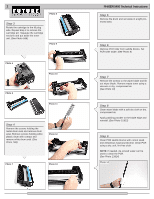
and remove white drum axial. (See Photo 7&8) Photo 12 Photo 7 Photo 13 PHASER 5400 Technical Instructions Step 5 Remove the drum and set aside in a light protected area. Step and Anhydrous Isopropyl Alcohol. Clean PCR using a dry, soft, lint-free cloth. NOTE: If needed, de-ionized water can be - Xerox 5400DX | Technical Reference - Page 3
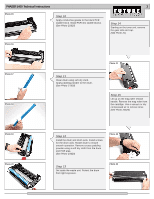
PHASER 5400 Technical Instructions Photo 15 Step 10 Apply conductive grease to the black PCR saddle block. Install PCR into saddle blocks. (See Photo 15&16) 3 Step 14 Starting on the toner unit, remove the gear side end cap. (See Photo 21) Photo 16 Photo 17 Photo 18 Step 11 Clean drum using - Xerox 5400DX | Technical Reference - Page 4
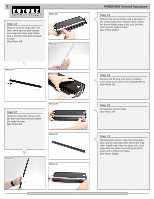
. Set aside for later. (See Photo 25) Photo 29 Photo 30 Photo 25 Photo 31 PHASER 5400 Technical Instructions Step 18 Remove the doctor blade. Use a vacuum or dry compressed air to remove toner. Clean the doctor blade using a dry, soft, lint-free cloth and set aside for later. (See Photo 26&27 - Xerox 5400DX | Technical Reference - Page 5
PHASER 5400 Technical Instructions 5 Photo 32 Step 22 Fill toner hopper Use a small blade screw driver to turn the pin to the lock position (¼ turn). (See Photo 36&37) Photo 38 XEROX PHASER 5400 In October of 2001, Xerox released the Phaser 5400 laser printer. The Xerox Phaser is a 40ppm printer
-
 1
1 -
 2
2 -
 3
3 -
 4
4 -
 5
5
 |
 |
Xerox Phaser 5400/B
Xerox Phaser 5400/N
Xerox Phaser 5400/DT
Xerox Phaser 5400/DX
113R00495
Black
(Standard Capacity – 20K pages)
Tools & Supplies Needed:
Tools required:
#1 Phillips Screwdriver
Small Flat Blade Screwdriver
HP2600PINREMTOOL
Spring Hook
Needle-nose Pliers.
Supplies Required:
Padding Powder
Soft Lint-Free Cloth
Cotton Swabs
Conductive Grease
Anhydrous Isopropyl Alcohol
MAGCLEANER
Vacuum or dry Compressed Air.
Technical Instructions
Printers
OEM Info
Tools
1
E-mail:
Website:
www.futuregraphicsllc.com
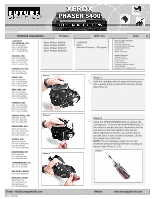
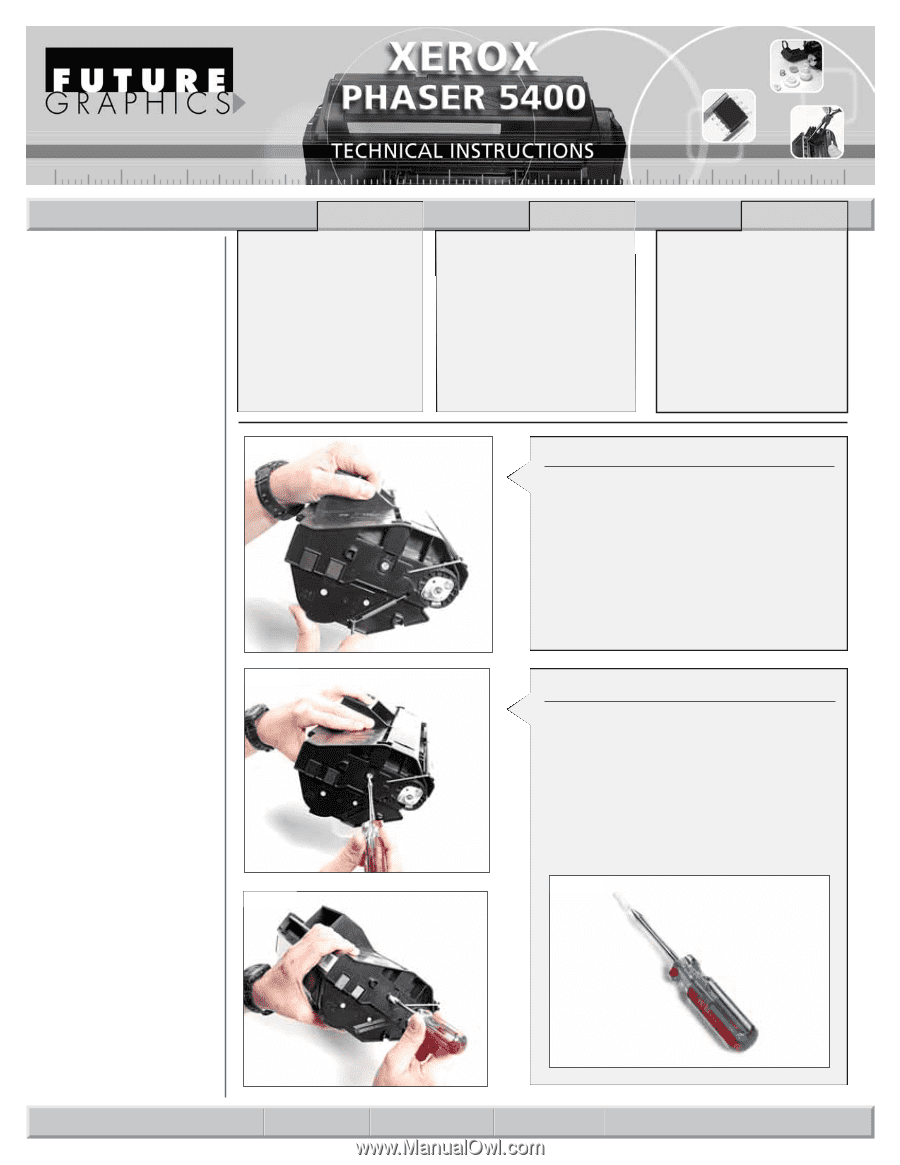
Step 1
Hold the cartridge with the gear side facing you.
Use a spring hook to remove the tension spring.
(See Photo 1)
Photo 1
Step 2
Using the HP2600PINREMTOOL to remove the
cartridge pin.
Push the HP2600PINREMTOOL in
the center of the pin and turn clockwise until the
tool bores a hole and tightens onto the pin.
When tightened on the pin, you will be able to
turn the pin a ¼ turn counter clockwise. Lift the
pin straight out of the hole.
NOTE:
The pin damages easily. Do not use
excessive pressure boring the hole or pulling on
the pin.
(See Photo 2, 3, 4)
Photo 2
Photo 3
PHASER5400TECH
REV. 12/27/06
US 1 800 394.9900
Int’l +1 818 837.8100
FAX 1 800 394.9910
Int’l
+1 818 838.7047
KANSAS CITY, USA
US 1 913 871.1700
FAX
1 913 888.0626
ATLANTA, USA
US 1 877 676.4223
Int’l +1 678 919.1189
FAX 1 877 337.7976
Int’l +1 770 516.7794
MIAMI, USA
US 1 800 595.4297
Int’l +1 305 594.3396
FAX 1 800 522.8640
Int’l +1 305 594.3309
TORONTO, CAN
CAN
1 877 848.0818
Int’l +1 905 712.9501
FAX 1 877 772.6773
Int’l +1 905 712.9502
NEW YORK, USA
US 1 800 431.7884
Int’l +1 631 588.7300
FAX 1 800 431.8812
Int’l +1 631 588.7333
SYDNEY, AUS
AUS 1 800 003.100
Int’l +62 02 9648.2630
FAX 1800 004.302
Int’l +62 02 9548.2635
BUENOS AIRES, ARG
ARG 0810 444.2656
Int’l +011 4583.5900
FAX +011 4584.3100
MONTEVIDEO, URY
URY 02 902.2001
Int’l +5982 902.2001
FAX +5982 900.0858
JOHANNESBURG, S.A.
S.A. +27 11 974.6155
FAX +27 11 974.3593
MELBOURNE, AUS
AUS 1 800 003. 100
Int’l +62 03 9561.8102
FAX 1 800 004.302
Int’l +62 03 9561-7751
CORPORATE
LOS ANGELES, USA
SÃO PAULO, BRAZIL
Int’l +55 11 5524.8000
RAANANA, ISRAEL
ISR 09 760.12.39
Int’l +972 9760.12.39
ISR 052.38.555.82
Int’l +972 5238.555.82
Photo 4