Xerox 5400DX Technical Reference - Page 4
Step 19, Step 18, Step 20, Step 21, Step 16, Step 17
 |
UPC - 042215476539
View all Xerox 5400DX manuals
Add to My Manuals
Save this manual to your list of manuals |
Page 4 highlights
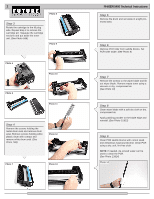
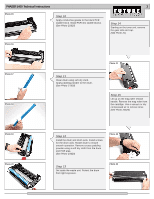
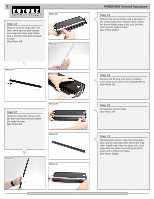
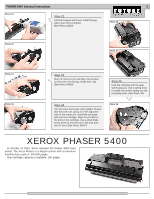
4 Photo 26 Step 16 Remove from the mag roller: the latch, latch spacer, gear spacer, and mag roller drive gear. Clean with a soft dry cloth and set aside for later. (See Photo 24) Photo 27 Photo 24 Photo 28 Step 17 Clean the mag roller using a soft, lint-free cloth and MAGCLEANER. Set aside for later. (See Photo 25) Photo 29 Photo 30 Photo 25 Photo 31 PHASER 5400 Technical Instructions Step 18 Remove the doctor blade. Use a vacuum or dry compressed air to remove toner. Clean the doctor blade using a dry, soft, lint-free cloth and set aside for later. (See Photo 26&27) Step 19 Remove the fill plug and clean remaining toner using a vacuum or dry compressed air. (See Photo 28) Step 20 Reinstall the doctor blade. (See Photo 29) Step 21 Reinstall gear spacer, mag roller drive gear, latch spacer, and mag roller latch onto mag roller. Install mag roller into toner unit. Lock mag roller into place by pushing the latch down until it clicks into place. (See Photo 30&31)
-
 1
1 -
 2
2 -
 3
3 -
 4
4 -
 5
5
 |
 |
