Xerox 5400DX Technical Reference - Page 5
Xerox Phaser 5400
 |
UPC - 042215476539
View all Xerox 5400DX manuals
Add to My Manuals
Save this manual to your list of manuals |
Page 5 highlights
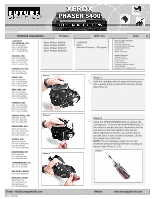
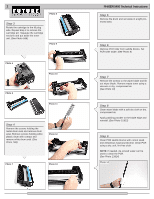
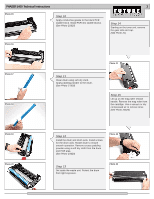
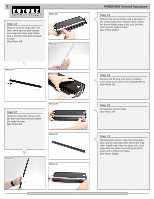
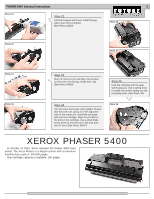
PHASER 5400 Technical Instructions 5 Photo 32 Step 22 Fill toner hopper with toner. Install fill plug when toner fill is complete. (See Photo 32&33) Photo 36 Photo 33 Photo 37 Photo 34 Photo 35 Step 23 Step 23: Remove the cartridge chip located on the toner unit fill plug. Install new chip. (See Photo 34&35) Step 25 Hold the cartridge with the gear side facing you. Use a spring hook to install the tension spring into the mounting holes. (See Photo 38) Step 24 Join the toner and waste unit together. Ensure that the toner unit spring is in the alignment hole of the waste unit. Install the cartridge pins into the cartridge. Align the pin tabs to the slots in the cartridge. Use a small blade screw driver to turn the pin to the lock position (¼ turn). (See Photo 36&37) Photo 38 XEROX PHASER 5400 In October of 2001, Xerox released the Phaser 5400 laser printer. The Xerox Phaser is a 40ppm printer with a maximum monthly duty cycle of 200,000 pages. One cartridge capacity is available, 20K pages.
-
 1
1 -
 2
2 -
 3
3 -
 4
4 -
 5
5
 |
 |
