Xerox 6180MFP Quick Use Guide - Page 9
Scanning to a computer - phaser user guide
 |
UPC - 095205733839
View all Xerox 6180MFP manuals
Add to My Manuals
Save this manual to your list of manuals |
Page 9 highlights
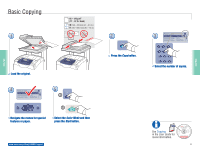
Scanning Scanning to a computer USB PC 1 Mac Select settings in the Express Scan Manager (application). 4 OK x2 Press twice to display the file format options. 5 File Format TIFF JPEG PDF BMP OK Scroll to select the file format. www.xerox.com/office/6180MFPsupport 2 Copy Fax E-mail Scan Color Mode B&W Color Job in Memory Scan Job Status System OK Manual Dial 3 Service Computer (Network)... Server (FTP)... Computer (USB)... OK Press the Scan button. Scroll to select Computer (USB)... 6 6.1 OK 6.2 Start Press OK, and then Start. See Scanning in the User Guide for more information. 063-0000-00a Phaser® 6180MFP Software and Documentation CD-ROM Printer Drivers and Utilities Installation Video W i n d o w s ®, Mac OS® 9 Scanning
-
 1
1 -
2
-
3
-
 4
4 -
 5
5 -
 6
6 -
 7
7 -
 8
8 -
 9
9 -
 10
10 -
 11
11 -
 12
12 -
 13
13 -
 14
14 -
15
 |
 |

9
Scanning
Scanning
USB
1
5
6
4
3
2
Start
Scan
Copy
Fax
E-mail
Scan
Color Mode
B&W
Color
OK
Job in Memory
Job Status
System
Manua
PC
Mac
Service
Computer (Network)...
Server (FTP)...
Computer (USB)...
OK
OK
File Format
TIFF
JPEG
PDF
BMP
x2
OK
OK
6.1
6.2
063-0000-00a
Phaser
®
6180MFP Software and
Documentation CD-ROM
Printer Drivers
and Utilities
Installation Video
Windows
,
Mac OS
www.xerox.com/office/6180MFPsupport
Scanning to a computer
Select settings in the
Express Scan Manager
(application).
Select settings in the
Express Scan Manager
(application).
Scroll to select the file format.
Scroll to select the file format.
Press
OK
, and then
Start
.
Press
OK
, and then
Start
.
Press twice to display the file
format options.
Press twice to display the file
format options.
Scroll to select
Computer (USB)...
Scroll to select
Computer (USB)...
Press the
Scan
button.
Press the
Scan
button.
See
Scanning
in the
User Guide
for more information.