Xerox 850DX Xerox Wide Format 8825/8830/8850/8855/X2 Tech System Introduction - Page 37
Setting Nesting Parameters with the 8825/8830/8850 Printer Control Panel
 |
UPC - 042215454865
View all Xerox 850DX manuals
Add to My Manuals
Save this manual to your list of manuals |
Page 37 highlights
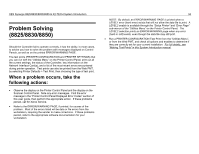
Quick Start for Plot Nesting (continued) Setting Nesting Parameters with the 8825/8830/8850 Printer Control Panel • Press on the Control Panel to take the printer off-line. Press Enter. • Press the Next key until SETUP PRINTER is displayed. Press the Enter key to confirm the choice. • Press the Next key until PLOT NESTING is displayed. Press the Enter key to confirm the choice. • Press the Next key until MODE ENABLE is displayed. Either accept the factory default setting of OFF, or press the Enter key to change the setting. Use the Next key to select ON or OFF. Press the Enter key to confirm the choice and the Exit key to return to the PLOT NESTING menu. • Press the Next key until EXCLUSIVE ENABLE is displayed. Either accept the factory default setting of OFF, or press the Enter key to change the setting. Use the Next key to select ON or OFF. Press the Enter key to confirm the choice and the Exit key to return to the PLOT NESTING menu. • Press the Next key until TIMEOUT is displayed. Either accept the factory default setting of 5, or press the Enter key to change the setting. Input a Plot Nesting Timeout between 5 and 300 seconds using the numeric keypad. Press the Enter key to confirm the choice and the Exit key to return to the PLOT NESTING menu. • Press the Next key until MARGIN is displayed. Either accept the factory default setting of zero (0), or press the Enter key to change the setting. Input the Plot Nesting Margin using a number between 0 and 25 millimeters using the numeric keypad. Press the Enter key to confirm the choice and the Exit key to return to the PLOT NESTING menu. • Press the Next key until MAXIMUM LENGTH is displayed. Either accept the factory default setting of 61 centimeters, or press the Enter key to change the setting. Input a Plot Nesting maximum length between 21 and 2438 centimeters using the numeric keypad. Press the Enter key to confirm the choice and the Exit key to return to the PLOT NESTING menu. • Press on the Control Panel to put the printer back on-line. XES Synergix 8825/8830/8850/8855 & X2-TECH System Introduction 29
-
 1
1 -
2
-
3
-
4
-
5
-
6
-
7
-
8
-
9
-
10
-
11
-
12
-
13
-
14
-
15
-
16
-
17
-
18
-
19
-
20
-
21
-
22
-
23
-
24
-
25
-
26
-
27
-
28
-
29
-
30
-
31
-
 32
32 -
 33
33 -
 34
34 -
 35
35 -
 36
36 -
 37
37 -
 38
38 -
 39
39 -
 40
40 -
 41
41 -
 42
42 -
43
-
44
-
45
-
46
-
47
-
48
-
49
-
50
-
51
-
52
-
53
-
54
-
55
-
56
-
57
-
58
-
59
-
60
-
61
-
62
-
63
-
64
-
65
-
66
-
67
-
68
-
69
-
70
-
71
-
72
-
73
-
74
-
75
-
76
-
77
-
78
-
79
-
80
-
81
-
82
-
83
-
84
-
85
-
86
-
87
-
88
-
89
-
90
-
91
-
92
-
93
-
94
-
95
-
96
-
97
-
98
 |
 |