Xerox M118i Network Connection Quick Setup Guide - Page 6
Set the IP Address, Set the Gateway Address, Set the Subnet Mask, IP Address, Gateway Address - workcentre m118
 |
UPC - 095205219265
View all Xerox M118i manuals
Add to My Manuals
Save this manual to your list of manuals |
Page 6 highlights
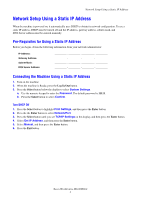
Network Setup Using a Static IP Address Set the IP Address 1. Press the Select button until you see IP Address on the display, and then press the Enter button. 2. If there is an incorrect IP address in the field, press the Clear button to delete the address. 3. Use the numeric key pad to enter the first number of the IP address, and then press the Right Arrow button to move to the next field. 4. Repeat Step 3 to enter the remaining numbers. Note If you are using a server name for the machine (instead of an IP address), you must enter the DNS server information. Use CentreWare IS to set the DNS server address. See Verifying Network Setup Using CentreWare Internet Services (IS) on page 5. 5. Press the Enter button to accept the address. 6. Press the Exit button. Set the Gateway Address 1. Press the Select button until you see Gateway Address on the display, and then press the Enter button. 2. Use the numeric key pad to enter the first number of the gateway address, and then press the Right Arrow button to move to the next field. 3. Repeat Step 2 to enter the remaining numbers. 4. Press the Enter button to accept the address. 5. Press the Exit button. Set the Subnet Mask 1. Press the Select button until you see Subnet Mask on the display, and then press the Enter button. 2. Use the numeric key pad to enter the first number of the subnet mask, and then press the Right Arrow button to move to the next field. 3. Repeat Step 2 to enter the remaining numbers. 4. Press the Enter button to accept the subnet mask. 5. Press the Exit button. 6. Press the Log In/Out button to return to the main menu. Xerox WorkCentre M118/M118i 4
-
 1
1 -
 2
2 -
 3
3 -
 4
4 -
 5
5 -
 6
6 -
 7
7 -
 8
8 -
 9
9 -
 10
10 -
 11
11 -
 12
12 -
13
-
14
-
15
-
16
-
17
-
18
-
19
-
20
-
21
-
22
-
23
-
24
-
25
-
26
-
27
-
28
-
29
-
30
-
31
-
32
-
33
-
34
-
35
-
36
-
37
-
38
-
39
-
40
-
41
-
42
-
43
-
44
-
45
-
46
-
47
-
48
-
49
-
50
-
51
-
52
-
53
-
54
-
55
-
56
-
57
-
58
-
59
-
60
-
61
-
62
 |
 |
