Xerox M118i Network Connection Quick Setup Guide - Page 7
Verifying Network Setup Using, CentreWare Internet Services IS, Address, Properties, Protocol Settings - user guide
 |
UPC - 095205219265
View all Xerox M118i manuals
Add to My Manuals
Save this manual to your list of manuals |
Page 7 highlights
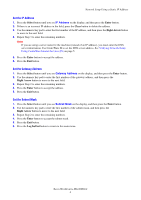
Verifying Network Setup Using CentreWare Internet Services (IS) Verifying Network Setup Using CentreWare Internet Services (IS) CentreWare IS provides a simple interface that enables you to manage, configure, and monitor networked printers from your desktop using an embedded web server. CentreWare IS gives administrators easy access to printer status, configuration, and diagnostic functions. It also provides users with access to printer status and special printing functions such as printing saved jobs. With CentreWare IS software, you can access and manage your printers over a TCP/IP network using a web browser. Note To enter network configuration settings via CentreWare IS, your computer must be on the same subnet as the Xerox WorkCentre M118/M118i. For additional information about using CentreWare IS, see the User Guide and the System Administrator Guide on the Customer Documentation CD-ROM or the Xerox website. To verify your network setup using CentreWare IS: 1. At your computer, launch your web browser. 2. Enter the machine's IP address in the browser's Address field (http://xxx.xxx.xxx.xxx). 3. Click the Properties tab. 4. Select the Protocol Settings folder on the left sidebar, and then select TCP/IP. 5. If you are using a server name for the machine (instead of an IP address), enter the DNS server address in the DNS Address 1 field, and then click the Apply New Settings button at the bottom of the page. 6. Enter the default user ID and password in the Connect to [ip address] dialog box, and then click the OK button. ■ Default user ID: admin ■ Default password: x-admin. The user ID and password should be changed after network setup is complete. Xerox WorkCentre M118/M118i 5
-
 1
1 -
 2
2 -
 3
3 -
 4
4 -
 5
5 -
 6
6 -
 7
7 -
 8
8 -
 9
9 -
 10
10 -
 11
11 -
 12
12 -
13
-
14
-
15
-
16
-
17
-
18
-
19
-
20
-
21
-
22
-
23
-
24
-
25
-
26
-
27
-
28
-
29
-
30
-
31
-
32
-
33
-
34
-
35
-
36
-
37
-
38
-
39
-
40
-
41
-
42
-
43
-
44
-
45
-
46
-
47
-
48
-
49
-
50
-
51
-
52
-
53
-
54
-
55
-
56
-
57
-
58
-
59
-
60
-
61
-
62
 |
 |
