Yamaha 107 Reference Booklet - Page 42
Attach the rear panel B., Install the main unit A., WATCH YOUR FINGERS WHEN DO, ING
 |
View all Yamaha 107 manuals
Add to My Manuals
Save this manual to your list of manuals |
Page 42 highlights
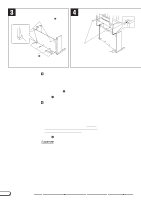
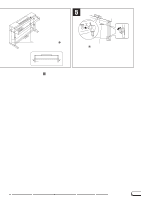
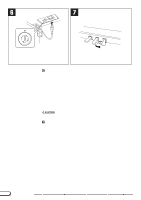
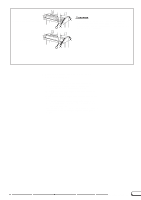
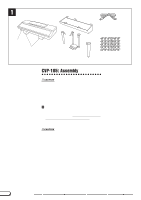
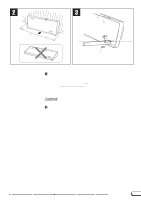
3 • 4 x 12 mm round-head screws 2 B • 4 x 20 mm tapping screws 3 4 15 cm A D 15 cm D • Be sure to place your hands at least 15 centimeters from either end of the main unit when positioning it. CAttach the rear panel (B). With the rear panel slightly angled as shown in the illustration, lower it onto the feet's protruding edge at the rear of the pedal box. Then, while eliminating any gaps between the rear and side panels, secure the top of the rear panel to the side panel brackets using two 4 x 12 mm round-head screws 2. Finally, secure the bottom of the rear panel to the pedal box using four 4 x 20 mm tapping screws 3. VInstall the main unit (A). Place the main unit (A) on the side panels (D) with the screws on its bottom panel (toward the rear of the main unit) just behind the grooves in the brackets located at the top of the side panels. Then slide the main unit forward until it stops. WATCH YOUR FINGERS WHEN DOING THIS!! Align the holes on the bottom panel of the main unit with the holes in the brackets on the side panels (also center the main unit to produce equal clearance on the left and right sides, as shown in the illustration), then screw in and securely tighten the four 6 x 16 millimeter flat-head screws 4. CAUTION • Do not hold the keyboard in any position other than the position shown in the above illustration. • Fingers can become pinched between the main unit and the rear or side panels, be extra careful so as not to drop the main unit. 42 CVP-109/107/105/103/700
-
 1
1 -
2
-
3
-
4
-
5
-
6
-
7
-
8
-
9
-
10
-
11
-
12
-
13
-
14
-
15
-
16
-
17
-
18
-
19
-
20
-
21
-
22
-
23
-
24
-
25
-
26
-
27
-
28
-
29
-
30
-
31
-
32
-
33
-
34
-
35
-
36
-
 37
37 -
 38
38 -
 39
39 -
 40
40 -
 41
41 -
 42
42 -
 43
43 -
 44
44 -
 45
45 -
 46
46 -
 47
47 -
48
-
49
-
50
-
51
-
52
-
53
-
54
-
55
-
56
-
57
-
58
-
59
-
60
-
61
-
62
-
63
-
64
-
65
-
66
-
67
-
68
 |
 |
