Yamaha CDR-D651 Owner's Manual - Page 12
Menu Setting, When editing CD TEXT - operating manual
 |
View all Yamaha CDR-D651 manuals
Add to My Manuals
Save this manual to your list of manuals |
Page 12 highlights
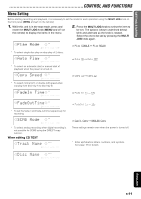
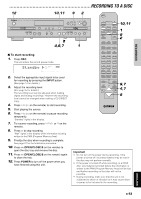
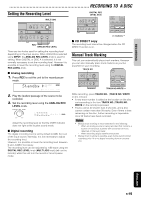
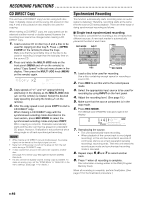
GETTING STARTED RECORDING PLAYBACK CONTROL AND FUNCTIONS Menu Setting Before starting recording and playback, it is necessary to set the mode for each operation using the MULTI JOG knob on the front panel (MENU and +/- on the remote). 1. While this unit is in the stop mode, press and rotate the MULTI JOG knob (MENU and +/- on the remote) to display the items in the menu. 2. Press the MULTI JOG knob to select the item to be set. The options (shown underlined below) blink and alternate as the knob is rotated. Select the one to be set by pressing the MULTI JOG knob again. Play Mode CD L dB -60 -30 -I0 R -6 -4 -2 -I 0 OVER * To select single disc play or relay play of 2 discs. ⇒ Play SINGLE ↔ Play RELAY Auto Play CD L dB -60 -30 -I0 R -6 -4 -2 -I 0 OVER * To select an automatic start or manual start of playback when the power is turned on. ⇒ Auto ON ↔ Auto OFF Copy S p e e d CD L dB -60 -30 -I0 R -6 -4 -2 -I 0 OVER * To select normal (x1) or double (x2) speed when copying from disc tray A to disc tray B. ⇒ Copy x1 ↔ Copy x2 FadeIn T i m e CD L dB -60 -30 -I0 R -6 -4 -2 -I 0 OVER ⇒ Fade In 1s - 10s FadeOutTime CD L dB -60 -30 -I0 R -6 -4 -2 -I 0 OVER * To set the fade-in and fade-out time respectively for recording. SCMS Mode CD L dB -60 -30 -I0 R -6 -4 -2 -I 0 OVER * To select analog recording when digital recording is not possible for SCMS using the DIRECT copy function. When editing CD TEXT Track Name CD-R L dB -60 -30 -I0 R -6 -4 -2 -I 0 OVER ⇒ FadeOut 1s - 10s ⇒ Can't Copy ↔ ANALOG Copy These settings remain even when the power is turned off. * Enter alphabetical letters, numbers, and symbols. See page 19 for details. Disc Name CD-R L dB -60 -30 -I0 R -6 -4 -2 -I 0 OVER ADDITIONAL INFORMATION ENGLISH E-11
-
 1
1 -
2
-
3
-
4
-
5
-
6
-
 7
7 -
 8
8 -
 9
9 -
 10
10 -
 11
11 -
 12
12 -
 13
13 -
 14
14 -
 15
15 -
 16
16 -
 17
17 -
18
-
19
-
20
-
21
-
22
-
23
-
24
-
25
-
26
-
27
-
28
-
29
-
30
-
31
-
32
-
33
 |
 |
