Yamaha CVP-79A Owner's Manual - Page 84
Chord Sequence amp; 3 Functions
 |
View all Yamaha CVP-79A manuals
Add to My Manuals
Save this manual to your list of manuals |
Page 84 highlights
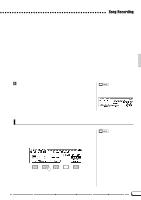
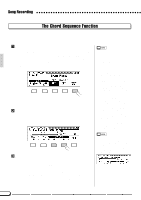
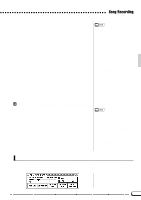
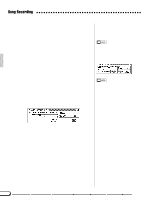
Song Recording appropriate selections in the normal way. Once the chord and/or style change has been entered, press the SET LCD button to actually input the chord and/or style change at the current cursor location. The location in the graphic measure symbol will become bold and the set data will be shown on the display: the time signature, the style name and section to the left, and the chord, tempo, and rhythm on/off status (see below) in the box to the right. Continue entering chords and style changes in this manner until your sequence is complete. The data recorded by the Chord Sequence function is listed below. Data Recorded By the Chord Sequence Function • Style • Accompaniment Section (MAIN A & B/Intro/Ending/Fill-in/Break) • Chord • ABC part volume (MIXER settings) • Tempo • Rhythm on/off • ABC/SONG volume (as an initial setting only) VStop Recording When all the required chords and style changes have been entered, enter an END MARK (press END MARK in display page 2), then press the END button in display page 3. The "Are You Sure?" confirmation prompt will appear. Press YES to save the recorded data and finish recording or NO to abort. Once the data has been saved, the Chord Sequence function will automatically be exited. It is also possible to leave the Chord Sequence function during recording by pressing the [EXIT] button, or the [RECORD] button so that its indicator goes out. In this case, if any data is left unsaved, the "Save recorded data?" confirmation prompt will appear. Press YES to save the recorded data and then exit from the Chord Sequence function, NO to exit without saving the data, or CANCEL to return to the Chord Sequence function. • The types of chords that can be entered are the same as those listed for the ABC fingered mode (see page 36). In addition "- - -" (i.e. no chord) can be entered via the TYPE LCD button. On-bass chords can be entered via the keyboard. • The number of each measure is shown to the left of the graphic measure symbols on the display. • See "Chord Sequence Page-2 Functions", below, for other useful editing features. • If no chords are entered (i.e. chord type is set to "- - -"), the result will be a rhythm-only sequence. • A "Break" can be produced by both setting the chord type to "- - -" and rhythm sound to "OFF" (see "Rhythm OFF/ON", below). • The same chord, as set previously (i.e. the same chord shown in the box), cannot be entered even if the SET LCD button is pressed. • Only data other than chord data can be entered by first moving the cursor and making the required changes without entering any chord (the ROOT and TYPE LCD sections should be blank), and pressing the SET LCD button. • If a different style with another time signature is selected after chords have been entered, the timing of the chords will be changed accordingly. • The chord sequence data now resides in tracks 9 through 16, and can be played back in the normal way. Add other tracks as required by using the standard track selection and recording procedure. You can also record over individual tracks of the sequence and replace them with original material if you like by using the standard track selection and record procedure. • The song recorded via the Chord Sequence function can be modified later by re-entering the Chord Sequence mode and making the required changes. But please note that the track data recorded over by using the standard recording procedure will be returned back to the preset style data. Chord Sequence Page 2 & 3 Functions The CHORD SEQUENCE page-2 and page-3 displays contain a number of functions that can make the chord-entering process more efficient and versatile. 81
-
 1
1 -
2
-
3
-
4
-
5
-
6
-
7
-
8
-
9
-
10
-
11
-
12
-
13
-
14
-
15
-
16
-
17
-
18
-
19
-
20
-
21
-
22
-
23
-
24
-
25
-
26
-
27
-
28
-
29
-
30
-
31
-
32
-
33
-
34
-
35
-
36
-
37
-
38
-
39
-
40
-
41
-
42
-
43
-
44
-
45
-
46
-
47
-
48
-
49
-
50
-
51
-
52
-
53
-
54
-
55
-
56
-
57
-
58
-
59
-
60
-
61
-
62
-
63
-
64
-
65
-
66
-
67
-
68
-
69
-
70
-
71
-
72
-
73
-
74
-
75
-
76
-
77
-
78
-
 79
79 -
 80
80 -
 81
81 -
 82
82 -
 83
83 -
 84
84 -
 85
85 -
 86
86 -
 87
87 -
 88
88 -
 89
89 -
90
-
91
-
92
-
93
-
94
-
95
-
96
-
97
-
98
-
99
-
100
-
101
-
102
-
103
-
104
-
105
-
106
-
107
-
108
-
109
-
110
-
111
-
112
-
113
-
114
-
115
-
116
-
117
-
118
-
119
-
120
-
121
-
122
-
123
-
124
-
125
-
126
-
127
-
128
-
129
-
130
-
131
-
132
-
133
-
134
-
135
-
136
-
137
-
138
-
139
-
140
-
141
-
142
-
143
-
144
-
145
-
146
-
147
-
148
-
149
-
150
-
151
-
152
-
153
-
154
-
155
-
156
-
157
-
158
-
159
-
160
-
161
-
162
-
163
 |
 |
