Yamaha DGX-670 DGX-670 Reference Manual - Page 29
Rec Channel, Rhythm Clear, Channel Delete/Drum Setup, Channel Delete
 |
View all Yamaha DGX-670 manuals
Add to My Manuals
Save this manual to your list of manuals |
Page 29 highlights
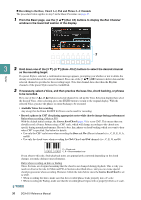
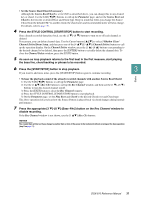
Styles 4 Press the STYLE CONTROL [START/STOP] button to start recording. As the already recorded data plays back, use the [1 ]-[8 ] buttons to turn each channel on or off as desired. If necessary, you can delete channel data. Use the Cursor buttons [][] to select 3 Rhythm Clear/ Channel Delete/Drum Setup, and then press one of the [4 ]/[5 ] (Channel Delete) buttons to call up the operation display. On the Channel Delete window, press the [1 ]-[8 ] buttons corresponding to the desired channel to delete, and then press the [ENTER] button to actually delete the channel data. To close the Channel Delete window, press the [EXIT] button. 5 As soon as loop playback returns to the first beat in the first measure, start playing the rhythm pattern to be recorded. If the rhythm is difficult to play in real time, break it up into individual parts and play each separately as the playback loops, as shown in the example below. Loop 1st round Bass Drum 3 Loop 2nd round Snare Drum Bass Drum Loop 3rd round Hi-Hat Snare Drum Bass Drum Deleting mistakenly recorded notes (Rhythm Clear) If you make a mistake or play any wrong notes, you can delete those specific notes. Use the Cursor buttons [][] to select 3 Rhythm Clear/Channel Delete/Drum Setup. While holding down one of the [2 ]/ [3 ] (Rhythm Clear) buttons, press the corresponding key on the keyboard. 6 Press the [START/STOP] button to stop playback. If you want to add more notes, press the [START/STOP] button again to continue recording. 7 Press the appropriate [1 ] (Rhy1) or [2 ] (Rhy2) button on the Rec Channel window to disable recording. If the Rec Channel window is not shown, use the [1 ](Rec Ch) buttons. NOTICE The created Style will be lost if you change to another Style or turn off the power to the instrument without carrying out the Save operation (step 8 on page 27). DGX-670 Reference Manual 29
-
 1
1 -
2
-
3
-
4
-
5
-
6
-
7
-
8
-
9
-
10
-
11
-
12
-
13
-
14
-
15
-
16
-
17
-
18
-
19
-
20
-
21
-
22
-
23
-
 24
24 -
 25
25 -
 26
26 -
 27
27 -
 28
28 -
 29
29 -
 30
30 -
 31
31 -
 32
32 -
 33
33 -
 34
34 -
35
-
36
-
37
-
38
-
39
-
40
-
41
-
42
-
43
-
44
-
45
-
46
-
47
-
48
-
49
-
50
-
51
-
52
-
53
-
54
-
55
-
56
-
57
-
58
-
59
-
60
-
61
-
62
-
63
-
64
-
65
-
66
-
67
-
68
-
69
-
70
-
71
-
72
-
73
-
74
-
75
-
76
-
77
-
78
-
79
-
80
-
81
-
82
-
83
-
84
-
85
-
86
-
87
-
88
-
89
-
90
-
91
-
92
-
93
 |
 |
