Yamaha DGX-670 DGX-670 Reference Manual - Page 64
Sequence End, Use the [1
 |
View all Yamaha DGX-670 manuals
Add to My Manuals
Save this manual to your list of manuals |
Page 64 highlights
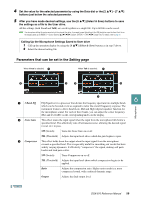
5 Program the Sequence order, from left to right. Press one of the REGISTRATION MEMORY [1]-[4] buttons on the panel, and then use the [4 ] (Insert) buttons to input the number. The Cursor position can be moved by using the Cursor buttons [][][E][F]. Indicates the Registration Memory numbers, in the order of the current Registration Sequence. [3 ] Replace [4 ] Insert [5 ] Delete 7 5 6 Replaces the number at the cursor position with the currently selected Registration Memory number. Inserts the number of the currently selected Registration Memory number to the cursor position. Deletes the number at the cursor position. 6 Press one of the [6 ]/[7 ] (Sequence End) buttons repeatedly to determine how Registration Sequence behaves when reaching the end of the sequence. • Stop Pressing the TAB [F] button or the "advance" pedal has no effect. The sequence is 7 "stopped." • Top The sequence starts again at the beginning. • Next Bank...... The sequence automatically moves to the beginning of the next Registration Memory Bank in the same folder. 7 Use the [1 ] (Seq.) buttons to turn the Registration Sequence function on. Registration Memory/Playlist 8 Press the [EXIT] button to save the Registration Sequence settings as part of the current Registration Bank file. When a message appears asking you to change the settings, use the [7 ] (Yes) buttons to actually save the sequence data. NOTICE Settings in the Registration Sequence display will be lost if you select another Registration Bank without carrying out the Save operation. 64 DGX-670 Reference Manual
-
 1
1 -
2
-
3
-
4
-
5
-
6
-
7
-
8
-
9
-
10
-
11
-
12
-
13
-
14
-
15
-
16
-
17
-
18
-
19
-
20
-
21
-
22
-
23
-
24
-
25
-
26
-
27
-
28
-
29
-
30
-
31
-
32
-
33
-
34
-
35
-
36
-
37
-
38
-
39
-
40
-
41
-
42
-
43
-
44
-
45
-
46
-
47
-
48
-
49
-
50
-
51
-
52
-
53
-
54
-
55
-
56
-
57
-
58
-
 59
59 -
 60
60 -
 61
61 -
 62
62 -
 63
63 -
 64
64 -
 65
65 -
 66
66 -
 67
67 -
 68
68 -
 69
69 -
70
-
71
-
72
-
73
-
74
-
75
-
76
-
77
-
78
-
79
-
80
-
81
-
82
-
83
-
84
-
85
-
86
-
87
-
88
-
89
-
90
-
91
-
92
-
93
 |
 |
