Yamaha DPX-530 Owner's Manual
Yamaha DPX-530 Manual
 |
View all Yamaha DPX-530 manuals
Add to My Manuals
Save this manual to your list of manuals |
Yamaha DPX-530 manual content summary:
- Yamaha DPX-530 | Owner's Manual - Page 1
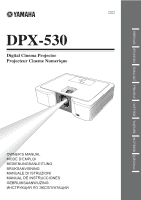
EB DPX-530 Digital Cinema Projector Projecteur Cineme Numerique OWNER'S MANUAL MODE D'EMPLOI BEDIENUNGSANLEITUNG BRUKSANVISNING MANUALE DI ISTRUZIONI MANUAL DE INSTRUCCIONES GEBRUIKSAANWIJZING - Yamaha DPX-530 | Owner's Manual - Page 2
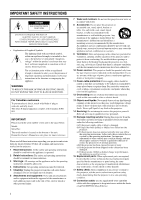
the bottom of the unit. Retain this Owner's Manual in a safe place for future reference. Please read all these instructions regarding your projector and retain them for future reference. Follow all warnings and instructions marked on the projector. 1 Read instructions: All the safety and operating - Yamaha DPX-530 | Owner's Manual - Page 3
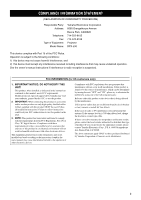
Yamaha Electronics Corporation 6660 Orangethorpe Avenue Buena Park, CA90620 714-522-9105 714-670-0108 Projector DPX-530 according to the instructions found in the users manual, may cause "OFF" and "ON", please try to eliminate the problem by using one of the following measures: Relocate either - Yamaha DPX-530 | Owner's Manual - Page 4
manual, do not attempt to service this product yourself. Contact your dealer when you want to fix, adjust or inspect the projector. • Do not modify this projector projector during operation It can lead to lamp breakage, fire, electric shock or other trouble refer to the instructions described below. - Yamaha DPX-530 | Owner's Manual - Page 5
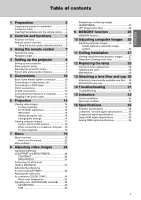
the lamp 29 Maintenance 29 13 Attaching a lens filter and cap 30 Attaching a commercially available lens filter.... 30 Attaching the lens cap 30 14 Troubleshooting 31 Troubleshooting 31 15 Indicators 34 Normal conditions 34 Abnormal condition 34 16 Specifications 35 Projector - Yamaha DPX-530 | Owner's Manual - Page 6
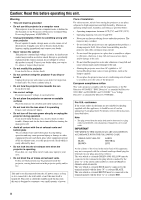
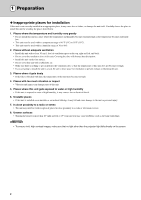
if placed in close proximity to a radio or television receiver. 8. Uneven surfaces • Slanting the projector more than 10° right and left or 15° front and rear may cause problems (such as the lamp exploding). Warning • To ensure vivid, high contrast images, make sure that no light other than - Yamaha DPX-530 | Owner's Manual - Page 7
Accessory check The following accessories are provided with this projector. Check to be sure that all of the 232C cable (WF76930) • Used for adjustment by service person. ■ Ferrite core set Power cable ■ Others • Instruction guide • Ferrite core • Owner's manual • Lens cap • Band (two) Remote - Yamaha DPX-530 | Owner's Manual - Page 8
• Batteries may explode if misused. Do not recharge, disassemble, or dispose of in fire. • Be sure to handle the battery according to the instructions. • Load the battery with its positive (+) and negative (-) sides correctly oriented as indicated on the remote control. • Keep batteries out of reach - Yamaha DPX-530 | Owner's Manual - Page 9
2 Controls and functions ◆ Projector overview 12 3 4 5 1. FOCUS ring 2. ZOOM ring 3. Control panel 4. Air intake vent 5. Remote buttons (Left/Right) 7. Air exhaust vent 8. SERIAL terminal (8-pin) • Used for adjustment by service person. 6 9. S-VIDEO input terminal 10. VIDEO input terminal 5 - Yamaha DPX-530 | Owner's Manual - Page 10
cover 3. Adjustment feet (Rear) 4. Air intake vent 4 Caution • Do not replace the lamp immediately after using the projector because the lamp will be extremely hot and may cause burns. 3 ◆ Remote control overview 1 2 16 3 15 4 14 5 13 12 6 11 7 10 8 9 1. IR signal transmitter - Yamaha DPX-530 | Owner's Manual - Page 11
a commercially available protection sticker on one of the sensors that is closer to the fluorescent lamp. When operating the remote control, keep the distance from the remote control to the projector via the screen within about 5 m. The operable range of the remote control, however, depends on - Yamaha DPX-530 | Owner's Manual - Page 12
to the size of the images to be projected (see page 9). W A B A=B STANDBY/ON POWER STATUS AUTO SYNC ENTER MENU DIGITAL CINEMA PROJECTOR DPX-530 • Do not place this projector on a carpet or blanket because the exhaust vent and the intake vent on the bottom surface will be blocked and the inside - Yamaha DPX-530 | Owner's Manual - Page 13
◆ Screen size and projection distance Refer to the following diagram to determine the screen size. Screen size A (Height of the projected image) Hd B (Width of the projected image) Center of the lens Projected distance (L) When the aspect ratio of the screen is 4:3, the positional relation - Yamaha DPX-530 | Owner's Manual - Page 14
5 Connections Preparations: • Make sure that the power of the projector and that of the video equipment are turned off. ◆ Basic home theater system connection Y (Green) PB/CB (Blue) PR/CR (Red) Video player DVD player Set-top box or digital tuner 10 - Yamaha DPX-530 | Owner's Manual - Page 15
1. Connect one end of the supplied S-video cable to the S-VIDEO terminal of this projector. 2. Connect the other end of the S-video cable to the S-VIDEO terminal of the video equipment. • Read the instruction manual of the equipment to be connected. • Contact your dealer for details of connection - Yamaha DPX-530 | Owner's Manual - Page 16
source. • Only RGB signals are supported. Component video signals are not supported. When you connect this projector and a DVI-Digital device (such as Refer to the users guide of your DVD player for details. • When your DVD player does not have such function, set BRIGHTNESS of this projector to -16. - Yamaha DPX-530 | Owner's Manual - Page 17
the type of the computer to be connected. • This projector does not support 3-line signals (SYNC-ONGREEN signals). To DVI terminal 1 To a long cable may decrease the quality of projected images. • Read the instruction manual of the equipment to be connected. • Images may not be projected correctly - Yamaha DPX-530 | Owner's Manual - Page 18
button ON ( I ) button COMP. button VIDEO button S-VIDEO button VIDEO/S/COMP. button 1. Confirm the POWER indicator lights up red. • If the projector was turned off before the lamp was cooled down sufficiently last time, the fan may start rotating and the STANDBY/ON button may not work after the - Yamaha DPX-530 | Owner's Manual - Page 19
press the MENU button. ) button on the remote control. 2. Press the STANDBY/ON button on the projector or the STANDBY ( ) button on the remote control again. • The lamp goes out and the projector goes into a cooling period. In this condition, the POWER indicator turns red and the STATUS indicator - Yamaha DPX-530 | Owner's Manual - Page 20
Setting the aspect ratio You can change the aspect ratio of the input video signal (or the ratio of width to height of the image). Change the setting according to the type of the input video signal. Original image size NORMAL Projects images with an aspect ratio of 4:3 when the input signal is 4:3 - Yamaha DPX-530 | Owner's Manual - Page 21
D-SUB/DVI button STANDBY/ON button ON ( I ) button DVI button D-SUB button 1. Confirm the POWER indicator lights up red. • If the projector was turned off before the lamp was cooled down sufficiently last time, the fan may start rotating and the STANDBY/ON button may not work after the power - Yamaha DPX-530 | Owner's Manual - Page 22
the computer. See the user manual of your computer. To stop projecting: 1. Press the STANDBY/ON button on the projector or the STANDBY ( • this one minute period, the intake fan and exhaust fan rotate to cool the lamp. • Do not unplug the power cable while the STATUS indicator is blinking. - Yamaha DPX-530 | Owner's Manual - Page 23
when no signal is received by the projector. IMAGE SET UP CONTRAST BRIGHTNESS WHITE ENHANCE *1 sRGB COLOR TEMP. *1 SATURATION HUE SHARPNESS GAMMA *1 *3 *1 *3 *3 *1 KEYSTONE AUTO POWER ON AUTO POWER OFF SPLASH SCREEN HIDE SCREEN COLOR LAMP MODE LOCATION 0 - 60 ± 30 DEFAULT, 0 - 10 ON - Yamaha DPX-530 | Owner's Manual - Page 24
How to set the menus Following describe how to set AUTO POWER OFF time as an example. 1. Press the MENU button. • If no signal is input, the menu does not appear. TV60 IMAGE 2. Press the or button to select a menu to use. TV60 SETUP 3. Press the ENTER button (or button). TV60 SETUP KEYSTONE - Yamaha DPX-530 | Owner's Manual - Page 25
SATURATION HUE SHARPNESS GAMMA TV60 0 0 DEFAULT OFF MID 0 0 0 DEFAULT SETUP KEYSTONE AUTO POWER ON AUTO POWER OFF SPLASH SCREEN HIDE SCREEN COLOR LAMP MODE LOCATION TV60 0 OFF OFF ON BLUE BRIGHT FRONT/TABLE INITIAL MENU POSITION PROGRESSIVE MODE COLOR SYSTEM ASPECT LANGUAGE RESET ALL TV60 UPPER - Yamaha DPX-530 | Owner's Manual - Page 26
projector is in the stand-by mode when the lamp is off. Use the remote control to turn on the lamp. Use to set the time elapsed before the projector the image isn't displayed correctly, select the desired video format manually. The appropriate aspect ratio is automatically selected depending on the - Yamaha DPX-530 | Owner's Manual - Page 27
Use to eliminate vertical wide stripes, if it appears, while viewing the projected image. D-SUB INPUT RGB Select this option when connecting the projector to high definition video equipment having R, G, and B output terminals. SET UP LEVEL COMPONENT OFF Select this option when connecting the - Yamaha DPX-530 | Owner's Manual - Page 28
show the differences in white. When its temperature is low, white appears reddish. When the color temperature rises, white appears bluish. This projector adjusts this color temperature by changing the values of the blue and red contrasts. To raise the color temperature: Increase the CONTRAST B (blue - Yamaha DPX-530 | Owner's Manual - Page 29
◆ Adjusting color (SATURATION and HUE) You can adjust the color of the projected image using the menu (see page 21). 1. Display the IMAGE menu. 2. Select SATURATION or HUE by pressing the or button. • SATURATION is unavailable when the D-SUB source is an RGB signal or DVI is selected as the input - Yamaha DPX-530 | Owner's Manual - Page 30
. However, some video signals may not be projected, depending on the type of the computer. In such a case, press the AUTO POSITION button on the projector or the AUTO button on the remote control (see page 18). When the signal is still not projected properly, adjust the projected image using the - Yamaha DPX-530 | Owner's Manual - Page 31
bracket, which is commercially available, is required. Be sure to ask a certified installation specialist for installation of the projector. Contact your dealer for details. • Yamaha assumes no responsibilities for any damage caused by use of other manufacturer s ceiling bracket and by inadequate - Yamaha DPX-530 | Owner's Manual - Page 32
on the screen for one minute every 20 hours*1 thereafter. When the lamp operation time exceeds 4000 hours*1 *2, the projector automatically shuts off and can not be used until the lamp is replaced and the lamp operation time is reset. *1: When LAMP MODE in the SETUP menu is set to CINEMA. When it is - Yamaha DPX-530 | Owner's Manual - Page 33
securely. • Be sure to reset the lamp operation time whenever you replace the lamp. • Do not reset the lamp operation time unless you replace the lamp. • This projector uses a lamp that contains mercury. Disposal of the lamp or the projector with the lamp may be regulated due to environmental - Yamaha DPX-530 | Owner's Manual - Page 34
placed. (It should make a clicking sound.) Important • Do not force the lens cap onto the projector. • Make sure that the YAMAHA name on the lens cap is aligned parallel to the top and bottom edges of the projector. • The lens cap can be placed over the lens filter if a lens filter has been - Yamaha DPX-530 | Owner's Manual - Page 35
14 Troubleshooting ◆ Troubleshooting Refer to the chart below when this projector does not function properly. If the problem you are experiencing is not listed below or if the instructions do not help, stop using the projector and contact your dealer. No image appears on the screen. Problem - Yamaha DPX-530 | Owner's Manual - Page 36
are not displayed correctly. Problem Solution Projected images are in the IMAGE menu (see page 24). • Replace the lamp (see page 28). Projected images are blurred. • Adjust the on projected images. • This symptom is normal for a DLP projector and is not a malfunction. (A very small number of - Yamaha DPX-530 | Owner's Manual - Page 37
. This is not a malfunction. If the following problem occurs after the lamp is replaced, check the following first. Problem The projector does not turn on. The STATUS indicator blinks. Solution • Fit the lamp cover securely (see page 29). • Reset the lamp operating time (see page 29). • Reset the - Yamaha DPX-530 | Owner's Manual - Page 38
the operation condition of the projector. Refer to Troubleshooting for additional indication signals. Lamp operation time warning. (Total lamp operation time reached 4000 hours*1, *2 while the power was off.) The lamp cover isn't closed. Replace the lamp. Change with a new lamp if this problem - Yamaha DPX-530 | Owner's Manual - Page 39
DLP™ projector Model DPX-530 Display Technology 0.65-inch Single chip DMD (Aspect ratio 16:9) Pixel 1024 × 576 = 589824 pixels Projection lens F 2.4 - 2.6 f= 23 - 27.6 mm Light-source lamp 2 Control terminal/Others RS-232C (8P): For service person Operating temperatures +41°F (+5°C) to +95 - Yamaha DPX-530 | Owner's Manual - Page 40
◆ Composite / S-video signal specifications Signal mode Resolution (H × V) Horizontal frequency (kHz) TV60 - 15.73 TV50 - 15.63 ◆ Component signal specifications Vertical frequency (Hz) 59.94 50.00 Signal mode Resolution (H × V) Horizontal frequency (kHz) 480i (525i) - 15.73 576i ( - Yamaha DPX-530 | Owner's Manual - Page 41
mode is indicated as TV60 or TV50. When they are input to the COMPONENT terminal, the signal mode is indicated as 480i or 576i. • This projector cannot be connected to other equipment via an RGB-CS (4 line) connection. Connectors SERIAL (8-pin) D-SUB (Mini D-SUB 15-pin) DVI (DVI-D 24-pin with - Yamaha DPX-530 | Owner's Manual - Page 42
ELECTRONIQUE FRANCE S.A. RUE AMBROISE CROIZAT BP70 CROISSY-BEAUBOURG 77312 MARNE-LA-VALLEE CEDEX02, FRANCE YAMAHA ELECTRONICS (UK) LTD. YAMAHA HOUSE, 200 RICKMANSWORTH ROAD WATFORD, HERTS WD18 7GQ, ENGLAND YAMAHA SCANDINAVIA A.B. J A WETTERGRENS GATA 1, BOX 30053, 400 43 VÄSTRA FRÖLUNDA, SWEDEN
-
 1
1 -
 2
2 -
 3
3 -
 4
4 -
 5
5 -
 6
6 -
 7
7 -
8
-
9
-
10
-
11
-
12
-
13
-
14
-
15
-
16
-
17
-
18
-
19
-
20
-
21
-
22
-
23
-
24
-
25
-
26
-
27
-
28
-
29
-
30
-
31
-
32
-
33
-
34
-
35
-
36
-
37
-
38
-
39
-
40
-
41
-
42
 |
 |
DPX-530
OWNER
’
S MANUAL
DPX-530
Digital Cinema Projector
Projecteur Cineme Numerique
MODE D’EMPLOI
BEDIENUNGSANLEITUNG
MANUALE DI ISTRUZIONI
MANUAL DE INSTRUCCIONES
BRUKSANVISNING
GEBRUIKSAANWIJZING