Yamaha DTX700 Reference Manual
Yamaha DTX700 Manual
 |
View all Yamaha DTX700 manuals
Add to My Manuals
Save this manual to your list of manuals |
Yamaha DTX700 manual content summary:
- Yamaha DTX700 | Reference Manual - Page 1
DRUM TRIGGER MODULE DTX700 Reference Manual How to Use This Manual The DTX700 Reference Manual created via the PDF format is equipped with special features that are exclusive to electronic these and other functions in the software, refer to the owner's manual of the software. > keys to move to EN - Yamaha DTX700 | Reference Manual - Page 2
cup's trigger input source will be played. One-zone pads (producing a single trigger signal) A mono pad such as the TP65 Single Zone Drum Pad or PCY65 Single Zone Cymbal Pad transmits only one type of trigger signal to the DTX700, irrespective of where it is struck. DTX700 Reference Manual 2 - Yamaha DTX700 | Reference Manual - Page 3
and DTX700 trigger input jacks, please refer to the following web page. http://dtxdrums.yamaha.com/ Drum Kits & Voices Upon the receipt of a trigger signal, the DTX700's internal tone generator plays the voice assigned to the corresponding trigger input source. The term "kit" is used to refer to - Yamaha DTX700 | Reference Manual - Page 4
the sound produced by preset voices, you can perform with practically the same level of expressiveness as afforded by acoustic instruments. *1: See page 6 for details. *2: Sounds set using the VoiceCategory and VoiceNumber parameters from the Menu area's Kit/Voice page. DTX700 Reference Manual 4 - Yamaha DTX700 | Reference Manual - Page 5
(44) Pad songs (17) Kit Makeup In terms of the DTX700, the term "kit" is used to refer to a collection of voices, songs, and waves assigned to the trigger input jacks (q to !2) and the [HI-HAT CONTROL] jack (open and closed). For added convenience, the drum trigger module comes pre-loaded with 50 - Yamaha DTX700 | Reference Manual - Page 6
's Kit/EQ page). Master EQ Processing the overall instrument sound just before output, Master EQ supports three-band equalization. This effect unit is configured using the Menu area's Utility/Master EQ page, and changing kits has no effect on its equalization settings. DTX700 Reference Manual 6 - Yamaha DTX700 | Reference Manual - Page 7
well suited to solo performances. Three-band compressor. Three-band compressor also featuring equalization. Vintage five-band parametric equalizer. Adds higher-order harmonics to enhance a sound's presence. DTX700 Reference Manual 7 - Yamaha DTX700 | Reference Manual - Page 8
- mentioned Yamaha ProR3. Emulation of plate reverb using an - algorithm derived from the above- mentioned Yamaha ProR3. - Early reflections without any subsequent reverberation. - Simulation of gated reverb. - Simulation of gated reverb played in reverse. DTX700 Reference Manual 8 - Yamaha DTX700 | Reference Manual - Page 9
Controls the volume of individual frequency bands using powerful filters. Reproduces the sound of telephone speech by cutting high and low frequencies. Incorporates a vowel-type formant into the input signal. Changes the pitch of the input signal. DTX700 Reference Manual 9 - Yamaha DTX700 | Reference Manual - Page 10
for the EQ2 band. This parameter is used to set the gain for the EQ2 band. This parameter is used to set the resonance of the EQ2 band. This parameter is used to set the center frequency for the EQ3 band. This parameter is used to set the gain for the EQ3 band. DTX700 Reference Manual 10 - Yamaha DTX700 | Reference Manual - Page 11
This parameter is used to set how the feedback sound decays in the used to set the depth of modulation. [Tempo Phaser] This parameter is used to set the depth of phase modulation. This parameter is used to set the left-right phase difference between modulation waveforms. DTX700 Reference Manual - Yamaha DTX700 | Reference Manual - Page 12
set the speed of rotation of the low-frequency rotor at the "fast" setting. This parameter is used to set the speed of rotation of the low-frequency rotor at the "slow" setting. This parameter is used to set how sensitive the wah filter is to changes in the input level. DTX700 Reference Manual 12 - Yamaha DTX700 | Reference Manual - Page 13
memory can also be saved as files on a USB storage device. Whenever needed, furthermore, these memory files can be loaded back into the drum trigger module from the storage device. For details, see the description of the File pages from the Menu area (see page 57). DTX700 Reference Manual 13 - Yamaha DTX700 | Reference Manual - Page 14
the dial on parameter-type pages, the cursor (i.e., the inverted text) moves up and down within the displayed list. By pressing the dial, you can move one level further into the Menu area. When you press the again, the cursor will zoom out to select the entire row. DTX700 Reference Manual 14 - Yamaha DTX700 | Reference Manual - Page 15
kit's tempo setting. Trigger Setup Link (TrgSetupLink) Use this parameter to specify the trigger setup to be used when the current kit is selected. A trigger setup can be assigned to each different drum kit. Select "off" if the currently selected drum kit new setting. DTX700 Reference Manual 15 - Yamaha DTX700 | Reference Manual - Page 16
voice among other settings. • If a voice (i.e., not a song or MIDI note number) has been selected for the current pad (see page 17): • If a song has been selected for the current pad (see page 17): • If a MIDI note number has been selected directly (see page 18): DTX700 Reference Manual 16 - Yamaha DTX700 | Reference Manual - Page 17
a cut-off mode song is triggered, any other song already playing in this mode will be automatically stopped. NOTE • Up to three songs can be played simultaneously. • If the VoiceCategory parameter is set to "eSong", no other pan- els will be displayed for this page. DTX700 Reference Manual 17 - Yamaha DTX700 | Reference Manual - Page 18
parameter cannot be set to "eSong" when a MIDI note number is selected directly. KIT/VOICE 2/6 The parameter used for tuning will depend on the type of voice assigned to the current pad. [Drum sounds or waves (i.e., imported audio files)] Volume Use this parameter to set the volume of the voice - Yamaha DTX700 | Reference Manual - Page 19
the same pad will be treated. mono poly When two overlapping sounds are produced by striking the same pad, the latter sound is given priority and the earlier sound is silenced. No such restriction applies and all overlapping sounds are output. Settings: mono, poly DTX700 Reference Manual 19 - Yamaha DTX700 | Reference Manual - Page 20
is triggered after KIT/MIDI/ASSIGN 1/5 KIT/MIDI DTX700 Reference Manual MessageType Use this parameter to set the type of MIDI message that will be sent whenever the current pad is struck. note CC PC start continue stop A MIDI note will be sent. Use this setting if you wish to produce a sound - Yamaha DTX700 | Reference Manual - Page 21
MIDI Ch) Use this parameter to set the MIDI channel for the current layer's MIDI messages. Settings: 1 to 16 NOTE • If no note numbers have been assigned to any of the pad's lay- ers (see page 4), this setting will be displayed as "---" and modification will not be possible. DTX700 Reference Manual - Yamaha DTX700 | Reference Manual - Page 22
again. When set to "2.0s", for example, the DTX700 ignores the trigger for two seconds after you hit the corresponding pad or zone. Settings: off, 20ms to 30.00s KIT/MIDI/ASSIGN 4/5 Velocity Limit: Low (VelLimitLo) Velocity Limit: High (VelLimitHi) Use these parameters to set the range of velocities - Yamaha DTX700 | Reference Manual - Page 23
, on MIDI Switch Use this parameter to indicate whether MIDI messages produced by playing pads and changing drum kits should be output via the [MIDI OUT] connector on the rear panel or the [USB TO HOST] port on the side panel. (Choose "on" to output.) Settings: off, on DTX700 Reference Manual 23 - Yamaha DTX700 | Reference Manual - Page 24
Change number to be sent whenever the current kit is selected. Settings: 001 to 128 NOTE • If the Transmit parameter (also from the Menu area's Kit/MIDI/ Other page) has been set to "off", this setting will be displayed as "---" and modification will not be possible. DTX700 Reference Manual 24 - Yamaha DTX700 | Reference Manual - Page 25
be possible. • If the type of MIDI Control Change message set here matches one of the following Control Change message types (also set on the Menu area's Kit/MIDI/Other page), this parameter's setting will have priority. Volume, Pan, VarSend(Dry), ChoSend, and RevSend DTX700 Reference Manual 25 - Yamaha DTX700 | Reference Manual - Page 26
) Use this parameter to set the stereo panning of the chorus effect's return signal. Settings: L63 to C to R63 Chorus to Reverb (ChoToRev) Use this parameter to set the degree to which the output from the chorus effect is sent to the reverb effect. Settings: 0 to 127 DTX700 Reference Manual 26 - Yamaha DTX700 | Reference Manual - Page 27
. Settings: Refer to the Data List document. Variation Type (Type) Use this parameter to select a variation-effect type. Settings: Refer to the Data List document. NOTE • If the Type parameter is set to "No Effect", no other panels will be displayed for this page. DTX700 Reference Manual 27 - Yamaha DTX700 | Reference Manual - Page 28
shelving or peaking type equalization. NOTE • Kit equalization affects both drum and melody sounds. Gain Q Frequency (Hz) LowGain, LowMidGain, HighMidGain, and HighGain Use these parameters to boost or cut the : 500Hz to 16kHz Low HighMid LowMid High Four EQ bands DTX700 Reference Manual 28 - Yamaha DTX700 | Reference Manual - Page 29
List of Functions Pad PadCtrlType HH Func HH MIDI Ch HH MIDI Type SnaresOn/Off SnaresAdjust SnareBuzz ResonanceLevel KIT/PAD 1/3 KIT/PAD Center 's Kit/Pad page) from "off" to "on" and vice-versa. For more details, refer to Internal Design of the DTX700 (see page 3). DTX700 Reference Manual 29 - Yamaha DTX700 | Reference Manual - Page 30
to "SnareHd" or "SnareOp".) SnareBuzz Use this parameter to specify how the snare wire effect resonates with kick and tom sounds. The higher the setting, the greater the degree of resonance. Set to "off" to prevent the snare wire from resonating. Settings: off, 1 to 5 DTX700 Reference Manual 30 - Yamaha DTX700 | Reference Manual - Page 31
are permanent settings that serve as DTX700 defaults. Accordingly, you cannot access them by pressing the [KIT] button or edit this kit data by, for example, changing a drum voice. For details regarding the makeup of kit data, see page 5. Pad to be copied (Pad1) Use this parameter to select the pad - Yamaha DTX700 | Reference Manual - Page 32
, Pad11Rm1, Pad11Rm2, HHKick KIT/JOB/CLEAR KIT From the Clear Kit page, you can initialize the current drum kit. Simply press the [F3] button (EXECUTE) to do so. Kit1, Kit2 Use these parameters to select the two kits whose settings are to be swapped. Settings: 01 to 60 DTX700 Reference Manual 32 - Yamaha DTX700 | Reference Manual - Page 33
pages. List of Functions Common Loop Tempo Name MIDI Transmit Volume Pan a kit, the kit's tempo (see page 15) will take priority over this setting. Song Name (Name) Use this parameter INC] buttons. The following characters can be used. DTX700 Reference Manual NOTE • If you hold down the [SHIFT - Yamaha DTX700 | Reference Manual - Page 34
not be possible. To select a DTX700 drum kit, set parameters for MIDI channel 10 as follows. Setting a Program Change number for this MIDI channel ensures that the kit will change immediately whenever the song is played. MSB = 125, LSB = 001, PC = Number of desired kit DTX700 Reference Manual 34 - Yamaha DTX700 | Reference Manual - Page 35
songs. CAUTION • When a User song is cleared, its data is completely erased from the DTX700's memory. Be sure, therefore, to always save important song data on a USB memory device or the like before clearing it. • After clearing songs, be sure to store your new settings. DTX700 Reference Manual 35 - Yamaha DTX700 | Reference Manual - Page 36
standard MIDI file (SMF) into the DTX700 from a USB memory device for use as a User song. These files contain sequenced MIDI data and have a ".mid" file extension. It should be noted that the DTX700 supports Format indicates the total song memory in kilobyte (KB) units. DTX700 Reference Manual 36 - Yamaha DTX700 | Reference Manual - Page 37
List SnareBuzz Resonance MIDI MIDI IN/OUT ThruPort LocalCtrl MIDI Sync ClockOut Use this parameter to adjust the width of the DTX700's overall stereo-panning field, while maintaining the individual pan settings for drum and musical instrument sounds. Settings: 1 to 127 DTX700 Reference Manual - Yamaha DTX700 | Reference Manual - Page 38
parameters from the Menu area's Utility/Master EQ page can be used to adjust the master equalizer that shapes the tone of voices, Kit area (accessed by pressing the [KIT] and [F1] buttons). • Master equalization has no effect on audio input via the [AUX IN] jack (see page 7). DTX700 Reference Manual - Yamaha DTX700 | Reference Manual - Page 39
and high frequency bands, respectively. Settings: -12 to +0 to +12 LowFreq, MidFreq, and HighFreq Use these parameters to set the center frequencies of the low, mid, and high frequency bands, respectively. will be displayed as "---" and modification will not be possible. DTX700 Reference Manual 39 - Yamaha DTX700 | Reference Manual - Page 40
the controller is lightly depressed. Settings: 0 to 127 CymbalChokeRate Use this parameter to specify how quickly the cymbal sound is to decay when the choking or muting technique is used. The larger the value, the faster the sound will decay. Settings: -20 to +0 to +20 DTX700 Reference Manual 40 - Yamaha DTX700 | Reference Manual - Page 41
current int DTX700 tempo setting. Use "int" when the drum trigger module is to be used alone or as the mas- ter clock source for other equipment. The DTX700 will be synchronized with MIDI Clock ext messages received via MIDI. Use "ext" when an external MIDI device is to be used as the master - Yamaha DTX700 | Reference Manual - Page 42
, MIDI messages will be sent only when this parameter is set to "on". • If "MIDI" is selected for the HH Func (Hi-hat Function) parame- ter from the Menu area's Kit/Pad page, MIDI messages will always be sent, regardless of whether this parameter is set to "on" or "off". DTX700 Reference Manual 42 - Yamaha DTX700 | Reference Manual - Page 43
Set page, you can restore all of the DTX700's user data (i.e., all User kits, User trigger setups, User songs, waves, and utility settings DTX700. Restoring Defaults 1. Press the [F3] button (EXECUTE). You will be asked to confirm that you wish to restore the Factory Set. DTX700 Reference Manual - Yamaha DTX700 | Reference Manual - Page 44
characters can be used. NOTE • trigger setup name field. • If you hold down the [SHIFT] button and press the [-/DEC] or [+/INC] button, or alternatively, hold down the [SHIFT] button and turn the dial, the cursor will jump between the " ", "0", "A", "a", and "~" characters. DTX700 Reference Manual - Yamaha DTX700 | Reference Manual - Page 45
only produces loud sounds when the pad in question is struck quite hard. Settings: loud2, loud1, normal, hard1, hard2 loud2 loud1 normal hard1 hard2 Velocity m Trigger input level (i.e., strength of playing) m : The sound assigned to the current pad is played. DTX700 Reference Manual 45 - Yamaha DTX700 | Reference Manual - Page 46
the reject time. The struck pad has a type (as set on this, the Menu area's Trigger/Pad/Pad Type page) that does not start with "DT", and in addition, the trigger level of the second strike within the reject time is at least twice as strong as that of the first. DTX700 Reference Manual 46 - Yamaha DTX700 | Reference Manual - Page 47
current pad will produce sounds within these two velocities. Settings: 0 to 126 for Minimum Velocity 1 to 127 for Maximum Velocity TRIGGER/PAD/PAD TYPE 4/6 WaitTime These parameters are used to set the time until (or edge, in the case of cymbal pads). Settings: 0 to 64 DTX700 Reference Manual 47 - Yamaha DTX700 | Reference Manual - Page 48
any of the other pads are struck, that input will be treated as crosstalk and no sound will be produced. Although higher settings are more effective in preventing crosstalk, they can also make it difficult to play multiple pads at the same time. Settings: 0% to 99% DTX700 Reference Manual 48 - Yamaha DTX700 | Reference Manual - Page 49
to the row shown below and press the dial. 3. Using the dial, move the cursor to the trigger input jack of any pad causing crosstalk in the current indicates the name of the trigger input jack for the selected checkbox. w indicates the number of the trigger input jack. DTX700 Reference Manual 49 - Yamaha DTX700 | Reference Manual - Page 50
whose data is to be copied. "PRE" refers to the trigger setups stored as the DTX700's default settings, and "USER" refers to the trigger setups that can be accessed by pressing the [KIT] button followed by the [F2] button (TRIGGER) to open the Trigger Setup page. Settings: PRE, USER Number Use this - Yamaha DTX700 | Reference Manual - Page 51
(also from the Menu area's Click page) will be produced for each clicktrack quarter note sound. Settings: off, on NOTE • Regardless of this parameter's setting, no MIDI Note On mes- sages will be produced for click-track sounds other than accents and quarter notes. DTX700 Reference Manual 51 - Yamaha DTX700 | Reference Manual - Page 52
Menu area's Click page) is set to "on", a MIDI Note On message with the note number set here will be produced for each clicktrack quarter-note sound. NOTE • If this parameter is set to "off", no MIDI Note On messages will be produced for click-track quarter-note sounds. DTX700 Reference Manual 52 - Yamaha DTX700 | Reference Manual - Page 53
on Menu area pages. List of Functions Common PlayMode Start Loop Normalize Delete DeleteAll Optimize MemInfo PlayMode Use this parameter to set the way . This mode is normally selected for drums, special effects, and other nonlooped sounds. • loop: The wave will be DTX700 Reference Manual 53 - Yamaha DTX700 | Reference Manual - Page 54
, no data behind this point (i.e., Use this parameter to specify how the playback volume of the wave decays in response to operation of a hi-hat controller connected to the [HI-HAT CONTROL] jack. The smaller the value, the faster the rate of decay. Settings: -64 to +0 to +64 DTX700 Reference Manual - Yamaha DTX700 | Reference Manual - Page 55
wave file from the USB memory device to be imported into the DTX700. PadAssign Use this parameter to assign the selected wave to a trigger input source once imported. If "off" is selected, no assignment you can delete the wave currently selected on the Wave/Job page. DTX700 Reference Manual 55 - Yamaha DTX700 | Reference Manual - Page 56
you can delete all waves from the DTX700's internal wave memory. For checking internal memory status WAVE/MEMORY INFO To confirm the status of memory usage for wave data, navigate to the Menu area's Wave/ ) This indicates the total wave memory in megabyte (MB) units. DTX700 Reference Manual 56 - Yamaha DTX700 | Reference Manual - Page 57
on-screen. \YAMAHA DTX700 ALL : All ALLKIT : All kit ALLSNG : All song ALLTRG : All trigger ALLWAV : All wave UTL : Utility Format The operation of initializing a USB memory device is referred to as "formatting". Whenever you format a USB memory device using the DTX700, any previously created - Yamaha DTX700 | Reference Manual - Page 58
port or turn off either the memory device or the DTX700 while data is being saved. Failure to observe this precaution can lead to the memory device or the DTX700 being permanently damaged. When the data has been saved, you will be returned to the page from Step 2 above. DTX700 Reference Manual 58 - Yamaha DTX700 | Reference Manual - Page 59
have set either Src or Dst, press the dial once again. When loading a kit: Settings: 01 to 60 When loading a wave: Settings: 001 to 500 When loading a song: Settings: Src 01 to 98, Dst 01 to 93 NOTE • Src = 98 corresponds to data recorded by press- ing the [REC] button. DTX700 Reference Manual 59 - Yamaha DTX700 | Reference Manual - Page 60
User data - i.e., all User kits, User waves, User songs, and User triggers in addition to utility data All User kit data All wave data All User song data All User-trigger data Utility data Settings . 4-3 When you have made your selection, press the dial once again. DTX700 Reference Manual 60 - Yamaha DTX700 | Reference Manual - Page 61
name field using the [F1 triggers in addition to utility data All User kit data All wave data All User song data All User-trigger data Utility data Settings: All, AllKit, AllWave, AllSong, AllTrigger, Utility 3-3 When you have made your selection, press the dial once again. DTX700 Reference Manual - Yamaha DTX700 | Reference Manual - Page 62
formatting such a device, therefore, ensure that any important data it contains is backed up. NOTE • In certain cases, USB memory devices formatted on a com- puter will not be recognized by the DTX700. Be sure, therefore, to always use the drum trigger module to format memory devices that will be - Yamaha DTX700 | Reference Manual - Page 63
is currently unused in percentage format. e Total memory (MB) This indicates the total USB-device memory in megabyte (MB) units. NOTE • The units used here will depend on the corresponding memory size (i.e., KB for kilobytes, MB for megabytes, and GB for gigabytes). DTX700 Reference Manual 63 - Yamaha DTX700 | Reference Manual - Page 64
memory device. (Waves are not included when only kit data is loaded from a USB memory device. See page 59.) Check relevant pad settings as follows. • Ensure that the PadFunc (Pad Function) parameter from the Menu area's Utility/Pad page is set to "off". (See page 40.) DTX700 Reference Manual 64 - Yamaha DTX700 | Reference Manual - Page 65
, try the following. • Ensure that trigger setups have been configured correctly. • If an external MIDI instrument played from the DTX700 does not produce the expected sounds, review its voice settings for the MIDI channel on which the DTX700 is sending data, and ensure that they are appropriate for - Yamaha DTX700 | Reference Manual - Page 66
the pads using the Note parameter from the Menu area's Kit/ MIDI/Assign page. If a variation effect is applied to a two-zone or three-zone pad, but the sound from only one of the zones appears to change, proceed as follows. • Apply the effect to each zone individually. DTX700 Reference Manual 66 - Yamaha DTX700 | Reference Manual - Page 67
into contact with the drum trigger. • Raise the setting of the RejectTime parameter from the Menu area's Trigger/Pad/Pad Type page. (Avoid setting too large a reject time, as this can make it impossible to accurately detect flams, rolls, and the like. See page 46.) DTX700 Reference Manual 67 - Yamaha DTX700 | Reference Manual - Page 68
pads have been assigned to the same alternate group using the Alt- Group parameter. In certain cases, this can lead to only one sound being produced. (See page 20.) • Ensure that the TrgAltGrp (Trigger Alternate Group) parameter from the Menu area's Kit/MIDI/Assign page is set to "off". (See page 23 - Yamaha DTX700 | Reference Manual - Page 69
the DTX700, any connection with DAW software will be lost. To restore this connection, close the DAW application, turn the DTX700 back on, and then launch the application once again. It is advisable to disable the Auto Power-Off function when exchanging data with a computer. DTX700 Reference Manual
-
 1
1 -
 2
2 -
 3
3 -
 4
4 -
 5
5 -
 6
6 -
 7
7 -
8
-
9
-
10
-
11
-
12
-
13
-
14
-
15
-
16
-
17
-
18
-
19
-
20
-
21
-
22
-
23
-
24
-
25
-
26
-
27
-
28
-
29
-
30
-
31
-
32
-
33
-
34
-
35
-
36
-
37
-
38
-
39
-
40
-
41
-
42
-
43
-
44
-
45
-
46
-
47
-
48
-
49
-
50
-
51
-
52
-
53
-
54
-
55
-
56
-
57
-
58
-
59
-
60
-
61
-
62
-
63
-
64
-
65
-
66
-
67
-
68
-
69
 |
 |
DRUM TRIGGER MODULE
DTX700
Reference Manual
The DTX700 Reference Manual created via the PDF format is equipped with special features that are exclusive to electronic files, such as
the Link function and the Search function which let you jump to the desired page by clicking the specific term.
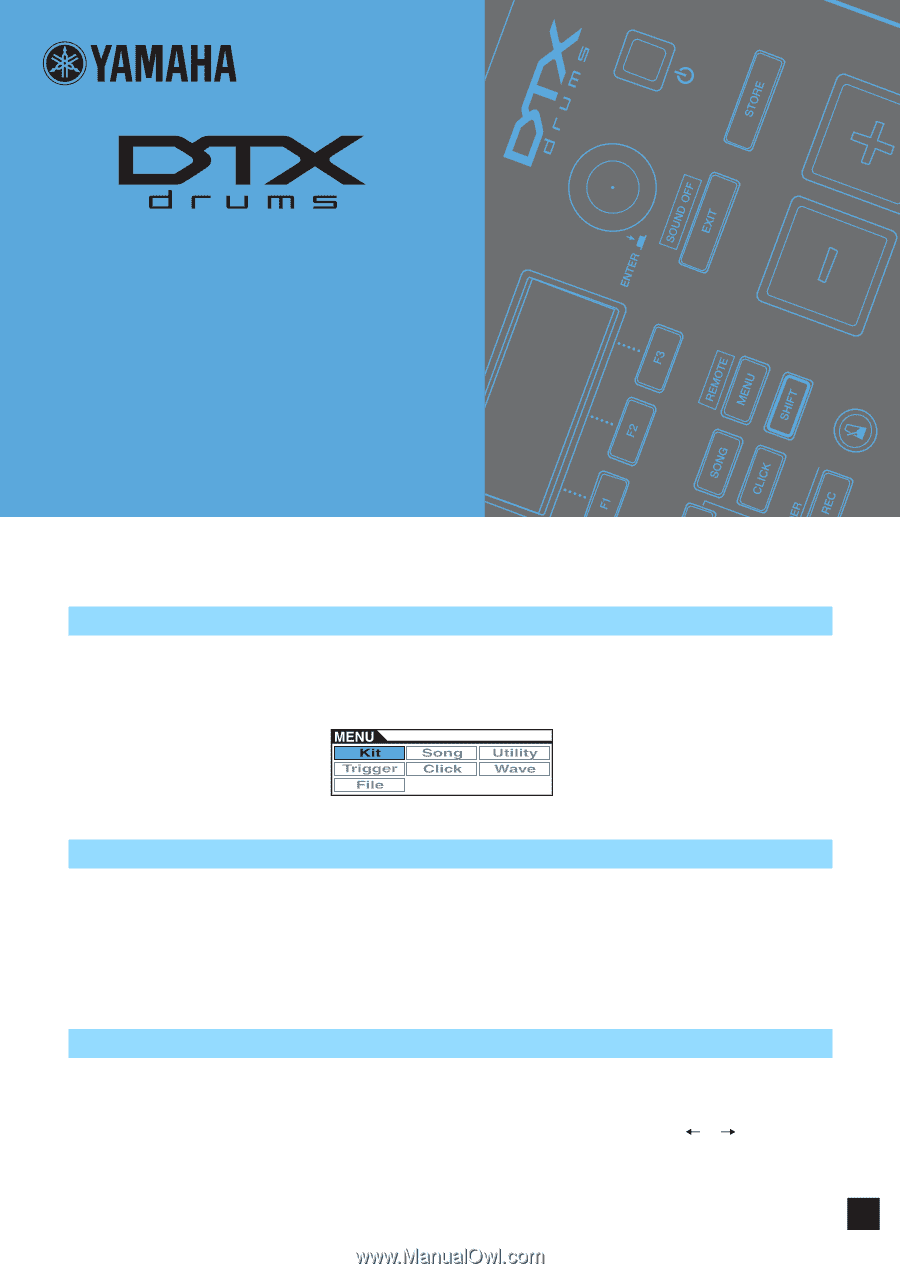
This illustration shows the page displayed on the DTX700 when the front panel’s [MENU] button is pressed. When you click on any of the
menu items, you will be taken to the start of the corresponding section.
This function built in the viewer software is very useful if you want to know the meaning of unfamiliar terms.
When using Adobe Reader to read this manual, enter a specific word in the search box, then press the <Enter> key of your computer key-
board to call up the relevant section in this manual.
NOTE
•
Make sure to check and download the latest version of the Adobe Reader from the following site.
When using Adobe Reader, click to return to the previous page view/go to the next page view via the buttons in the toolbar.
This function is very useful if you want to return to the previous page view when jumping to a link page.
NOTE
•
If the previous page view/next page view buttons are not shown in the toolbar, hold the <Alt> key and press <
>/<
> keys to move to
the previous/next page view.
•
For more information on these and other functions in the software, refer to the owner’s manual of the software.
How to Use This Manual
Search Function
Previous Page View/Next Page View
EN