Yamaha EL-27 Owner's Manual - Page 9
Getting Started
 |
View all Yamaha EL-27 manuals
Add to My Manuals
Save this manual to your list of manuals |
Page 9 highlights
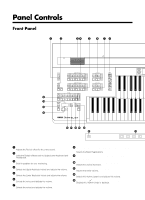
1 Quick Introductory Guide 1 Quick Introductory Guide No matter what your level of playing experience, we recommend that you take the time to go through this basic section. It shows you in the simplest possible manner how to start playing your Electone. The basic operations and functions that you learn in this section will also be important when you later use the Electone's more advanced features. 1. Getting Started Once you've set up your Electone and plugged the power cord into an electrical outlet, you're ready to get started and play. 1. Turn on the Electone by pressing the POWER switch. POWER Yamaha products are manufactured specifically for the supply voltage in the area where they are to be sold. If you should move, or if any doubt exists about the supply voltage, please consult with a qualified technician. POWER When you turn on the Electone, the following displays will appear in succession on the LCD: YAMAHA Electone £Strings ¢™Violin ¢Strings ¡ContBass This last display (Voice Display) shows the currently assigned voice settings for each voice section of the instrument, with the abbreviation for each voice section beside the voice name: Upper (£), Lower (¢), Lead (¢™), and Pedalboard (¡). Turning the Electone off erases all panel settings you have made. When the Electone is turned on, Basic Registration 1 is automatically selected. If you have made panel settings you wish to keep, save them to Registration Memory (see page 47.) before turning the Electone off. You can, however, restore the panel settings that were made before the Electone was last turned off. In doing this, first be careful NOT to press any panel buttons (excepting those in Basic Registration) after you turn the Electone back on. Then, to restore the previous settings, hold down the M. (Memory) button and press the D. (Disable) button. 7
-
 1
1 -
2
-
3
-
 4
4 -
 5
5 -
 6
6 -
 7
7 -
 8
8 -
 9
9 -
 10
10 -
 11
11 -
 12
12 -
 13
13 -
 14
14 -
15
-
16
-
17
-
18
-
19
-
20
-
21
-
22
-
23
-
24
-
25
-
26
-
27
-
28
-
29
-
30
-
31
-
32
-
33
-
34
-
35
-
36
-
37
-
38
-
39
-
40
-
41
-
42
-
43
-
44
-
45
-
46
-
47
-
48
-
49
-
50
-
51
-
52
-
53
-
54
-
55
-
56
-
57
-
58
-
59
-
60
-
61
-
62
-
63
-
64
-
65
-
66
-
67
-
68
-
69
-
70
-
71
-
72
-
73
-
74
-
75
-
76
-
77
-
78
-
79
-
80
-
81
-
82
-
83
-
84
-
85
-
86
-
87
-
88
 |
 |
