Yamaha ELS-01 Owner's Manual - Page 215
Appendix, Bench Assembly
 |
View all Yamaha ELS-01 manuals
Add to My Manuals
Save this manual to your list of manuals |
Page 215 highlights
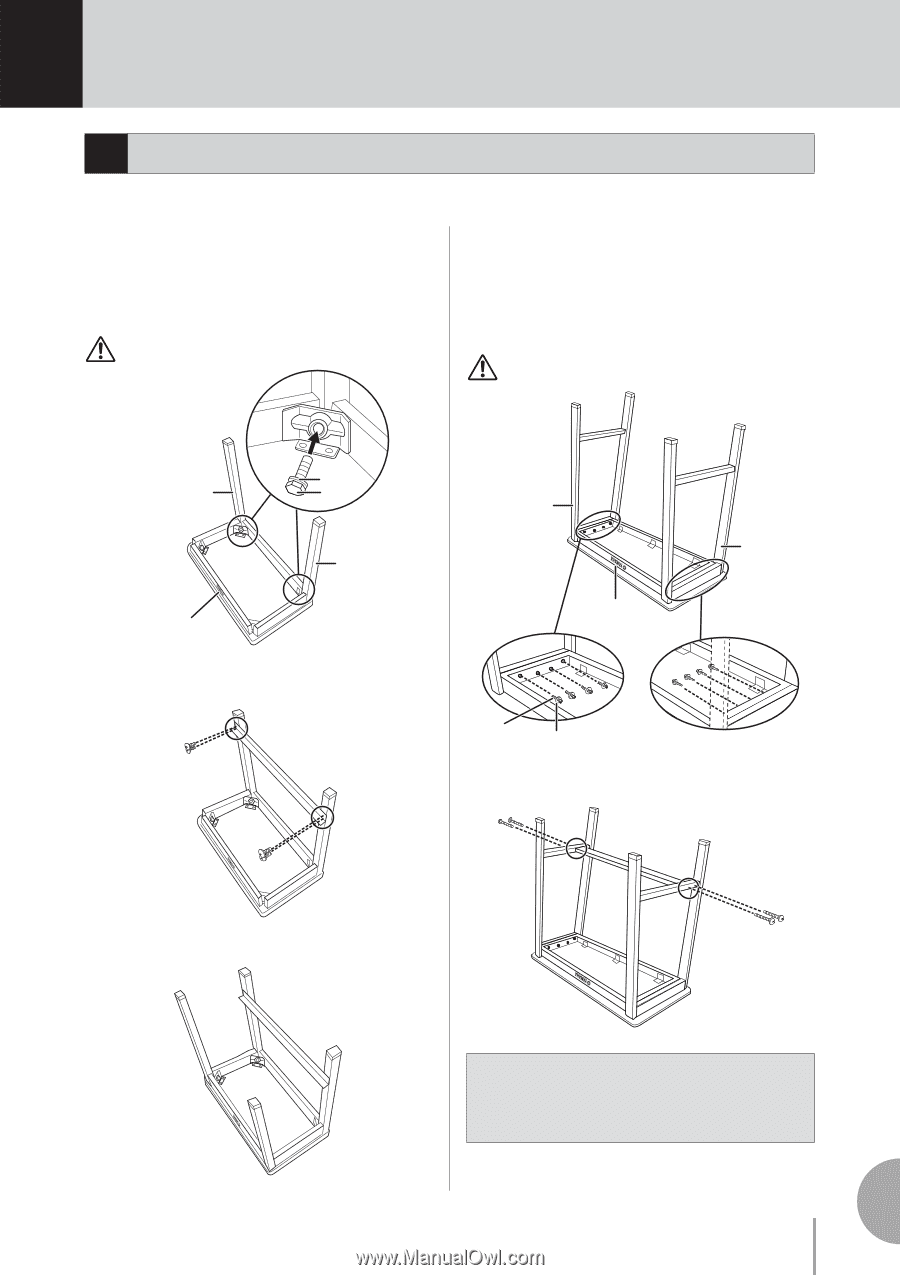
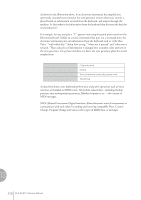
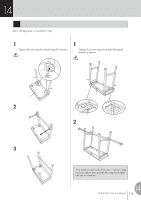
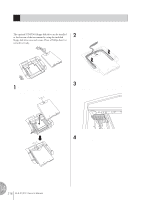
14 Appendix Bench Assembly Have a Phillips-head (+) screwdriver ready. Bench for the ELS-01 1 Turn the bench board over and install two legs for the front side. Tighten the bolts using the included wrench (as shown). Make sure to put washers between the bolts and the bench board. Bench for the ELS-01C 1 Turn the bench board over and install the legs with the included eight screws. Tighten the screws using the included hexagonal wrench (as shown). Make sure to put washers between the screws and the bench board. Washer R Bolt L Logo is written on back 2 Install the foot rest to the legs with the included four screws, using a screwdriver. R L Logo is written on back Bolt Washer 2 Install the foot rest to the legs with the included four screws, using a screwdriver. 3 Install the two legs for the back side. If the bench screws become loose due to extensive longterm use, tighten them periodically using the included tool and a screwdriver. 14 ELS-01/01C Owner's Manual 215 Appendix
-
 1
1 -
2
-
3
-
4
-
5
-
6
-
7
-
8
-
9
-
10
-
11
-
12
-
13
-
14
-
15
-
16
-
17
-
18
-
19
-
20
-
21
-
22
-
23
-
24
-
25
-
26
-
27
-
28
-
29
-
30
-
31
-
32
-
33
-
34
-
35
-
36
-
37
-
38
-
39
-
40
-
41
-
42
-
43
-
44
-
45
-
46
-
47
-
48
-
49
-
50
-
51
-
52
-
53
-
54
-
55
-
56
-
57
-
58
-
59
-
60
-
61
-
62
-
63
-
64
-
65
-
66
-
67
-
68
-
69
-
70
-
71
-
72
-
73
-
74
-
75
-
76
-
77
-
78
-
79
-
80
-
81
-
82
-
83
-
84
-
85
-
86
-
87
-
88
-
89
-
90
-
91
-
92
-
93
-
94
-
95
-
96
-
97
-
98
-
99
-
100
-
101
-
102
-
103
-
104
-
105
-
106
-
107
-
108
-
109
-
110
-
111
-
112
-
113
-
114
-
115
-
116
-
117
-
118
-
119
-
120
-
121
-
122
-
123
-
124
-
125
-
126
-
127
-
128
-
129
-
130
-
131
-
132
-
133
-
134
-
135
-
136
-
137
-
138
-
139
-
140
-
141
-
142
-
143
-
144
-
145
-
146
-
147
-
148
-
149
-
150
-
151
-
152
-
153
-
154
-
155
-
156
-
157
-
158
-
159
-
160
-
161
-
162
-
163
-
164
-
165
-
166
-
167
-
168
-
169
-
170
-
171
-
172
-
173
-
174
-
175
-
176
-
177
-
178
-
179
-
180
-
181
-
182
-
183
-
184
-
185
-
186
-
187
-
188
-
189
-
190
-
191
-
192
-
193
-
194
-
195
-
196
-
197
-
198
-
199
-
200
-
201
-
202
-
203
-
204
-
205
-
206
-
207
-
208
-
209
-
 210
210 -
 211
211 -
 212
212 -
 213
213 -
 214
214 -
 215
215 -
 216
216 -
 217
217 -
 218
218 -
 219
219 -
 220
220 -
221
-
222
-
223
-
224
-
225
-
226
-
227
-
228
-
229
-
230
-
231
-
232
-
233
-
234
-
235
-
236
-
237
-
238
-
239
-
240
 |
 |