Yamaha MDX-793 Owner's Manual - Page 15
Recording Level, Auto Marking, To stop, To pause, PAUSE, To eject the MD, REC LEVEL - remote control
 |
View all Yamaha MDX-793 manuals
Add to My Manuals
Save this manual to your list of manuals |
Page 15 highlights
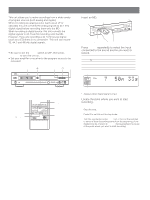
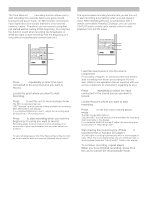
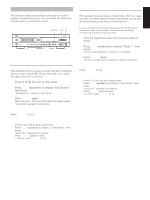
ENGLISH 4 Press REC to set this unit to record pause mode. The REC * indicators light up. "REC Standby" and the amount of time available for recording flash alternately in the display. If you selected a track number or paused playback (in step 3) to record over a previous recording "OverWriteOK?" appears in the display. To confirm, press ENTER. This operation will erase the selected track number (or point) and all subsequent material. To cancel, press CANCEL (or &). If you selected ANALOG in step 2, adjust the recording level as described in "Recording Level". Note When recording from a digital source that has a digital output (volume) control, set the output level (volume) to "MAX". Recording may not be possible at low output levels (when the digital volume is turned down). 5 Start playing the program source to be recorded. 6 Press #/* (or # PLAY on the remote) to start recording. The TOC indicator lights up. When the TOC indicator is lit, this means that the TOC information has not yet been written to the disc. After recording, eject the disc, or turn this unit's power off to write the TOC information and finalize the recording. To stop Press & (& STOP on the remote). To pause Press #/* (* PAUSE on the remote). Press again to resume recording. To eject the MD Press ). TOC writing may be impossible (or track number marking may not perform as expected) when recording a damaged CD or a broadcast source under interference. Recording Level To set the recording level, first set this unit to the record pause mode (press REC). Then play the loudest passage of the source to be recorded and watch the meter readings. Adjust the REC LEVEL control so that the highest peak causes the 0 dB level indicators to flicker. The OVER indicators should not light. L dB -00 -60 -30 -10 R -6 4 -2 -1 0 OVER Should not light Note Although some sources can be recorded with lower peak levels, setting the peak levels too low may degrade the quality of the recording. Auto Marking When making a recording, you can choose either automatic or manual marking. This feature operates somewhat differently for analog and digital signals. See below for details. Press M-MARK on the remote repeatedly to select automatic (MANUAL indicator out) or manual (MANUAL indicator lit) marking. MANUAL When recording analog signals Auto : Track numbers are written in synchronization with the input level of the signal being recorded. In other words, if the source signal falls below a certain level for more than 1.5 seconds a track number is written automatically the next time the source signal rises above that level. Manual : One track number is written automatically when you start recording, but none are written during recording. To mark a track number, press REC at the desired position while recording. Note When using manual marking, the marks must be set at least 4 seconds apart. When recording digital signals Track numbers are written in the same positions as the original source (CD, etc.) with either automatic or manual marking. To add additional track numbers, set M-MARK to MANUAL and press REC at the desired position while recording. Note When recording is paused, the portion recorded up to the pause is counted as an individual track. When recording is resumed, a new track number is created. On the other hand, if one track is recorded in continuous repetition, that track(s) is recorded as one continuous track with a single track number. 15
-
 1
1 -
2
-
3
-
4
-
5
-
6
-
7
-
8
-
9
-
 10
10 -
 11
11 -
 12
12 -
 13
13 -
 14
14 -
 15
15 -
 16
16 -
 17
17 -
 18
18 -
 19
19 -
 20
20 -
21
-
22
-
23
-
24
-
25
-
26
-
27
-
28
-
29
 |
 |