Yamaha MRX-100 MRX-100 OWNERS MANUAL - Page 4
Installation/replacement
 |
View all Yamaha MRX-100 manuals
Add to My Manuals
Save this manual to your list of manuals |
Page 4 highlights
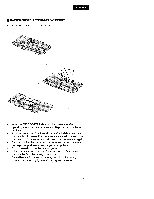
ENGLISH ■ BATTERY INSTALLATION/REPLACEMENT • Install the batteries as shown below. • When the ERROR/BATT. indicator lights three times after operating a key, the batteries are weak. Replace the batteries at this time. • All of the memorized functions will be retained while you replace the batteries. However, if no batteries are installed for a few hours, the memory will be erased and will have to be programmed again. • Be sure to follow the diagram at the bottom of the compartment to insure proper positive (+) and negative ( -) polarity. • Do not use old and new batteries together. • When the unit is not to be used for a long period of time, remove the batteries from the battery compartment. Should battery fluid leaks, wipe away the fluid in the battery compartment thoroughly before inserting new batteries. 3
-
 1
1 -
 2
2 -
 3
3 -
 4
4 -
 5
5 -
 6
6 -
 7
7 -
 8
8 -
 9
9 -
 10
10 -
11
-
12
-
13
-
14
-
15
-
16
-
17
 |
 |
