Yamaha S70 User Manual
Yamaha S70 Manual
 |
View all Yamaha S70 manuals
Add to My Manuals
Save this manual to your list of manuals |
Yamaha S70 manual content summary:
- Yamaha S70 | User Manual - Page 1
digital audio files is strictly prohibited except for your personal use. • The software and this owner's manual are exclusive copyrights of Yamaha Corporation. • Copying of the software or reproduction of this manual in whole or in part by any means is expressly forbidden without the written consent - Yamaha S70 | User Manual - Page 2
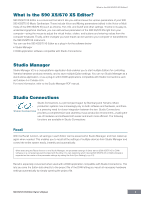
Music Synthesizer. These include Voice and Mixing parameters (edited in the Voice or using the mouse to adjust the virtual knobs, sliders, and buttons and entering values from the computer keyboard PDF manual. Studio Connections Studio Connections is a joint project begun by Steinberg and Yamaha - Yamaha S70 | User Manual - Page 3
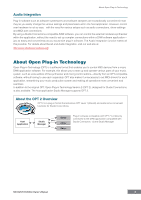
, this allows you to start up and operate various parts of your music system, such as voice editors of the synthesizer and mixing control editors-directly from an OPT-compatible software, without having to use each separately. OPT also makes it unnecessary to set MIDI drivers for each application - Yamaha S70 | User Manual - Page 4
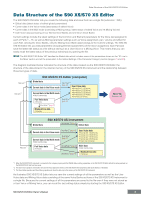
User Voice data (consisting of four Normal Voice Banks and one Drum Voice Bank) Current settings include the latest settings of the Common and Element parameters for the Voice last assigned to each of Parts 1 - 16, as well as Mixing parameter settings such as Voice assignment, pan, volume and effect - Yamaha S70 | User Manual - Page 5
instrument through the computer (without starting the DAW software), letting you hear the sound of the edited Voice by playing the keyboard. When starting Studio Manager as a plug-in: Set the MIDI Ports on the DAW application. For details, refer to the manual of your DAW application. When connecting - Yamaha S70 | User Manual - Page 6
guide in how to use the S90 XS/S70 XS Editor. As an example, this section explains how to edit a Voice in the Voice use the settings on the S90 XS/S70 XS Editor as starting data, set both Global, Current and Voice to the opposite, so that the arrow indicates data flow from the computer to the keyboard - Yamaha S70 | User Manual - Page 7
call up the VOICE LIBRARY window. 5-2 From the list in the VOICE LIBRARY, select the desired Voice to assign it temporarily to the current Part. You can confirm the sound of the selected Voice by clicking any note on the virtual keyboard or the S90 XS/S70 XS keyboard. 5-3 Click the Voice name or [OK - Yamaha S70 | User Manual - Page 8
/S70 XS Editor in Use 5-4 Edit the Voice parameters as desired. Edit the parameters (EQ, chorus, reverb, etc.) in the "V" row by clicking them. To confirm how the parameter edit affects the Voice sound, click any note on the virtual keyboard or the S90 XS/S70 XS keyboard. To make detailed settings - Yamaha S70 | User Manual - Page 9
An Example of S90 XS/S70 XS Editor in Use 6-4 Click [Store] to store the edited Voice to the selected number in the selected Bank. Performing this operation will store the Voice data to the User Voice Bank in the S90 XS/S70 XS instrument as well as that within the Editor. CAUTION When you execute - Yamaha S70 | User Manual - Page 10
of the parameters such as EQ and effect lined up to the right of "G" in the Global/Multi section and "1" - "16" in the Part section. To confirm how the parameter edit affects the Voice sound, click any note on the virtual keyboard or the S90 XS/S70 XS keyboard. To make detailed settings of the - Yamaha S70 | User Manual - Page 11
, refer to the Owner's Manual of the S90 XS/S70 XS. 8-2 Select the Part to which the desired Voice is assigned, select [Store Voice] under [Edit] in the starting the S90 XS/S70 XS Editor from Studio Manager, you can save the S90 XS/S70 XS Editor data into a Session file of Studio Manager. • When using - Yamaha S70 | User Manual - Page 12
below. Keep in mind that the ONLINE indication cannot be enabled when the MIDI Port is not set properly or the S90 XS/S70 XS instrument is not properly from OFFLINE to ONLINE. n When the Global, Current and Voice settings are set to "Off" and Auto Start is set to "On" in the Auto Sync window, 's Manual 12 - Yamaha S70 | User Manual - Page 13
Ins.FX (Insertion Effect) Turns the Insertion Effect on or off. Chorus Effect type. MEQ, Lo, Lo-M, Mid, Hi-M, Hi (Master EQ) Turns the Master EQ on or off and edits the parameters. Volume Adjust the entire volume. 2 [Voice]/[AD Part] tab Selects the Parts to be edited from [Voice] and [AD Part - Yamaha S70 | User Manual - Page 14
LED lights when MIDI messages are received. Category, Bank No., Voice Name Indicates the Category Bank and name of the Voice. When clicking here, the VOICE LIBRARY window appears to determine whether the Voices listed here are divided into Category folders or Bank folders. S90 XS/S70 XS Editor - Yamaha S70 | User Manual - Page 15
the Voice(s). In the User Bank, you can rearrange the Voices by dragging-anddropping the Voice(s) to a new location. A checkbox exists at left of each Voice. If you enter checkmarks to the checkboxes of your most-used or favorite Voice, you can call up a list of these Voices on the VOICE LIBRARY - Yamaha S70 | User Manual - Page 16
Voice mode by using the graphic knobs. Volume Adjusts the Volume for the A/D Part. Output Select Determines the specific output(s) for the A/D Part. LCD L&R asL&R asL asR vocoder Output jacks OUTPUT L and R ASSIGNABLE OUTPUT L and R ASSIGNABLE OUTPUT L ASSIGNABLE OUTPUT R Insertion Effect for Part - Yamaha S70 | User Manual - Page 17
(when the Voice/Multi is set to "Multi") Mixer section (when the Voice/Multi is set to "Multi") 1 3 2 1 Global This strip lets you edit the main parameters in the Multi mode, such as effect-related ones. Clicking (page 29). Before editing After editing S90 XS/S70 XS Editor Owner's Manual 17 - Yamaha S70 | User Manual - Page 18
closes. n By right-clicking this section and selecting a menu, you can use the following function. • Opening/closing all the folders 4 Search Box You can type. MFX (Master Effect) Turns the Master Effect on or off and selects the Master Effect type. MEQ, Lo, Lo-M, Mid, Hi-M, Hi (Part EQ) Turns the - Yamaha S70 | User Manual - Page 19
different Voice for the current Part. Using the VOICE LIBRARY is the same here as in the Voice mode; for details, refer to page 14. EQ Lo, Mi, Hi (Part EQ) Adjusts the equalizer settings for each Part. Ins.FX (Insertion Effect Switch) Switches the Insertion Effect on or off. n Insertion Effects can - Yamaha S70 | User Manual - Page 20
be output via the OUTPUT L and R jacks in stereo. When a Drum Voice is assigned to the edited Part, this value is indicated as "drum" and the sound will be output via the jacks set in the Drum Key Edit as the Output Select parameter on the S90 XS/S70 XS Editor. ARP (Arpeggio) Turns - Yamaha S70 | User Manual - Page 21
Parameter Category section (when the Voice/Multi is set to "Voice") Parameter Category section (when the Voice/Multi is set to "Voice") You can edit detailed parameters for the current Part by clicking the button (located near Detailed Parameter section S90 XS/S70 XS Editor Owner's Manual 21 - Yamaha S70 | User Manual - Page 22
S90 XS/S70 XS Editor Window: Parameter Category section (when the Voice/Multi is set to "Voice") The indicated categories in the Parameter Category section differ depending on the selected row: G, V, or AD Part, as illustrated below. Clicking each of Categories calls up the corresponding parameters - Yamaha S70 | User Manual - Page 23
Drum Voice is selected) Indicates the categories of Drum Key parameters. Clicking each of categories calls up the corresponding Drum Key parameters in the Detailed Parameter section. 5 AD This is shown when the AD Part is selected in the Mixer section. The Detailed Parameter section shows the Effect - Yamaha S70 | User Manual - Page 24
Parameter Category section (when the Voice/Multi is set to "Multi") Parameter Category section (when the Voice/Multi is set to "Multi") You can edit detailed parameters for the current Part by clicking the button (located near Detailed Parameter section S90 XS/S70 XS Editor Owner's Manual 24 - Yamaha S70 | User Manual - Page 25
the "G" row. The "Part 1 - 16" indication shown below appears by clicking any place on the Part row appearing only when the [Part 116] tab is selected at When a Drum Voice is assigned to the current Part ("Drum Key" is shown in the Parameter Category section) and you select a key number (from C0 - Yamaha S70 | User Manual - Page 26
the Owner's Manual of the S90 XS/S70 XS. V, G, F indicators Three Indicators showing the Editing Status One or more of the following three indicators are shown at the right top of the window when you edit a parameter. Indicates that the Voice edits are not stored yet as a User Voice. This indicator - Yamaha S70 | User Manual - Page 27
Clicking this in the Parameter Category section calls up the Effect-related parameters in the Detailed Parameter section. On the S90 XS/S70 XS instrument, these parameters are the same as those called up by selecting "Effect" on the Voice Edit Select display. S90 XS/S70 XS Editor Owner's Manual 27 - Yamaha S70 | User Manual - Page 28
when the Normal Voice is selected while the "Drum Key" is shown when the Drum Voice is selected. Part in the Voice mode. The following sub category is included. Effect Clicking this in the Parameter Category section calls up the parameters related to the Effect applied to the A/D Part of the Voice - Yamaha S70 | User Manual - Page 29
the Voice assigned to the current Part, or the Global settings. This section introduces what parameters belong to each of the Parameter Categories. For details about each parameter, refer to the Owner's Manual of the S90 XS/ S70 XS. V, M, G, F indicators Four Indicators showing the Editing Status - Yamaha S70 | User Manual - Page 30
Effect Clicking this in the Parameter Category section calls up the Effect Edit Select display. Part Common This Parameter category the current Part in use the search function for the selecting Types, as with the VOICE Part and the Controller Set Assign parameters for the current Part and the Voice - Yamaha S70 | User Manual - Page 31
(when the Voice/Multi is set to "Multi") Effect Clicking this in the Parameter Category section calls up the parameters related to the Insertion Effect for the current Part and System Effect applied to all the Parts in the Detailed Parameter section. Element or Drum Key This Parameter Category - Yamaha S70 | User Manual - Page 32
XS/S70 XS (either built-in or connected) is used as the Control Source of the Controller Set edited in the RCV/Control Set window. 2 1 3 1 Part Indicates the current Part. When [Voice]/[Multi] is set to "Voice" (Voice mode is enabled), in the Voice mode, this indication is fixed to "1." When the - Yamaha S70 | User Manual - Page 33
1 [TONE]/[EG]/[EQ]/[Effect]/[MIC] Same as the Voice Element Edit. For details, refer to the Owner's Manual of the S90 XS/S70 XS. 7 Keyboard Allows you to audition the edited sound. Note on/off messages corresponding to the keys you click or drag will be transmitted to the external device via the MIDI - Yamaha S70 | User Manual - Page 34
window, GENERAL window in the Part Common General, and the Store window. From the VOICE LIBRARY window (page 14), select a User Voice or Mixing Voice then click the selected Voice so that you can edit the name. After editing the Voice name, pressing the key or locating the cursor to another - Yamaha S70 | User Manual - Page 35
list box, from which you can select the desired value. You can also select the value also by clicking the arrow at right end of this box. Using key. The specific operation of the knob is determined by the settings of the Knob Guide key and click on the knob. Using Ctrl> key and Command key Command key - Yamaha S70 | User Manual - Page 36
default Mixing setup and Voice data. Open... Opens an already saved file of the S90 XS/S70 XS Editor. The following file types can be selected and opened. • S90 XS/S70 XS Editor (.X2E) • S90 ES Multi Part Editor (.M6E) • file (.X2E) under a new or different name. S90 XS/S70 XS Editor Owner's Manual 36 - Yamaha S70 | User Manual - Page 37
in the Destination Voice list (9) of the current file, then click [Import] to execute the Import operation. The following file types can be selected. • S90 XS/S70 XS Editor (.X2E) • MOTIF XS Editor (.X0E) • MOTIF-RACK XS Editor (.X1E) • S90 ES Voice Editor (.S7E) • S90 ES Multi Part Editor (.M6E - Yamaha S70 | User Manual - Page 38
folder from the Source Voice list then dropping it to the Destination Voice list. n A Normal Voice cannot be imported to the User Drum Voice Bank. Likewise, a Drum Voice cannot be imported to the User Normal Voice Bank. No Voices can be imported to the Preset Voice Bank. 6 [+]/[-] buttons Click the - Yamaha S70 | User Manual - Page 39
"! Yamaha USB IN 0-1"), this indicates that the previously used Port cannot be found or some Ports are not set properly. Check the MIDI Port settings in the host application. n Keep in mind that setup on the host application (Studio Manager) is necessary before making settings here. When starting - Yamaha S70 | User Manual - Page 40
Voice Determines whether or not the Voice data (see page 4) is synchronized and which data (S90 XS/S70 XS Editor or S90 XS/S70 XS itself) is synchronized with the other. Auto Start be started automatically as soon as the Auto Sync window is opened. • When clicking "OFFLINE" after setting the MIDI IN - Yamaha S70 | User Manual - Page 41
making it much easier to edit a knob's parameter. Knob Guide: On Knob Guide: Off 7 Knob Mouse Control Determines how the knob illustrated at any note on the virtual keyboard at the bottom of the Editor window. When "Fix" is turned on, clicking any key generates the same velocity value which - Yamaha S70 | User Manual - Page 42
section lets you set the startup mode when launching the S90 XS/S70 XS Editor. Voice The editor will start in the Voice mode. Multi The editor will start in the Multi mode. @ [OK] button Click this to actually apply the settings to the S90 XS/S70 XS Editor. S90 XS/S70 XS Editor Owner's Manual 42 - Yamaha S70 | User Manual - Page 43
→ MIDI → Keyboard Transmit Ch [UTILITY] → MIDI → MIDI Sync [UTILITY] → MIDI → Clock Out [UTILITY] → MIDI → Bank Select Sw [UTILITY] → MIDI → Prg Change Sw [UTILITY] → MIDI → Local Control [UTILITY] → MIDI → Controller Reset [UTILITY] → Quick Set → Quick Setup S90 XS/S70 XS Editor Owner's Manual 43 - Yamaha S70 | User Manual - Page 44
the Multi mode, select [Initialize Current Part Voice] under [Edit] to call up the Initialize Current Part Voice window from which you can initialize the Voice assigned to the current Part by clicking [Start]. When a Normal Voice is edited: 1 2 3 4 5 6 S90 XS/S70 XS Editor Owner's Manual 44 - Yamaha S70 | User Manual - Page 45
the Editor is set to the Voice mode or Part Common parameters when the Editor is set to the Multi mode). 4 with Wave Assignment When this is turned on, clicking [Start] initializes the Waveform assignment for all Elements of the current Voice. 5 Element [1] - [8] or Drum Key C0 - C6 checkboxes When - Yamaha S70 | User Manual - Page 46
set the parameters as necessary, then click [Start] to initialize the Voice data assigned to the current Part. 1 2 4 3 5 6 7 used as a tone generator which matches the name of the selected template. 5 Part [1] - [16] checkboxes Clicking [Start] initializes the settings of all parameters for the Parts - Yamaha S70 | User Manual - Page 47
Voice is stored in the Voice mode while the Voice assigned to the current Part is stored in the Multi mode. Select the desired Bank folder (5), select the number of the destination Voice (6), input the Voice name (2), then click the [Store] button to store the Voice as a User Voice or Mixing Voice - Yamaha S70 | User Manual - Page 48
(in the Multi mode). Likewise, the Normal User Bank is shown only when the Normal Voice is selected (in the Voice mode) or the Normal Voice is assigned to the current Part (in the Multi mode). 6 Voices The Voices in the selected Bank are listed. Before clicking the [Store] button, you need to select - Yamaha S70 | User Manual - Page 49
receive the Favorites-related settings of the Preset Voice(s). Normal User 1 - 4 Turn this on then click the [Start] button to transmit or receive the data of the Normal User Voice Bank 1, 2, 3, and 4 respectively. Drum User Turn this on then click the [Start] button to transmit or receive the data - Yamaha S70 | User Manual - Page 50
completed, click the [Start] button to actually execute data transmission. 6 [Stop] button This button is available only when data transmission is being executed and allows you to cancel the transmission. [Help] menu Manual Selecting this menu calls up this manual in PDF format. About Selecting this - Yamaha S70 | User Manual - Page 51
used Start parameter is set to "On" in the Auto Sync window, data synchronization may be started set the Data Port properly then click [Start] button to execute data synchronization. As soon the Setup window. See page 39. 6 Progress Bar 7 [Start] button 8 [Stop] button These parameters are same as in - Yamaha S70 | User Manual - Page 52
Troubleshooting Troubleshooting If you encounter problems such as no sound output or abnormal behavior, verify the connections before checking the following. Sound does not change when using the knobs or sliders. • Is "ONLINE" indicated on the Editor window? • Is the lamp at left of "ONLINE"
-
 1
1 -
 2
2 -
 3
3 -
 4
4 -
 5
5 -
 6
6 -
 7
7 -
8
-
9
-
10
-
11
-
12
-
13
-
14
-
15
-
16
-
17
-
18
-
19
-
20
-
21
-
22
-
23
-
24
-
25
-
26
-
27
-
28
-
29
-
30
-
31
-
32
-
33
-
34
-
35
-
36
-
37
-
38
-
39
-
40
-
41
-
42
-
43
-
44
-
45
-
46
-
47
-
48
-
49
-
50
-
51
-
52
 |
 |

S90 XS/S70 XS Editor Owner’s Manual
1
Contents
What is the S90 XS/S70 XS Editor?
........................................
2
Studio Manager
........................................................................
2
Studio Connections
.................................................................
2
About Open Plug-in Technology
.............................................
3
Data Structure of the S90 XS/S70 XS Editor
..........................
4
Starting the S90 XS/S70 XS Editor
..........................................
5
An Example of S90 XS/S70 XS Editor in Use
.........................
6
S90 XS/S70 XS Editor Window
..............................................
12
Basic Operations
....................................................................
34
Menu
........................................................................................
36
Troubleshooting
.....................................................................
52
•
Copying of the commercially available music sequence data and/or digital audio files is strictly prohibited except for
your personal use.
•
The software and this owner’s manual are exclusive copyrights of Yamaha Corporation.
•
Copying of the software or reproduction of this manual in whole or in part by any means is expressly forbidden without
the written consent of the manufacturer.
•
Yamaha makes no representations or warranties with regard to the use of the software and documentation and cannot
be held responsible for the results of the use of this manual and the software.
•
The screen displays as illustrated in this Owner’s Manual are for instructional purposes, and may appear somewhat
different from the screens which appear on your computer.
•
The company names and product names in this Owner’s Manual are the trademarks or registered trademarks of their
respective companies.
•
Click on the
red-colored
text to jump to the related item in this manual.
© 2009 Yamaha Corporation. All rights reserved.
This owner’s manual assumes that you are already familiar with basic Windows/Macintosh operations. If you are not,
please refer to the owner’s manual which came with your Windows/Macintosh software before using the S90 XS/S70
XS Editor.
For information about hardware requirements, the interconnection of devices and the installation of the S90 XS/S70
XS Editor software, refer to the separate Installation Manual as well as the Owner’s Manual for the respective MIDI
device.
S90 XS/S70 XS Editor
Owner’s Manual
S90 XS/S70 XS Editor
Owner’s Manual