Yamaha Tyros4 Installation Guide - Page 4
Voice Editor, Installing / Updating the USB-MIDI Driver - manual
 |
UPC - 086792947280
View all Yamaha Tyros4 manuals
Add to My Manuals
Save this manual to your list of manuals |
Page 4 highlights
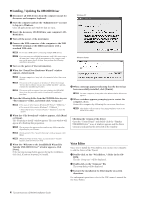
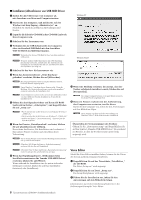
Installing / Updating the USB-MIDI Driver 1 Disconnect all USB devices from the computer except for the mouse and computer keyboard. 2 Start the computer and use the "Administrator" account to log on to Windows. Close all applications and windows that are open. 3 Insert the Accessory CD-ROM into your computer's CDROM drive. 4 Turn off the power of the instrument. 5 Connect the USB connector of the computer to the USB TO HOST terminal of the MIDI instrument with a standard USB cable. n Do not use a USB hub for connecting multiple USB devices. n If you are using several MIDI instruments with USB connection at the same time, connect all the instruments to the computer and turn on the power for all of them, then perform the following installation procedure. 6 Turn on the power of the instrument(s). 7 When the "Found New Hardware Wizard" window appears, click [Cancel]. n On some computers, it may take a few minutes before this screen appears. n This screen will not appear on Windows 7. When the message "Device driver software was not successfully installed." appears, continue the installation procedure. n This screen will not appear if you are updating the USB-MIDI driver from the previous version. Continue the installation procedure. 8 Open the following folder from the CD-ROM drive in your "My Computer" folder, and double click "setup.exe." n • For users of 32 bit version Windows XP/Vista/7: "USBdrv32_" • For users of 64 bit version Windows 7: "USBdrv64_" * Select [Start] menu → [Control Panel] → [System] to check the system. 9 When the "File Download" window appears, click [Run] or [Open]. The "Preparing to install" window appears. The next window will appear after finishing this preparation. n The messages that appear in this window may differ somewhat depending on your browser. n (Windows XP) If the "Security Warning" window appears, click [Run]. n (Windows Vista/7) If the "User Account Control" window appears, click [Continue] or [Yes]. ) When the "Welcome to the InstallShield Wizard for Yamaha USB-MIDI Driver" window appears, click [Next]. If the warning message below appears during the installation, click [Yes], [Continue Anyway], or [Install]. Windows XP Windows Vista/7 ! When a message appears indicating that the driver has been successfully installed, click [Finish]. n On some computers, it may take a few minutes before this screen appears. @ When a window appears prompting you to restart the computer, do so. Restart the computer by following the on-screen directions. n This display will not appear when using Windows Vista/7. No restart is necessary. Checking the version of the driver Open the "Control Panel" and double-click the "Yamaha USB-MIDI Driver" icon. A window appears and the driver version is indicated in the lower left of the window. Voice Editor Once you've install the Voice Editor, you can use your computer to edit the Voices of the Tyros4. 1 Double-click on the "VoiceEditor_" folder in the CD- ROM. The file "Setup.exe" will be displayed. 2 Double-click on the "Setup.exe" file. The setup dialog will be displayed. 3 Execute the installation by following the on-screen directions. For subsequent operations, refer to the PDF owner's manual for the Voice Editor. 4 Tyros4 Accessory CD-ROM Installation Guide
-
 1
1 -
 2
2 -
 3
3 -
 4
4 -
 5
5 -
 6
6 -
 7
7 -
 8
8 -
 9
9 -
 10
10 -
11
-
12
-
13
-
14
-
15
-
16
 |
 |
