Yamaha YDP-165 YDP-165_YDP-145_YDP-S55_YDP-S35_Owners Manual - Page 38
-4, box that were attached in step 1.
 |
View all Yamaha YDP-165 manuals
Add to My Manuals
Save this manual to your list of manuals |
Page 38 highlights
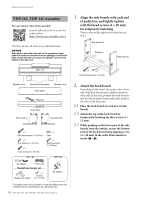
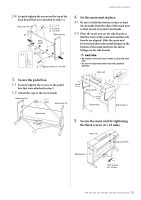
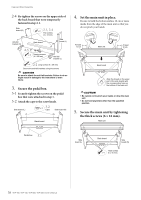
Keyboard Stand Assembly 2-4 Re-tighten the screws on the upper side of the back board that were temporarily fastened in step 2-1. Side board (R) Anti-fall bracket (R) × 2 2-1, 2-4 Thin screws (4 × 12 mm) Back board Side board (L) 2-3 × 2 Tapping screws (4 × 20 mm) Anti-fall bracket (L) 2-2 × 4 Long screws (6 × 25 mm) Secure the anti-fall brackets using the screws. CAUTION Be sure to attach the anti-fall brackets. Failure to do so might result in damage to the instrument or even injury. 3. Secure the pedal box. 3-1 Securely tighten the screws on the pedal box that were attached in step 1. 3-2 Attach the caps to the screw heads. Side board (L) × 2 3-2 Caps Side board (R) Back board 4. Set the main unit in place. Be sure to hold the bottom surface 10 cm or more inside from the edge of the main unit so that you do not pinch your hands. At least 10 cm Main unit At least 10 cm Back board Align the dowels on the upper part of the side boards with the corresponding holes on the bottom of the main unit. CAUTION • Be careful not to pinch your hands or drop the main unit. • Do not hold anywhere other than the specified position. 5. Secure the main unit by tightening the thick screws (6 × 16 mm). Main unit Pedal box 3-1 Side board (L) Back board Side board (R) Thick screws × 4 (6 × 16 mm) 38 YDP-165, YDP-145, YDP-S55, YDP-S35 Owner's Manual
-
 1
1 -
2
-
3
-
4
-
5
-
6
-
7
-
8
-
9
-
10
-
11
-
12
-
13
-
14
-
15
-
16
-
17
-
18
-
19
-
20
-
21
-
22
-
23
-
24
-
25
-
26
-
27
-
28
-
29
-
30
-
31
-
32
-
 33
33 -
 34
34 -
 35
35 -
 36
36 -
 37
37 -
 38
38 -
 39
39 -
 40
40 -
 41
41 -
 42
42 -
 43
43 -
44
-
45
-
46
-
47
-
48
 |
 |
