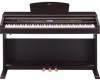
Yamaha YDP-V240 Owner's Manual
Yamaha YDP-V240 Manual
 |
View all Yamaha YDP-V240 manuals
Add to My Manuals
Save this manual to your list of manuals |
Yamaha YDP-V240 manual content summary:
- Yamaha YDP-V240 | Owner's Manual - Page 1
unit is initially shipped. To change the setting use a "minus" screwdriver to rotate the selector informations sur l'assemblage du support du clavier, reportez-vous aux instructions à la fin de , consulte las instrucciones al final de este manual. IMPORTANTE - Verifique la alimentación de corriente - Yamaha YDP-V240 | Owner's Manual - Page 2
important operating and maintenance (servicing) instructions in the literature accompanying the be sure that when it is properly installed and used in its normal and customary manner, all foreseeable in this manual is believed to be correct at the time of printing. However, Yamaha reserves the - Yamaha YDP-V240 | Owner's Manual - Page 3
uses radio frequencies and, if not installed and used according to the instructions found in the users manual problem by using one Yamaha Corporation of America Address : 6600 Orangethorpe Ave., Buena Park, Calif. 90620 Telephone : 714-522-9011 Type of Equipment : Digital Piano Model Name : YDP-V240 - Yamaha YDP-V240 | Owner's Manual - Page 4
manual serviceable parts. If it should appear to be malfunctioning, discontinue use immediately and have it inspected by qualified Yamaha service personnel. Water warning • Do not expose the instrument to rain, use AC outlet you are using is easily accessible. If some trouble or malfunction occurs, - Yamaha YDP-V240 | Owner's Manual - Page 5
ed Yamaha service Yamaha cannot be held responsible for damage caused by improper use or modifications to the instrument, or data that is lost or destroyed. Always turn the power off when the instrument is not in use. The illustrations and LCD screens as shown in this manual are for instructional - Yamaha YDP-V240 | Owner's Manual - Page 6
products that support GM System Level. XGlite As its name implies, "XGlite" is a simplified version of Yamaha's high-quality XG tone generation format. Naturally, you can play back any XG song data using an XGlite connecting peripheral devices while the power to the computer is on). 6 Owner's Manual - Yamaha YDP-V240 | Owner's Manual - Page 7
Congratulations and thank you for purchasing the Yamaha Digital Piano! Please read this owner's manual carefully before using the instrument in order to take full advantage of its various features. Make sure to keep this manual in a safe and handy place even after you finish reading, and refer to it - Yamaha YDP-V240 | Owner's Manual - Page 8
an extensive range of voices. You can change the mood of a song written for piano, for example, by using violin to play it instead. Experience a whole new world of musical variety. All display if the song you are using with the score display function does not contain the appropriate lyric and chord data. - Yamaha YDP-V240 | Owner's Manual - Page 9
Guide Changing the Display Language 16 Try Playing a Variety of Instrument Voices 17 Select and Play a Voice-MAIN 17 Play Two Voices Simultaneously-DUAL 18 Play Different Voices with the Left and Right Hands-SPLIT 19 Play the Grand Piano Voice 20 Using 107 Appendix Troubleshooting 110 - Yamaha YDP-V240 | Owner's Manual - Page 10
toward yourself as far as it will go. 2 Raise the two metal supports (at the rear of the music rest). 3 Gently lower the music rest backward until it is all the way down. 10 Owner's Manual CAUTION • Do not try to use the music rest in a half-raised position. When lowering the music - Yamaha YDP-V240 | Owner's Manual - Page 11
the two (page 104). To use the USB data-transfer features you'll instrument is set to OFF, then use an AB type USB cable to connect on the "Accessory CD-ROM Installation Guide". Turning the Power On Power indicator the minimum level. When you are not using the instrument for a long time, make - Yamaha YDP-V240 | Owner's Manual - Page 12
you are using only one pair of headphones, you can plug them into either jack.) Bottom surface PHONES Standard stereo phone plug Using the Headphone so that you can hang the headphoneson this instrument. Install the headphone hanger using the included two screws (4 x 10mm) as shown in the figure - Yamaha YDP-V240 | Owner's Manual - Page 13
bench periodically. ■ Pedal Cleaning As with an acoustic piano, pedals may become tarnished across the ages. When this occurs, polish the pedal with a compound designed for piano pedals. Before using the compound, make sure to read the instructions CAUTION • Do not use paint thinners, solvents, - Yamaha YDP-V240 | Owner's Manual - Page 14
Panel Controls and Terminals Front Panel w e r tyui o !0 !1 !2 !3 !4 !5 !6 !7 !8 !9 #9 q PHONES #8 #7 USB $0 TO HOST 14 Owner's Manual PEDAL #6 q Voice Category List (page 126) Style Category List (page 134) Song Category List (page 35) Music Database List (page 135) - Yamaha YDP-V240 | Owner's Manual - Page 15
q Power switch page 11 w [MASTER VOLUME] control ...........pages 11, 66 e [DEMO] button page 32 r FILE CONTROL [MENU], [EXECUTE] buttons pages 95-101 t OFF] button page 70 #2 [DSP ON/OFF] button page 73 #3 [PIANO RESET] button page 20 #4 REGIST MEMORY [MEMORY/BANK], [1], [2] buttons Manual 15 - Yamaha YDP-V240 | Owner's Manual - Page 16
Guide This instrument allows you to select English or Japanese as the display language. The default display language is English, but if you switch to Japanese the lyrics, file names, demo below the "Language" item. When highlighted you can use the [+] and [-] buttons to select the language as Manual - Yamaha YDP-V240 | Owner's Manual - Page 17
Playing a Variety of Instrument Voices In addition to piano, organ, and other "standard" keyboard instruments, this instrument has a large range of voices that includes guitar, bass, strings, sax, trumpet, drums and to return to the MAIN display. Select 106 Flute Adjusts volume. Owner's Manual 17 - Yamaha YDP-V240 | Owner's Manual - Page 18
The currently selected dual voice 3 Select the desired dual voice. Watch the displayed dual voice and rotate the dial until the voice you want to use is selected. The voice selected here becomes the dual voice. For this example try selecting the "124 Vibraphone" voice. 18 Owner - Yamaha YDP-V240 | Owner's Manual - Page 19
a second. The split voice selection display will appear. Voice Number Split voice selection display Hold for longer than a second The currently selected split voice Owner's Manual 19 - Yamaha YDP-V240 | Owner's Manual - Page 20
use 042 Folk Guitar" voice. Piano" voice will be selected. NOTE • When you press the [PIANO RESET] button all settings other than touch sensitivity are turned off. The dual and split voices will also be turned off, so only the Grand Piano voice will play over the entire keyboard. 20 Owner's Manual - Yamaha YDP-V240 | Owner's Manual - Page 21
Using the Pedals The instrument has three foot pedals that produce a range of expressive effects similar to those produced by the pedals on an acoustic piano you play before you release the pedal have a longer sustain. Sostenuto (Center) Pedal If you play a note or chord on the keyboard and Manual 21 - Yamaha YDP-V240 | Owner's Manual - Page 22
keyboard. ◆ Sound Effect Selection Procedure ➔ (refer to steps 1 and 2 on page 17) 1 Press the [VOICE] button. 2 Use the dial to select "143 SFX Kit 2". 3 Try out each key and enjoy the sound effects! As you try out the various 1" and "SFX Kit 2" in the "Drum Kit List" on page 133. 22 Owner's Manual - Yamaha YDP-V240 | Owner's Manual - Page 23
, press the [METRONOME ON/OFF] button again. 4/4 Current setting Adjusting the Metronome Tempo 1 Press the [TEMPO/TAP] button to call up the tempo setting. Tempo 2 Use the dial to select a tempo from 5 to 280. Owner - Yamaha YDP-V240 | Owner's Manual - Page 24
beats per measure.) Denominator (The length of one beat.) f r 2 Use the dial to select the number of beats per measure. The available range so these parameters cannot be changed while a style or song is playing. 4 Use the dial to select the beat length. Select the required length for each beat: - Yamaha YDP-V240 | Owner's Manual - Page 25
Use the CATEGORY [ ] and [ ] buttons to select the Bell item. r f 3 You can then use the [+] and [-] buttons to turn the bell sound on or off. Adjusting the Metronome Volume 1 Press the [FUNCTION] button. 2 Use the CATEGORY [ ] and [ ] buttons to select the Metronome Volume item. r f 3 Use - Yamaha YDP-V240 | Owner's Manual - Page 26
from a computer or stored on a USB flash memory device connected to the instrument can be selected and used in the same way as the internal Styles (Style numbers 161-). File transfer instructions are provided on page 107. 3 Press the [START/STOP] button. The style rhythm will start playing. Press - Yamaha YDP-V240 | Owner's Manual - Page 27
the keyboard to the left of the split point (054: F#2) becomes the "auto accompaniment region" and is used only for specifying the accompaniment chords. Split point (054: F#2) NOTE • The keyboard split point can be the sync start function on. Flashes when sync start is on. Owner's Manual 27 - Yamaha YDP-V240 | Owner's Manual - Page 28
when you're done. You can switch style "sections" to add variety to the accompaniment. Refer to "Pattern Variation (Sections)" on page 79. 28 Owner's Manual - Yamaha YDP-V240 | Owner's Manual - Page 29
it's own unique "color"-even if it's different fingerings of the same chord-the chords you choose to use in your chord progressions have a huge influence on the overall feel of the music you play. On page rit.] button and the auto accompaniment function will create a perfect ending. Owner's Manual 29 - Yamaha YDP-V240 | Owner's Manual - Page 30
Playing Styles Recommended Style 148 Piano Boogie -3-chord boogie-woogie- Press the [INTRO/ENDING/rit.] button. C F C G F C Press the [INTRO/ENDING/rit.] button. This it through several times. When you're ready to stop playing press the [INTRO/ENDING/rit.] button. 30 Owner's Manual - Yamaha YDP-V240 | Owner's Manual - Page 31
keys ■Easy Chords This method lets you easily play chords in the accompaniment range of the keyboard using only one, two, or three fingers. C • To play a major chord Press the Csus2 * Notes enclosed in parentheses ( ) are optional; the chords will be recognized without them. Owner's Manual 31 - Yamaha YDP-V240 | Owner's Manual - Page 32
to a demo song and 29 internal songs, or use them demo song and 29 songs provided. Song Listen Lesson Play the Demo song 1 Press the [DEMO] button The demo song will start playing. Record To stop demo play back at any time, press the [DEMO] button or [START/STOP] button. or 32 Owner's Manual - Yamaha YDP-V240 | Owner's Manual - Page 33
] button The song selection display will appear. The currently selected song number and name will be highlighted. Using Songs The currently selected song number and name 2 Select a song. Select a song after referring to by pressing the [START/STOP] button again. Song start! Owner's Manual 33 - Yamaha YDP-V240 | Owner's Manual - Page 34
can change the song tempo as required. Press the [TEMPO/TAP] button. The tempo display will appear and you can use the dial, the [+] and [-] buttons, or the [0] to [9] number buttons to set to tempo to anywhere from buttons. Press the [EXIT] button to return to the MAIN display. 34 Owner's Manual - Yamaha YDP-V240 | Owner's Manual - Page 35
ideas as to how the songs can most effectively used. Category Main Demo Voice Demo Function Demo Piano Solo Piano Ensemble Piano Accompaniment No. 1 CHORD 2 CHORD 3 CHORD CD-ROM. The scores for songs 9-11 are provided in this manual. Some of the classic and/or traditional songs have been edited - Yamaha YDP-V240 | Owner's Manual - Page 36
songs can be used by this instrument. ● Demo Song and Preset for instructions on how to transfer the songs to the instrument. The chart below shows the basic processes flow for using the display and can be used with the lesson features. NOTE • Different flash memory areas are used to store user songs - Yamaha YDP-V240 | Owner's Manual - Page 37
song has a lot of lyrics. • Small notes that are hard to read may be easier to read after you use the quantize function (page 94). Chord Lyrics Double-staff NOTE • No chords or lyrics are shown on the double-staff . 4 Press the [EXIT] button to return to the MAIN display. Owner's Manual 37 - Yamaha YDP-V240 | Owner's Manual - Page 38
Using Songs Display the Lyrics If a song contains lyric data, the lyrics can highlighted to show the current location in the song. Lyrics and chord display ■ Preset Songs That Can be Used For Lyrics Display Number 016 020 030 Name Mona Lisa (Jay Livingston and Ray Evans) Against All Odds ( - Yamaha YDP-V240 | Owner's Manual - Page 39
Piano melody. So even if you can't play piano and can't read a note of music play simple right-hand melodies but have trouble with left- hand chords, this is you to easily play chords to support the melody you are playing with using the Chord type. Split point Refer to page 48 for more information on - Yamaha YDP-V240 | Owner's Manual - Page 40
The Easy Way to Play Piano CHORD Type-Play with Both Hands 1 Press the [P.A.T. ON/ that makes up a complete song. The performance assistant technology features uses the chord and melody data, and should always be used with a song (page 32). 40 Owner's Manual The song displayed here will be played. - Yamaha YDP-V240 | Owner's Manual - Page 41
4 Press the [START/STOP] button. The Easy Way to Play Piano Song playback will begin. The basic pattern will play repeatedly. Listen to the basic pattern for four measures while assistant technology type is normally shown. NOTE • The score for Ave Maria is provided on page 122. Owner's Manual 41 - Yamaha YDP-V240 | Owner's Manual - Page 42
The Easy Way to Play Piano CHORD/FREE Type-Applying the using the dial. 3 Select a song. Press the [SONG] button, and the Song Select display appears. Select a song by using the dial. For this example try selecting the "011 Nocturne". Select Chord/Free NOTE • Using Songs (page 32) 42 Owner's Manual - Yamaha YDP-V240 | Owner's Manual - Page 43
4 Press the [START/STOP] button. The Easy Way to Play Piano Song playback will begin. The left-hand keys you should play will be shown on the display. 5 Play feature off. "..." will appear on the display where the performance assistant technology type is normally shown. Owner's Manual 43 - Yamaha YDP-V240 | Owner's Manual - Page 44
The Easy Way to Play Piano MELODY Type-Play with One Finger See page 48 for some hints on how to type by using the dial. 3 Select a song. Press the [SONG] button, and the Song Select display appears. Select a song by using the dial. Select Melody NOTE • Using Songs (page 32) 44 Owner's Manual The - Yamaha YDP-V240 | Owner's Manual - Page 45
The Easy Way to Play Piano 4 Press the [START/STOP] button. in the display. Sounds like a melody! How does it sound? You've played the melody using only one finger thanks to the performance assistant technology Melody type! You can stop song playback type is normally shown. Owner's Manual 45 - Yamaha YDP-V240 | Owner's Manual - Page 46
The Easy Way to Play Piano CHORD/MELODY-Chord Type with the Left Hand, Melody with the Right 1 Press the second so that the performance assistant technology type appears. Select the Chord/Melody type by using the dial. 3 Select a song. Press the [SONG] button, and the Song Select display appears. Select a - Yamaha YDP-V240 | Owner's Manual - Page 47
4 Press the [START/STOP] button. The Easy Way to Play Piano Song playback will begin. The basic pattern will repeat. Listen to eight measures while memorizing the basic off. "..." will appear on the display where the performance assistant technology type is normally shown. Owner's Manual 47 - Yamaha YDP-V240 | Owner's Manual - Page 48
Piano Use the Performance Assistant to Play Like a Pro! Here are a few hints for using the Chord type. If you select Chord/Free or Chord/Melody, the left-hand section of the keyboard becomes the Chord type section, so use combination. Play 3 notes at once with your right hand. 48 Owner's Manual - Yamaha YDP-V240 | Owner's Manual - Page 49
Piano Make Use of the Score in the Melody Type. If you want to play the melody with the correct rhythm, use used button you can use the Chord type can use the used with the performance assistant technology as long as they include the required chord and/or melody data. See page 108 for instructions - Yamaha YDP-V240 | Owner's Manual - Page 50
Yamaha Education Suite You can select song you like and use it for a left-hand, right-hand, or both-hands lesson. You can also use Select a song from the Piano Solo, Piano Ensemble category! Select the demos for performance assistant. The lesson function cannot be used with them. 50 Owner's Manual - Yamaha YDP-V240 | Owner's Manual - Page 51
Select a song for your lesson. Press the [SONG] button, and rotate the dial to select the song you want to use for your lesson. As listed on page 35 there are a variety of song types. 2 Press [EXIT] button to lesson. Select L for left-hand lesson. Select LR for bothhands lesson. Owner's Manual 51 - Yamaha YDP-V240 | Owner's Manual - Page 52
triangular marker (▼) above the score indicates playback progress. ▼ Marker Left-hand part Right-hand part ● Marker (In the case of a right-hand lesson) 52 Owner's Manual - Yamaha YDP-V240 | Owner's Manual - Page 53
marker will appear on the appropriate key in the display). Notes that actually fall outside the keyboard's range cannot be used in the lesson. 5 Stop the Lesson mode You can stop the Lesson mode at any time by pressing the can be turned off via the FUNCTION Grade item (page 94). Owner's Manual 53 - Yamaha YDP-V240 | Owner's Manual - Page 54
can stop the Lesson mode at any time by pressing the [START/ STOP] button. Once you've mastered Lesson 2, move on to Lesson 3. 54 Owner's Manual - Yamaha YDP-V240 | Owner's Manual - Page 55
case of a right-hand lesson) 3 Stop the Lesson mode. You can stop the Lesson mode at any time by pressing the [START/ STOP] button. Owner's Manual 55 - Yamaha YDP-V240 | Owner's Manual - Page 56
Select a Song For a Lesson Practice Makes Perfect-Repeat and Learn Use this feature when you want to start again just ahead of a section on which you made a playback. e Jump back 4 measures and repeat playback Song playback direction q Oops! A mistake! w Press immediately 56 Owner's Manual - Yamaha YDP-V240 | Owner's Manual - Page 57
list on the panel or Music Database List on page 135 of the manual, use the dial to select a music database. Select one that matches the image instrument can be selected and used in the same way as the internal Music Databases (MDB numbers 301-). File transfer instructions are provided on page 107. - Yamaha YDP-V240 | Owner's Manual - Page 58
1 Press the [EASY SONG ARRANGER] button. The Song Select display will appear. The currently selected song name and number will be highlighted. 2 Select a Song. Use the dial to select the song you want to arrange. 58 Owner's Manual The currently selected song number and name are displayed here. - Yamaha YDP-V240 | Owner's Manual - Page 59
and 020 to 030 while using the Easy Song Arranger, melody • Because the Easy Song Arranger uses song data you can't specify signature of the song will be used. The Melody R and Melody play as a song melody. Use the dial to change the Use the [START/STOP] button to stop playback completely. Owner - Yamaha YDP-V240 | Owner's Manual - Page 60
■ Recordable Data 5 melody tracks and 1 Style (chord) track can be recorded. To record your own performance, first use the SONG MEMORY [1]-[5] and [A] buttons to specify the track(s) you want to record on. ● SONG MEMORY (Track) are recording or playing back other tracks (page 89). 60 Owner's Manual - Yamaha YDP-V240 | Owner's Manual - Page 61
Record Your Own Performance Recording Procedure 1 From the MAIN display press the [SONG] button, then use the dial to select the user song number (031-035) you want to record to. Rotate a second time. Style accompaniment cannot be turned on or off while recording is in progress. Owner's Manual 61 - Yamaha YDP-V240 | Owner's Manual - Page 62
• If the memory becomes full during recording a warning message will appear and recording will stop automatically. Use the song clear or track clear (page 63) function to delete unwanted data and make more room the save confirmation message appears, then press the [+/YES] button. 62 Owner's Manual - Yamaha YDP-V240 | Owner's Manual - Page 63
Press the [SONG] button from the MAIN display. 2 The current song number/name will be highlighted-use the dial to select the user song (031-035) you want to play. 3 Press the [START/ a specific track from a user song use the Track Clear function. Hold for longer than a second Press and hold Owner - Yamaha YDP-V240 | Owner's Manual - Page 64
the [+] button to clear the track. The clear-in-progress message will appear briefly on the display while the track is being cleared. 64 Owner's Manual - Yamaha YDP-V240 | Owner's Manual - Page 65
power is turned off. If you want to initialize the settings, use the Initialize operation as explained below. ● The Backup Parameters • Registration , Style Volume, Song Volume, Metronome Volume, Grade, Demo Cancel, Language Selection, Sustain, Sound Type, Chord Fingering Owner's Manual 65 - Yamaha YDP-V240 | Owner's Manual - Page 66
on the following simple operations. 1 Press a button to select a basic function. 2 Use the dial to select an item or value. 3 Start a function. 3 Start a song you want to listen to or a song you want to use for a lesson. Select an auto-accompaniment style. Select a voice you want to play - Yamaha YDP-V240 | Owner's Manual - Page 67
can be used to directly enter a song number or parameter value. Hundreds or tens digits that are use the dial or [+] and [-] buttons to select the item. This can be particularly handy when you have to select from a large number of voices. In most procedures described throughout this owner's manual - Yamaha YDP-V240 | Owner's Manual - Page 68
functions. Press the CATEGORY button(s) as many times as necessary until the required function appears. You can then use the dial, the [+] and [-] buttons, or the number [0]-[9] buttons to adjust the value of the . This provides convenient direct access to a range of functions. 68 Owner's Manual f r - Yamaha YDP-V240 | Owner's Manual - Page 69
after selecting a style. When showing the keyboard range to the left of the split point is used for accompaniment chord recognition. Appears when the synchro-stop function is engaged. The style pattern name. track that is being played. No border appears around a Muted track. Owner's Manual 69 - Yamaha YDP-V240 | Owner's Manual - Page 70
the harmony icon will appear in the display. The currently selected harmony type 3 Use the dial to select a harmony type. Refer to the Effect Type List on is on (page 27). • Harmony type 15 to 18 (Echo) 70 Owner's Manual Keep holding down the keys. • Harmony type 19 to 22 (Tremolo) • Harmony - Yamaha YDP-V240 | Owner's Manual - Page 71
you select a style or song the optimum reverb type for the voice used is automatically selected. If you want to select a different reverb type, use the procedure described below. Refer to the Effect Type List on page 138 applied to the main, dual, and split voices. (See page 93). Owner's Manual 71 - Yamaha YDP-V240 | Owner's Manual - Page 72
the optimum chorus type for the voice used is automatically selected. If you want to select a different chorus type, use the procedure described below. 1 Press how the selected chorus type sounds by playing on the keyboard. f r 2 Use the CATEGORY [ ] and [ ] buttons to select the Chorus Type item. - Yamaha YDP-V240 | Owner's Manual - Page 73
DSP DSP is term of abbreviated form of Digital Signal Processor. The DSP effect can be added other dynamic processing tools that let you enhance the sound, or completely transform it. 1 Use the [DSP ON/OFF] button to turn the DSP function on. The indicator lights DSP Type Owner's Manual 73 - Yamaha YDP-V240 | Owner's Manual - Page 74
Effects Adding Sustain This function adds sustain to the keyboard voices. Use it when you want to add sustain to the voices at voice. 1 Press the [FUNCTION] button to call up the FUNCTION display. 3 You can then use the [+] and [-] buttons to turn sustain on or off. NOTE • The sustain of some - Yamaha YDP-V240 | Owner's Manual - Page 75
] button. The currently selected function will appear in the display. 3 Use the dial to select a touch sensitivity setting between 1 and 3. Higher keys. NOTE • The initial default touch sensitivity setting is "2". f r 2 Use the CATEGORY [ ] and [ ] buttons to select the Touch Sensitivity item. - Yamaha YDP-V240 | Owner's Manual - Page 76
feature. 1 Select voice number "000" (steps 1 to 2 on page 17). 4 Use the dial to change songs, then play the keyboard and listen to the voice. Use the dial to select voice number 000. 2 Select and play back any song (steps the [START/STOP] button to start playback again. 76 Owner's Manual - Yamaha YDP-V240 | Owner's Manual - Page 77
sound type for the internal speakers from piano sound or style sound. 1 Press and hold the [PIANO PRESET] button for longer than a Use the dial to select the desired Sound Type. Select Piano when you want to play only a piano sound, or select Style when you want to play a style. NOTE • When using - Yamaha YDP-V240 | Owner's Manual - Page 78
button. 2 Use the CATEGORY [ ] and [ ] buttons to select the Transpose item. f r f r 2 Use the CATEGORY [ ] and [ ] buttons to select the Tuning item. Transpose item Can be set between -12 and +12 3 Use be set between -100 and +100 3 Use the dial to set the tuning value between - Yamaha YDP-V240 | Owner's Manual - Page 79
Guide. Here are some other ways you can play the styles, the style volume adjustment procedure, how you can play chords using ll ● INTRO section This is used for the beginning of the Song ● MAIN section This is used for playing the main part B. ● ENDING section This is used for the ending of the Song. - Yamaha YDP-V240 | Owner's Manual - Page 80
a chord in the accompaniment range of the keyboard. You can disengage the synchro-start standby mode by pressing the [SYNC START] button again. 80 Owner's Manual Accompaniment range - Yamaha YDP-V240 | Owner's Manual - Page 81
the ending is playing back. The style will play while you are playing the keys Style playback will stop when you release the keys Owner's Manual 81 - Yamaha YDP-V240 | Owner's Manual - Page 82
key), but you can change it to another key using the procedure described below. Split point (054: F#2) FUNCTION] button. 2 Use the CATEGORY [ ] and [ ] but- tons to select the Split point item. f r f r 3 Use the dial to set using the CATEGORY [ ] and [ ] buttons to locate the item (page 92). 82 - Yamaha YDP-V240 | Owner's Manual - Page 83
", and any of the chord fingerings recognized by the instrument can be used (page 31). Press the [ACMP ON/OFF] button to turn auto 1 Press the [FUNCTION] button. 2 Use the CATEGORY [ ] and [ ] buttons to select the Style Volume item. f r 3 Use the dial to set the style volume between - Yamaha YDP-V240 | Owner's Manual - Page 84
is the chord's "root position" ... using other chord notes for the lowest note results in "inversions"). The root is the central sound of the chord, which supports and anchors the other chord notes. The chord Flatted 5 th Minor 7 th chord Flatted 7 th Suspended 4 th chord 84 Owner's Manual - Yamaha YDP-V240 | Owner's Manual - Page 85
• A perfect fifth (1 + 5) produces accompaniment based only on the root and fifth which can be used with both major and minor chords. • The chord fingerings listed are all in "root" position, but other inversions • Two-note fingerings will produce a chord based on the previously played chord. Owner's Manual 85 - Yamaha YDP-V240 | Owner's Manual - Page 86
Style (Auto-accompaniment) Functions Playing Styles Using the Entire Keyboard In "Play Along with a Style" on page 27 we [ACMP ON/OFF] button for longer than a second to select the function "Chord Fingering". 2 Use the dial to select 2 "FullKeyboard". Hold for longer than a second 86 Owner - Yamaha YDP-V240 | Owner's Manual - Page 87
Style (Auto-accompaniment) Functions Looking Up Chords Using the Chord Dictionary The Dictionary function is essentially a built-in "chord book" that shows you the individual notes of and the chord name in the display flash. Press the [EXIT] button to return to the MAIN display. Owner's Manual 87 - Yamaha YDP-V240 | Owner's Manual - Page 88
[ ] buttons to select the Song Volume item. f r Song volume item Can be set between 000 and 127 3 Use the dial to set the song volume between 000 and 127. NOTE • Song volume can be adjusted while a song is song press the [A-B REPEAT] button before starting playback of the song. 88 Owner's Manual - Yamaha YDP-V240 | Owner's Manual - Page 89
"LR" appears in the upper right corner of the MAIN display. Select the song and play it. 2 Use the dial to select the voice. As you select different melody voices, only the melody voice changes while the between VOICE SELECT MELODY R and MELODY L. Hold for longer than a second Owner's Manual 89 - Yamaha YDP-V240 | Owner's Manual - Page 90
order to check the bank and registration memory numbers. Bank number 3 Use the dial or the [1]-[8] number buttons to select a bank number from be saved to the registration memory during song play- back. 90 Owner's Manual Bank number NOTE • You can also save your panel settings memorized to - Yamaha YDP-V240 | Owner's Manual - Page 91
, Harmony Volume • Other settings Transpose * Style settings are not available for Registration Memory when using the Song features. You can check whether the panel settings are stored in registration memory 1 want to recall. The panel controls will be instantly set accordingly. Owner's Manual 91 - Yamaha YDP-V240 | Owner's Manual - Page 92
and [-] buttons, or the [0]-[9] number buttons to set the selected function as required. The [+] and [-] buttons are used to make ON/ OFF type settings: [+] = ON, [-] = OFF. In some cases the [+] button will initiate described in the "Initialization" section on page 65. Value 92 Owner's Manual - Yamaha YDP-V240 | Owner's Manual - Page 93
Main Pan 000 (left)- 64 (center)- 127 (right) Determines the pan position Dual Pan 000 (left)- 64 (center)- 127 (right) Determines the pan Pan 000 (left)- 64 (center)- 127 (right) Determines the pan Piano/Style Determines the sound type, optimizing it either for a simple, pure piano sound - Yamaha YDP-V240 | Owner's Manual - Page 94
the minimum timing resolution used in the song. 1-16 Determines the guide track number for your 1-16 Determines the guide track number for Demo Cancel ON/OFF Determines whether Demo cancel is enabled or not. When this is set to ON, the Demo Song will not play, even if the [DEMO here is used. * - Yamaha YDP-V240 | Owner's Manual - Page 95
and loading data to and from them. Before using a USB device, read through the "Precautions when using the USB TO DEVICE terminal" section on page 96 display. (Do not press this button now, but only when instructed to in the sections below.) Menu Format User File Save User . Owner's Manual 95 - Yamaha YDP-V240 | Owner's Manual - Page 96
The instrument does not necessarily support all commercially available USB devices. Yamaha cannot guarantee operation of USB devices that you purchase. Before purchasing a USB device for use with this instrument, please visit so may corrupt the data on either or both devices. 96 Owner's Manual - Yamaha YDP-V240 | Owner's Manual - Page 97
of the data will be erased. Be careful not to erase important data when using the format function. 1 After connecting the USB flash memory to be formatted the display and you will not be able to execute the operation. f r 3 Use the CATEGORY [ ] and [ ] buttons to select the Format item. The display - Yamaha YDP-V240 | Owner's Manual - Page 98
the cursor to the left, and the [0] button moves it to the right. • Use the dial to select a character for the current cursor location. • The [+] button deletes the character at the cursor location. 98 Owner's Manual Cursor 6 Press the [EXECUTE] button. The display prompts you for confirmation. You - Yamaha YDP-V240 | Owner's Manual - Page 99
● To Overwrite an Existing File If you want to overwrite a file that already exists on the USB flash memory, use the dial or the [+] and [-] buttons to select the file, then skip ahead to step 7. 8 Press the [ button. A cursor will appear below the first character in the file name. Owner's Manual 99 - Yamaha YDP-V240 | Owner's Manual - Page 100
load connected to the USB TO DEVICE connector, check that the File Control icon is shown in the MAIN display. 4 Use the dial to select the file you want to load. All user files in the USB flash memory will be has finished. Press the [EXIT] button to return to the MAIN display. 100 Owner's Manual - Yamaha YDP-V240 | Owner's Manual - Page 101
is showing in the MAIN display. 2 Press the FILE CONTROL [MENU] button. 3 Use the CATEGORY [ ] and [ ] buttons to locate the USB Delete item. f r 4 Use the dial to select the file you want to delete. All User files in the display and you will not be able to execute the operation. Owner's Manual 101 - Yamaha YDP-V240 | Owner's Manual - Page 102
does not erase the preset data. 1 Press the FILE CONTROL [MENU] button. 2 Use the CATEGORY [ ] and [ ] but- tons to locate the User Delete item. the MAIN display. Song File Song File Song File Song File 102 Owner's Manual Can be selected/played. Cannot be selected/played. 2 Press the [SONG], - Yamaha YDP-V240 | Owner's Manual - Page 103
Connections Connectors q w USB TO HOST q USB TO DEVICE terminal This terminal allows connection to USB storage devices. Refer to "Precautions when using the USB TO DEVICE terminal" on page 96. w USB TO HOST terminal This terminal allows direct connection to a personal computer. Refer to " - Yamaha YDP-V240 | Owner's Manual - Page 104
flash memory. For instructions about how to install Musicsoft Downloader (refer to included "Accessory CD-ROM Installation Guide") and how to transfer or turn the power to the instrument off then on again. CAUTION • Use an AB type USB cable of less than about 3 meters. • Before Owner's Manual - Yamaha YDP-V240 | Owner's Manual - Page 105
By connecting the instrument to a computer, the instrument's performance data can be used on the computer, and performance data from the computer can be played on not start. 1 Press the [FUNCTION] button. f r 2 Use the CATEGORY [ ] and [ ] buttons to select the item you want to change its value - Yamaha YDP-V240 | Owner's Manual - Page 106
and the instrument. * Set the PC mode to PC2 when using Digital Music Notebook. Local External Clock Song Out Style Out Keyboard Out PC1 and hold the [DEMO] button for longer than a second so that the PC Mode item appears. Hold for longer than a second. 2 Use the dial to select 106 Owner's Manual - Yamaha YDP-V240 | Owner's Manual - Page 107
[-/NO] to cancel. f r 2 Use the CATEGORY [ ] and [ ] buttons Accessory CD-ROM Installation Guide" for installation details. common and widely compatible sequence formats used for storing sequence data. There are Use the Musicsoft Downloader application with Internet Explorer 5.5 or higher. - Yamaha YDP-V240 | Owner's Manual - Page 108
Use refer to "Accessory CD-ROM Installation Guide"). 2 Insert the included CD-ROM to a USB flash memory root directory using the Musicsoft Downloader-any location outside the USER be deleted via the instrument's file control display. Use the Musicsoft Downloader delete button to delete such files - Yamaha YDP-V240 | Owner's Manual - Page 109
in flash memory for which you want to set the guide track. 2 Press the [FUNCTION] button. 3 Use the CATEGORY [ ] and [ ] buttons to select the R-Part or L-Part item. 4 Use the dial to select the channel you want to play it will not be recognized when transferred to the instrument. Owner's Manual 109 - Yamaha YDP-V240 | Owner's Manual - Page 110
Troubleshooting ■ For the Instrument Problem Possible Cause and Solution When the instrument is turned on or off, a popping This is normal and indicates that the instrument is receiving electrical sound is temporarily produced. power. When using a mobile phone, noise is produced. Using Demo - Yamaha YDP-V240 | Owner's Manual - Page 111
Troubleshooting Problem Possible Cause and Solution The wrong the [STYLE] button lit? Always press the [STYLE] button first when you are going to use any style-related function. There is no harmony sound. The harmony effects (01-26) behave differently power of the instrument. Owner's Manual 111 - Yamaha YDP-V240 | Owner's Manual - Page 112
Musicsoft Downloader. Displayed while writing data in the memory. Never turn the power off while writing. Doing so may result in data loss. 112 Owner's Manual - Yamaha YDP-V240 | Owner's Manual - Page 113
... Rename File Save OK ? Saved data is not found. Saving... Send OK? Sending... "Since the media is in use now, this function is not available." Style data is too large to load. Sure ? [YES/NO] "The limit of are listed in the table: the messages neces- sary to be explained only. Owner's Manual 113 - Yamaha YDP-V240 | Owner's Manual - Page 114
screws of the correct size in the correct hole locations. Do not use any other screws. Use of incorrect screws can cause damage or malfunction of the product. • Be C Bundled pedal cord inside AC power cord (x 1) Headphone hanger (x 1) D E Cord holders (x 2) Adjuster (x 1) 114 Owner's Manual - Yamaha YDP-V240 | Owner's Manual - Page 115
outside part of D and E towards each other, secure the bottom of B at each end using two tapping screws (4 x 20mm). 3-4 Insert the other two tapping screws (4 x 20mm) into D C 3-3 3-4 4 Secure C. 4-1 Securely tighten the screws on C that were attached in Step 2-2. D B E C 4-1 Owner's Manual 115 - Yamaha YDP-V240 | Owner's Manual - Page 116
which is provided in some areas. To set the selector for 110V, 127V, 220V or 240V main voltages, use a "minus" screwdriver to rotate the selector dial so that the correct voltage for your region appears next AC power cord plug into the AC INLET. PEDAL 7-1 6-2 7-3 7-2 7-5 7-4 116 Owner's Manual - Yamaha YDP-V240 | Owner's Manual - Page 117
floor surface. 9 Attach the headphone hanger. 9-1 Install the headphone hanger using included two screws (4 x 10mm) as shown in the figure. ■ , please check the following. • Are there any parts left over? ➔ Review the assembly procedure and correct any errors. • Is this instrument clear of Manual 117 - Yamaha YDP-V240 | Owner's Manual - Page 118
P.A.T. ON/OFF 15, 40, 48 PAUSE 15, 34 PC 106 PEDAL 15 PHONES 15 PIANO RESET 15, 20 REC, 1-5, A 15, 60 REGIST. MEMORY 15, 90 REPEAT & LEARN USB flash memory 101 Delete (User Data 102 Delete (User Song 63 Demo 32 Demo Cancel 94 Display 68-69 Double-Staff Score 37 Drum Kit 22 Drum Manual - Yamaha YDP-V240 | Owner's Manual - Page 119
81 T Tempo 34, 75 TimeSignature (Denominator, Numerator 24 Touch Response 75 Touch Sensitivity 75 Track 60 Track Clear 64 Transfer 105, 107 Transpose 78 Troubleshooting 110 Tuning 78 U USB 103 USB-MIDI driver 11 User file 98, 100 User File Save 98 User Song 36, 60 V Voice 17 Voice - Yamaha YDP-V240 | Owner's Manual - Page 120
Noten / Partitions / Partituras This demo is an example of how the Easy Song Arranger can be used to change styles throughout a piece. Song No. 9 q =123 Hallelujah Chorus (Function Demo for Easy Song Arranger) 120 Owner's Manual / Bedienungsanleitung / Mode d'emploi / Manual de instrucciones - Yamaha YDP-V240 | Owner's Manual - Page 121
Scores / Noten / Partitions / Partituras Owner's Manual / Bedienungsanleitung / Mode d'emploi / Manual de instrucciones 121 - Yamaha YDP-V240 | Owner's Manual - Page 122
feature. If you play the "Play These Notes" part using the performance assistant technology feature, the part will be corrected Demo for performance assistant technology) P.A.T. Type =CHORD Your Turn. Repeatedly Play the Same Key. 122 Owner's Manual / Bedienungsanleitung / Mode d'emploi / Manual - Yamaha YDP-V240 | Owner's Manual - Page 123
Scores / Noten / Partitions / Partituras Owner's Manual / Bedienungsanleitung / Mode d'emploi / Manual de instrucciones 123 - Yamaha YDP-V240 | Owner's Manual - Page 124
technology feature. If you play the "Play These Notes" part using the performance assistant technology feature, the part will be corrected and played Function Demo for performance assistant technology) P.A.T. Type =CHORD/FREE 124 Owner's Manual / Bedienungsanleitung / Mode d'emploi / Manual - Yamaha YDP-V240 | Owner's Manual - Page 125
Scores / Noten / Partitions / Partituras Owner's Manual / Bedienungsanleitung / Mode d'emploi / Manual de instrucciones 125 - Yamaha YDP-V240 | Owner's Manual - Page 126
includes MIDI program change numbers for each voice. Use these program change numbers when playing the instrument MIDI pour chaque voix. Utilisez ces derniers pour commander le YDP-V240 à partir d'un périphérique MIDI. • Les numé Manual / Bedienungsanleitung / Mode d'emploi / Manual de instrucciones - Yamaha YDP-V240 | Owner's Manual - Page 127
024 Bandoneon 023 Modern Harp 023 Harmonica GUITAR 025 Classical Guitar 026 Folk Guitar 027 Jazz Guitar 028 60's Clean Guitar 026 12Strings Guitar 028 Clean Guitar 027 Octave Guitar 029 Muted Guitar 030 Overdriven Guitar 031 Distortion Guitar BASS 034 Finger Bass 033 Acoustic Bass - Yamaha YDP-V240 | Owner's Manual - Page 128
(1-128) XG PIANO 001 Grand Piano 001 Grand Piano KSP 001 Piano Strings 001 Dream 002 Bright Piano 002 Bright Piano KSP 003 Electric Grand Piano 003 Electric Grand Piano KSP 003 Detuned CP80 004 Honky-tonk Piano 004 Honky-tonk Piano KSP 005 Electric Piano 1 005 Electric Piano 1 KSP 005 - Yamaha YDP-V240 | Owner's Manual - Page 129
Amp 028 Clean Guitar 028 Chorus Guitar 029 Muted Guitar 029 Funk Guitar 029 Muted Steel Guitar 029 Jazz Man 030 Overdriven Guitar 030 Guitar Pinch 031 Distortion Guitar 031 Feedback Guitar 031 Feedback Guitar 2 032 Guitar Harmonics 032 Guitar Feedback 032 Guitar Harmonics 2 XG BASS - Yamaha YDP-V240 | Owner's Manual - Page 130
082 Thick Sawtooth 000 018 082 Dynamic Sawtooth 000 019 082 Digital Sawtooth 000 020 082 Big Lead 000 096 082 Sequenced 000 019 100 Hollow Release 000 040 100 Nylon Electric Piano 000 064 100 Nylon Harp 000 065 100 Harp Vox Manual / Bedienungsanleitung / Mode d'emploi / Manual de instrucciones - Yamaha YDP-V240 | Owner's Manual - Page 131
voix porteur d'un astérisque (*) est une voix XGlite en option. El número de voz con un asterisco (*) es una voz opcional de XGlite. Owner's Manual / Bedienungsanleitung / Mode d'emploi / Manual de instrucciones 131 - Yamaha YDP-V240 | Owner's Manual - Page 132
indicates that the drum sound is the same as "Standard Kit 1". • Each percussion voice uses one note. • The MIDI Note # and Note are actually one octave lower than keyboard L 2 Claves 2 Scratch H 2 Scratch L 3 132 Owner's Manual / Bedienungsanleitung / Mode d'emploi / Manual de instrucciones - Yamaha YDP-V240 | Owner's Manual - Page 133
Coaster Submarine Shower Thunder Wind Stream Bubble Feed Laugh Scream Punch Heartbeat Footsteps Dog Horse Bird Tweet 2 Machine Gun Laser Gun Explosion Firework Maou Owner's Manual / Bedienungsanleitung / Mode d'emploi / Manual de instrucciones 133 - Yamaha YDP-V240 | Owner's Manual - Page 134
PopBossa Tijuana DiscoLatin Mambo Salsa Beguine GuitarRumba RumbaFlamenco RumbaIsland Reggae BALLROOM VienneseWaltz EnglishWaltz Slowfox Foxtrot 134 Owner's Manual / Bedienungsanleitung / Mode d'emploi / Manual de instrucciones Style No. 111 112 113 114 115 116 117 118 119 120 121 122 123 - Yamaha YDP-V240 | Owner's Manual - Page 135
289 Spanish 290 SunnyStr 291 MistyFln 292 LdnBridg 293 GrndClck 294 Importnc 295 Snowman 296 Favorite 297 SugerSpn 298 Washngtn 299 ThisWay 300 ZipperD Owner's Manual / Bedienungsanleitung / Mode d'emploi / Manual de instrucciones 135 - Yamaha YDP-V240 | Owner's Manual - Page 136
Anh.114 Canon in D Der Vogelfänger Bin Ich Ja "Die Zauberflöte" Piano Sonate No.14 op.27-2 "Mondschein" The "Surprise" Symphony No.94 To a The easy song arranger can only be used with songs that include chord data. 136 Owner's Manual / Bedienungsanleitung / Mode d'emploi / Manual de instrucciones - Yamaha YDP-V240 | Owner's Manual - Page 137
pulsadas (hasta cuatro). • Los tipos de efectos de trino (23 a 26) crean trinos de dos notas (notas alternadas) cuando se mantienen pulsadas dos teclas. Owner's Manual / Bedienungsanleitung / Mode d'emploi / Manual de instrucciones 137 - Yamaha YDP-V240 | Owner's Manual - Page 138
. MSB 1 1 1 1 1 1 1 1 1 1 2 2 2 2 2 2 2 2 2 2 2 2 2 3 3 3 3 4 4 4 4 17 18 19 16 0 LSB 0 16 17 18 1 6 7 30 31 23 16 17 18 19 0 1 2 5 6 7 20 21 22 16 17 0 1 16 17 0 7 0 0 0 0 0 138 Owner's Manual / Bedienungsanleitung / Mode d'emploi / Manual de instrucciones - Yamaha YDP-V240 | Owner's Manual - Page 139
71 70 120 0 LSB 17 8 16 1 2 0 1 8 16 17 3 4 5 6 7 0 2 16 0 8 16 17 1 0 7 16 17 18 17 18 0 22 0 16 0 21 0 16 19 0 18 20 19 0 0 Owner's Manual / Bedienungsanleitung / Mode d'emploi / Manual de instrucciones 139 - Yamaha YDP-V240 | Owner's Manual - Page 140
18 1 6 7 30 31 23 16 17 18 19 0 1 2 5 6 7 20 21 22 16 17 0 1 16 17 0 7 0 0 0 0 17 8 16 1 2 0 1 8 16 17 3 4 5 6 7 0 2 16 0 0 16 0 1 2 0 1 0 0 16 17 0 0 140 Owner's Manual / Bedienungsanleitung / Mode d'emploi / Manual de instrucciones - Yamaha YDP-V240 | Owner's Manual - Page 141
Produces three delayed sounds: L, R and C (center). Produces two delayed sounds: L and R. Two warm soft distortion. A simulation of a guitar amp. Stereo amp simulator. Distortion and Delay 0 1 16 1 0 1 16 17 18 19 20 Owner's Manual / Bedienungsanleitung / Mode d'emploi / Manual de instrucciones 141 - Yamaha YDP-V240 | Owner's Manual - Page 142
31 0 1 16 17 23 18 24 17 20 18 19 0 22 25 17 18 19 20 0 1 1 2 2 3 3 16 0 1 21 0 1 16 19 0 18 20 19 0 142 Owner's Manual / Bedienungsanleitung / Mode d'emploi / Manual de instrucciones - Yamaha YDP-V240 | Owner's Manual - Page 143
an Auto Wah can be distorted by Overdrive. Tempo synchronized auto wah. Changes the center frequency of a wah filter according to the input level. The output of an 17 1 1 16 18 28 19 29 0 1 21 23 25 2 22 24 26 0 0 Owner's Manual / Bedienungsanleitung / Mode d'emploi / Manual de instrucciones 143 - Yamaha YDP-V240 | Owner's Manual - Page 144
Number of MDB USB device Range Metronome Piano Reset Performance Assistant Technology Transpose, Tuning Headphones CD-ROM for Windows Installation Guide, My Yamaha Product User Registration, Bench (included or optional depending on locale), Owner's Manual HPE-150 UD-FD01 * Specifications - Yamaha YDP-V240 | Owner's Manual - Page 145
Owner's Manual / Bedienungsanleitung / Mode d'emploi / Manual de instrucciones 145 - Yamaha YDP-V240 | Owner's Manual - Page 146
146 Owner's Manual / Bedienungsanleitung / Mode d'emploi / Manual de instrucciones - Yamaha YDP-V240 | Owner's Manual - Page 147
packaging, and/or accompanying documents means that used electrical and electronic products should not be mixed , please contact your local municipality, your waste disposal service or the point of sale where you purchased the Manual / Bedienungsanleitung / Mode d'emploi / Manual de instrucciones 147 - Yamaha YDP-V240 | Owner's Manual - Page 148
des déchets d'équipements électriques et électroniques, veuillez contacter votre municipalité, votre service de traitement des déchets ou le point de vente où vous avez acheté por el método correcto de disposición. 148 Owner's Manual / Bedienungsanleitung / Mode d'emploi / Manual de instrucciones - Yamaha YDP-V240 | Owner's Manual - Page 149
servicing) instructions in the literature accompanying the product. IMPORTANT SAFETY INSTRUCTIONS 1 Read these instructions. 2 Keep these instructions. 3 Heed all warnings. 4 Follow all instructions. 5 Do not use ) Owner's Manual / Bedienungsanleitung / Mode d'emploi / Manual de instrucciones 149 - Yamaha YDP-V240 | Owner's Manual - Page 150
Yamaha Yamaha Yamaha av Yamaha Scandinavia Yamaha Music Yamaha Music Europe GmbH Siemensstraße 22-34, 25462 Rellingen, Germany Tel: 04101-3030 OTHER COUNTRIES Yamaha OF CHINA Yamaha Music & Yamaha Yamaha Music Indonesia (Distributor) PT. Nusantik Gedung Yamaha Music Center Yamaha Yamaha Yamaha - Yamaha YDP-V240 | Owner's Manual - Page 151
- Yamaha YDP-V240 | Owner's Manual - Page 152
Yamaha Home Keyboards Home Page http://music.yamaha.com/homekeyboard/ Yamaha Manual Library http://www.yamaha.co.jp/manual/ U.R.G., Pro Audio & Digital Musical Instrument Division, Yamaha Corporation © 2009 Yamaha Corporation WR86780 XXXPOXXX.X-01A0 Printed in Indonesia
-
 1
1 -
 2
2 -
 3
3 -
 4
4 -
 5
5 -
 6
6 -
 7
7 -
8
-
9
-
10
-
11
-
12
-
13
-
14
-
15
-
16
-
17
-
18
-
19
-
20
-
21
-
22
-
23
-
24
-
25
-
26
-
27
-
28
-
29
-
30
-
31
-
32
-
33
-
34
-
35
-
36
-
37
-
38
-
39
-
40
-
41
-
42
-
43
-
44
-
45
-
46
-
47
-
48
-
49
-
50
-
51
-
52
-
53
-
54
-
55
-
56
-
57
-
58
-
59
-
60
-
61
-
62
-
63
-
64
-
65
-
66
-
67
-
68
-
69
-
70
-
71
-
72
-
73
-
74
-
75
-
76
-
77
-
78
-
79
-
80
-
81
-
82
-
83
-
84
-
85
-
86
-
87
-
88
-
89
-
90
-
91
-
92
-
93
-
94
-
95
-
96
-
97
-
98
-
99
-
100
-
101
-
102
-
103
-
104
-
105
-
106
-
107
-
108
-
109
-
110
-
111
-
112
-
113
-
114
-
115
-
116
-
117
-
118
-
119
-
120
-
121
-
122
-
123
-
124
-
125
-
126
-
127
-
128
-
129
-
130
-
131
-
132
-
133
-
134
-
135
-
136
-
137
-
138
-
139
-
140
-
141
-
142
-
143
-
144
-
145
-
146
-
147
-
148
-
149
-
150
-
151
-
152
 |
 |
For information on assembling the keyboard stand, refer to the instructions at the end of this manual.
IMPORTANT — Check your power supply —
Make sure that your local AC mains voltage matches the voltage specified on the name plate on the bottom panel. In some areas a voltage
selector may be provided on the bottom panel of the main keyboard unit near the power cord. Make sure that the voltage selector is set for
the voltage in your area. The voltage selector is set at 240V when the unit is initially shipped.
To change the setting use a “minus” screwdriver to rotate the selector dial so that the correct voltage appears next to the pointer on the
panel.
Weitere Informationen über die Montage des Keyboard-Ständers erhalten Sie in den Anweisungen am Ende dieses Handbuchs.
WICHTIG — Überprüfen Sie Ihren Netzanschluss —
Vergewissern Sie sich, dass die Spannung in Ihrem örtlichen Stromnetz mit der Spannung übereinstimmt, die auf dem Typenschild auf der
Unterseite des Instruments angegeben ist. In bestimmten Regionen ist auf der Unterseite des Keyboards in der Nähe des Netzkabels ein
Spannungswähler angebracht. Vergewissern Sie sich, dass der Spannungswähler auf die Spannung Ihres lokalen Stromnetzes eingestellt
ist. Dieser Spannungswähler ist bei Auslieferung auf 240 V eingestellt. Sie können die Einstellung mit einem Schlitzschraubenzieher ändern.
Drehen Sie dazu den Wählschalter, bis der Pfeil auf dem Instrument auf die richtige Spannung zeigt.
Pour obtenir des informations sur l'assemblage du support du clavier, reportez-vous aux instructions à la fin de ce manuel.
IMPORTANT — Contrôler la source d'alimentation —
Vérifiez que la tension spécifiée sur le panneau inférieur correspond à la tension du secteur. Dans certaines régions, l'instrument peut être
équipé d'un sélecteur de tension situé sur le panneau inférieur du clavier à proximité du cordon d'alimentation. Vérifiez que ce sélecteur est
bien réglé en fonction de la tension secteur de votre région. Le sélecteur de tension est réglé sur 240 V au départ d'usine. Pour modifier ce
réglage, utilisez un tournevis à lame plate pour tourner le sélecteur afin de mettre l'indication correspondant à la tension de votre région vis
à vis du repère triangulaire situé sur le panneau.
Para información sobre el montaje del soporte del teclado, consulte las instrucciones al final de este manual.
IMPORTANTE — Verifique la alimentación de corriente —
Asegúrese de que tensión de alimentación de CA de su area corresponde con la tension especificada en la placa de características del
panel inferior. En algunas zonas puede haberse incorporado un selector de tensión en el panel inferior de la unidad del teclado principal,
cerca del cable de alimentación. Asegúrese de que el selector de tensión esté ajustado a la tensión de su área. El selector de tension se
ajusta a 240V cuando la unidad sale de fábrica. Para cambiar el ajuste, emplee un destornillador de cabeza ”recta” para girar el selector de
modo que aparezca la tensión correcta al lado del indicador del panel.
Owner’s Manual
Bedienungsanleitung
Mode d’emploi
Manual de instrucciones
ES
FR
DE
EN