Zanussi Z816WT85BI User Manual - Page 12
Warning, Installing Anti-tilting Device, Cannot, Preparation And Assembly Of The Cupboard Door
 |
View all Zanussi Z816WT85BI manuals
Add to My Manuals
Save this manual to your list of manuals |
Page 12 highlights
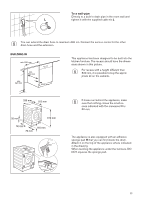
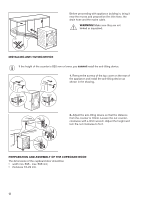
Before proceeding with appliance building in, bring it near the recess and preposition the inlet hose, the drain hose and the mains cable. WARNING! Make sure they are not kinked or squashed. INSTALLING ANTI-TILTING DEVICE If the height of the counter is 820 mm or lower, you cannot install the anti-tilting device. 1. Remove the screws of the top cover on the rear of the appliance and install the anti-tilting device as shown in the drawing. ~10mm 2. Adjust the anti-tilting device so that the distance from the counter is 10mm. Loosen the nut counterclockwise with a 3mm wrench. Adjust the height and turn the nut clockwise to fix it. PREPARATION AND ASSEMBLY OF THE CUPBOARD DOOR The dimensions of the cupboard door should be: • width min. 595 - max. 598 mm; • thickness 16-22 mm. 12
-
 1
1 -
2
-
3
-
4
-
5
-
6
-
 7
7 -
 8
8 -
 9
9 -
 10
10 -
 11
11 -
 12
12 -
 13
13 -
 14
14 -
 15
15 -
 16
16 -
 17
17 -
18
-
19
-
20
-
21
-
22
-
23
-
24
-
25
-
26
-
27
-
28
-
29
-
30
-
31
-
32
-
33
-
34
-
35
-
36
-
37
-
38
-
39
-
40
-
41
-
42
-
43
-
44
 |
 |
