Zenith DTT901 Operation Guide - Page 7
Install Guide - remote control only
 |
View all Zenith DTT901 manuals
Add to My Manuals
Save this manual to your list of manuals |
Page 7 highlights
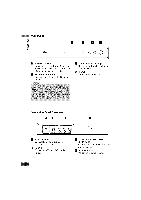
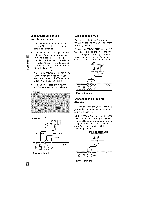
Install Guide The Install Guide is a convenient way for you to customize the settings of this unit. When the unit is turned on for the first time after connecting the power supply, Install Guide is displayed on the screen automatically. Step 1 (Welcome Message) Press > to move to the next step. Menu Overview By using the menu, you can make various adjustments to menu options such as picture and sound. Step 2 (Menu Language) Use ^ / v to select a language (English, Spanish, French) then press > to move to the next step. Step 3 (TV Aspect Ratio) Use ^ / v to select your TV type then press > to move to the next step. Step 4 (Searching for Channels...) Press ® (Select) to start auto tuning. After auto tuning is complete, press > to move to the next step. Step 5 (Time Zone) Use A / v to select a time zone then press > to move to the next step. To display and exit the Menu: Press MENU to display the menu. A second press of Menu will take you back to initial screen. To go to the next level: Press > on the remote control. To go back to the previouslevel: Press < on the remote control. Typical Menu Operation 1. Press MENU. The menu appears. 2. Use v / A to select the desired option then press > or ® (Select) to move to the second level. 3. Use h / V to select the second desired option then press > to move to the third level. 4. Use ^ / v to select the desired setting then press ® (Select) to confirm your selection. Some items require additional steps. 5. Press EXIT to exit the menu. Step 6 (ThankYou Message) Press ® (Select) to finish install guide.
-
 1
1 -
 2
2 -
 3
3 -
 4
4 -
 5
5 -
 6
6 -
 7
7 -
 8
8 -
 9
9 -
 10
10 -
 11
11 -
 12
12 -
13
-
14
-
15
-
16
-
17
-
18
-
19
-
20
-
21
-
22
-
23
-
24
-
25
-
26
-
27
-
28
-
29
-
30
-
31
-
32
-
33
-
34
-
35
-
36
 |
 |
