Zenith SL-6199-B User Guide - Page 2
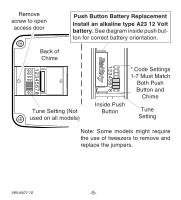
Set the push button jumpers to match the chime receiver, code., Install alkaline type A23 12 volt
 |
UPC - 016963619906
View all Zenith SL-6199-B manuals
Add to My Manuals
Save this manual to your list of manuals |
Page 2 highlights
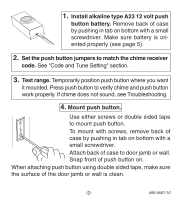
1. Install alkaline type A23 12 volt push button battery. Remove back of case by pushing in tab on bottom with a small screwdriver. Make sure battery is oriented properly (see page 5). 2. Set the push button jumpers to match the chime receiver code. See "Code and Tune Setting" section. 3. Test range. Temporarily position push button where you want it mounted. Press push button to verify chime and push button work properly. If chime does not sound, see Troubleshooting. 4. Mount push button. Use either screws or double sided tape to mount push button. To mount with screws, remove back of case by pushing in tab on bottom with a small screwdriver. Attach back of case to door jamb or wall. Snap front of push button on. When attaching push button using double sided tape, make sure the surface of the door jamb or wall is clean. -2- 595-5507-10
-
 1
1 -
 2
2 -
 3
3 -
 4
4 -
 5
5 -
 6
6 -
 7
7 -
 8
8 -
9
-
10
-
11
-
12
-
13
-
14
-
15
-
16
-
17
-
18
-
19
-
20
-
21
-
22
-
23
-
24
 |
 |
