2007 BMW 5 Series Owner's Manual - Page 104
2007 BMW 5 Series Manual

Page 104 highlights
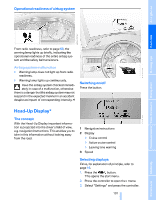
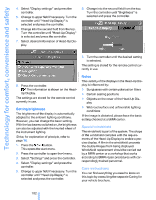
Technology for comfort, convenience and safety 4. Select "Display settings" and press the controller. 5. Change to upper field if necessary. Turn the controller until "Head-Up Display" is selected and press the controller. 6. Change into the second field from the top. Turn the controller until "Head-Up Display" is selected and press the controller. 7. Select desired information of Head-Up Display. 6. Change into the second field from the top. Turn the controller until "Brightness" is selected and press the controller. 7. Turn the controller until the desired setting is selected. The setting is stored for the remote control currently in use. Notes 8. Press the controller. The information is shown on the HeadUp Display. The settings are stored for the remote control currently in use. The visibility of the displays in the Head-Up Display is influenced by: > Sunglasses with certain polarization filters > Certain seating positions > Objects on the cover of the Head-Up Display > Wet road surface and unfavorable lighting conditions If the image is distorted, please have the basic setting checked at a BMW center. Setting brightness The brightness of the display is automatically adapted to the ambient lighting conditions. However, you can change the basic setting. With the low beams switched on, the brightness can also be adjusted with the knurled wheel of the instrument lighting. iDrive, for explanation of principle, refer to page 16. 1. Press the button. This opens the start menu. 2. Press the controller to open the menu. 3. Select "Settings" and press the controller. 4. Select "Display settings" and press the controller. 5. Change to upper field if necessary. Turn the controller until "Head-Up Display" is selected and press the controller. Special windshield The windshield is part of the system. The shape of the windshield complies with the requirements of the Head-Up Display to enable a precise display. A film in the windshield prevents the double images from being displayed. Windshield replacement should be carried out by a BMW center or a workshop that works according to BMW repair procedures with correspondingly trained personnel. Care instructions You can find everything you need to know on this topic by consulting the separate Caring for your vehicle brochure. 102 Online Edition for Part no. 01 41 0 013 308 02/07 BMW AG
-
 1
1 -
2
-
3
-
4
-
5
-
6
-
7
-
8
-
9
-
10
-
11
-
12
-
13
-
14
-
15
-
16
-
17
-
18
-
19
-
20
-
21
-
22
-
23
-
24
-
25
-
26
-
27
-
28
-
29
-
30
-
31
-
32
-
33
-
34
-
35
-
36
-
37
-
38
-
39
-
40
-
41
-
42
-
43
-
44
-
45
-
46
-
47
-
48
-
49
-
50
-
51
-
52
-
53
-
54
-
55
-
56
-
57
-
58
-
59
-
60
-
61
-
62
-
63
-
64
-
65
-
66
-
67
-
68
-
69
-
70
-
71
-
72
-
73
-
74
-
75
-
76
-
77
-
78
-
79
-
80
-
81
-
82
-
83
-
84
-
85
-
86
-
87
-
88
-
89
-
90
-
91
-
92
-
93
-
94
-
95
-
96
-
97
-
98
-
 99
99 -
 100
100 -
 101
101 -
 102
102 -
 103
103 -
 104
104 -
 105
105 -
 106
106 -
 107
107 -
 108
108 -
 109
109 -
110
-
111
-
112
-
113
-
114
-
115
-
116
-
117
-
118
-
119
-
120
-
121
-
122
-
123
-
124
-
125
-
126
-
127
-
128
-
129
-
130
-
131
-
132
-
133
-
134
-
135
-
136
-
137
-
138
-
139
-
140
-
141
-
142
-
143
-
144
-
145
-
146
-
147
-
148
-
149
-
150
-
151
-
152
-
153
-
154
-
155
-
156
-
157
-
158
-
159
-
160
-
161
-
162
-
163
-
164
-
165
-
166
-
167
-
168
-
169
-
170
-
171
-
172
-
173
-
174
-
175
-
176
-
177
-
178
-
179
-
180
-
181
-
182
-
183
-
184
-
185
-
186
-
187
-
188
-
189
-
190
-
191
-
192
-
193
-
194
-
195
-
196
-
197
-
198
-
199
-
200
-
201
-
202
-
203
-
204
-
205
-
206
-
207
-
208
-
209
-
210
-
211
-
212
-
213
-
214
-
215
-
216
-
217
-
218
-
219
-
220
-
221
-
222
-
223
-
224
-
225
-
226
-
227
-
228
-
229
-
230
-
231
-
232
-
233
-
234
-
235
-
236
-
237
-
238
-
239
-
240
-
241
-
242
-
243
-
244
-
245
-
246
-
247
-
248
-
249
-
250
-
251
-
252
-
253
-
254
-
255
-
256
-
257
-
258
-
259
-
260
-
261
-
262
-
263
-
264
-
265
-
266
-
267
-
268
-
269
-
270
-
271
-
272
-
273
-
274
-
275
-
276
-
277
-
278
-
279
-
280
-
281
-
282
-
283
-
284
-
285
-
286
 |
 |
