2007 BMW 7 Series Owner's Manual - Page 49
2007 BMW 7 Series Manual
Page 49 highlights
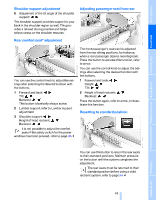
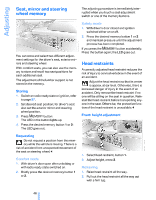
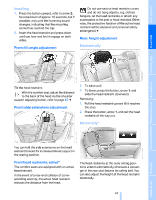
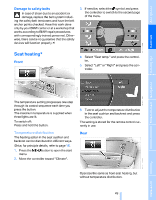
Installing 1. Press the button upward, refer to arrow 2, for a maximum of approx. 10 seconds, but if possible, only until the humming sound changes, indicating that the mounting socket has reached the top. 2. Insert the head restraint and press down until you hear and feel it engage on both sides. Do not use seat or head restraint covers and do not hang objects, e.g. clothes hangers, on the head restraints or attach any accessories to the seat or head restraint. Otherwise, the protective function of the active head restraint will be impaired and personal safety endangered.< Rear: height adjustment Mechanically Front: tilt angle adjustment Tilt the head restraint. With the comfort seat, adjust the distance to the back of the head via the shoulder support adjusting button, refer to page 45.< > To raise: pull. > To lower: press the button, arrow 1, and slide the head restraint downward. Removing: 1. Pull the head restraint upward till it reaches the stop. 2. Press the button, arrow 1, and pull the head restraint all the way out. Front: side extensions adjustment Electrically* You can fold the side extensions on the head restraint forward for increased lateral support in the resting position. The comfort seats are equipped with an active head restraint. In the event of a rear-end collision of corresponding severity, the active head restraint reduces the distance from the head. The head restraints at the outer sitting positions extend automatically whenever a passenger in the rear seat fastens his safety belt. You can also adjust the height of the head restraint electrically. 47 Online Edition for Part no. 01 41 0 013 316 - © 02/07 BMW AG Reference Mobility Front head restraints, active* Communications Entertainment Navigation Driving tips Controls At a glance
-
 1
1 -
2
-
3
-
4
-
5
-
6
-
7
-
8
-
9
-
10
-
11
-
12
-
13
-
14
-
15
-
16
-
17
-
18
-
19
-
20
-
21
-
22
-
23
-
24
-
25
-
26
-
27
-
28
-
29
-
30
-
31
-
32
-
33
-
34
-
35
-
36
-
37
-
38
-
39
-
40
-
41
-
42
-
43
-
 44
44 -
 45
45 -
 46
46 -
 47
47 -
 48
48 -
 49
49 -
 50
50 -
 51
51 -
 52
52 -
 53
53 -
 54
54 -
55
-
56
-
57
-
58
-
59
-
60
-
61
-
62
-
63
-
64
-
65
-
66
-
67
-
68
-
69
-
70
-
71
-
72
-
73
-
74
-
75
-
76
-
77
-
78
-
79
-
80
-
81
-
82
-
83
-
84
-
85
-
86
-
87
-
88
-
89
-
90
-
91
-
92
-
93
-
94
-
95
-
96
-
97
-
98
-
99
-
100
-
101
-
102
-
103
-
104
-
105
-
106
-
107
-
108
-
109
-
110
-
111
-
112
-
113
-
114
-
115
-
116
-
117
-
118
-
119
-
120
-
121
-
122
-
123
-
124
-
125
-
126
-
127
-
128
-
129
-
130
-
131
-
132
-
133
-
134
-
135
-
136
-
137
-
138
-
139
-
140
-
141
-
142
-
143
-
144
-
145
-
146
-
147
-
148
-
149
-
150
-
151
-
152
-
153
-
154
-
155
-
156
-
157
-
158
-
159
-
160
-
161
-
162
-
163
-
164
-
165
-
166
-
167
-
168
-
169
-
170
-
171
-
172
-
173
-
174
-
175
-
176
-
177
-
178
-
179
-
180
-
181
-
182
-
183
-
184
-
185
-
186
-
187
-
188
-
189
-
190
-
191
-
192
-
193
-
194
-
195
-
196
-
197
-
198
-
199
-
200
-
201
-
202
-
203
-
204
-
205
-
206
-
207
-
208
-
209
-
210
-
211
-
212
-
213
-
214
-
215
-
216
-
217
-
218
-
219
-
220
-
221
-
222
-
223
-
224
-
225
-
226
-
227
-
228
-
229
-
230
-
231
-
232
-
233
-
234
-
235
-
236
-
237
-
238
-
239
-
240
-
241
-
242
-
243
-
244
-
245
-
246
-
247
-
248
-
249
-
250
-
251
-
252
-
253
-
254
 |
 |
