2009 Chevrolet Traverse Owner's Manual - Page 350
2009 Chevrolet Traverse Manual
Page 350 highlights
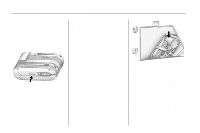
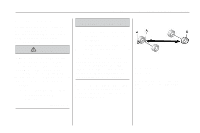
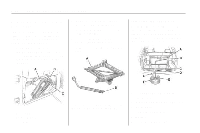
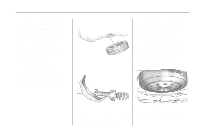
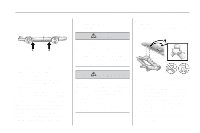
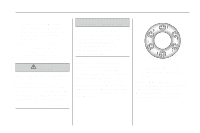
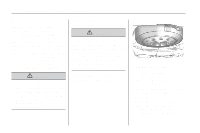
5-68 Service and Appearance Care Do the following to check the cable: 1. Check under the vehicle to see if the cable is visible. 2. If it is not visible, see Secondary Latch System on page 5-72. If it is visible, first try to tighten the cable by turning the lug wrench clockwise until you hear two clicks or feel it skip twice. You cannot over-tighten the cable. 3. Loosen the cable by turning the wrench counterclockwise three or four turns. 4. If the spare tire has not lowered, tighten the cable all the way and then loosen it at least two times. If the spare tire did lower to the ground, continue with Step 5 under "Removing the Spare Tire (Vehicles with the Rear Convenience Center)" listed previously. 5. If you still cannot lower the spare tire to the ground, see Secondary Latch System on page 5-72. Removing the Flat Tire and Installing the Spare Tire 1. Do a safety check before proceeding. See Changing a Flat Tire on page 5-65 for more information. 2. If the vehicle has a wheel cover, loosen the plastic nut caps with the wheel wrench. They will not come off. Then, using the flat end of the wheel wrench, pry along the edge of the cover until it comes off. Be careful; the edges may be sharp. Do not try to remove the cover with your bare hands. Store the wheel cover securely in the rear of the vehicle until you have the flat tire repaired or replaced. If the vehicle has aluminum wheels, remove the wheel nut caps using the wheel wrench. 3. Loosen the wheel nuts - but do not remove them - using the lug wrench. For wheels with a wheel lock key, use the wheel lock key between the lock nut and lug wrench. The key is supplied in the front passenger door pocket. Notice: If this vehicle has wheel locks and an impact wrench is used to remove the wheel nuts, the lock nut or wheel lock key could be damaged. Do not use an impact wrench to remove the wheel nuts if this vehicle has wheel locks.
-
 1
1 -
2
-
3
-
4
-
5
-
6
-
7
-
8
-
9
-
10
-
11
-
12
-
13
-
14
-
15
-
16
-
17
-
18
-
19
-
20
-
21
-
22
-
23
-
24
-
25
-
26
-
27
-
28
-
29
-
30
-
31
-
32
-
33
-
34
-
35
-
36
-
37
-
38
-
39
-
40
-
41
-
42
-
43
-
44
-
45
-
46
-
47
-
48
-
49
-
50
-
51
-
52
-
53
-
54
-
55
-
56
-
57
-
58
-
59
-
60
-
61
-
62
-
63
-
64
-
65
-
66
-
67
-
68
-
69
-
70
-
71
-
72
-
73
-
74
-
75
-
76
-
77
-
78
-
79
-
80
-
81
-
82
-
83
-
84
-
85
-
86
-
87
-
88
-
89
-
90
-
91
-
92
-
93
-
94
-
95
-
96
-
97
-
98
-
99
-
100
-
101
-
102
-
103
-
104
-
105
-
106
-
107
-
108
-
109
-
110
-
111
-
112
-
113
-
114
-
115
-
116
-
117
-
118
-
119
-
120
-
121
-
122
-
123
-
124
-
125
-
126
-
127
-
128
-
129
-
130
-
131
-
132
-
133
-
134
-
135
-
136
-
137
-
138
-
139
-
140
-
141
-
142
-
143
-
144
-
145
-
146
-
147
-
148
-
149
-
150
-
151
-
152
-
153
-
154
-
155
-
156
-
157
-
158
-
159
-
160
-
161
-
162
-
163
-
164
-
165
-
166
-
167
-
168
-
169
-
170
-
171
-
172
-
173
-
174
-
175
-
176
-
177
-
178
-
179
-
180
-
181
-
182
-
183
-
184
-
185
-
186
-
187
-
188
-
189
-
190
-
191
-
192
-
193
-
194
-
195
-
196
-
197
-
198
-
199
-
200
-
201
-
202
-
203
-
204
-
205
-
206
-
207
-
208
-
209
-
210
-
211
-
212
-
213
-
214
-
215
-
216
-
217
-
218
-
219
-
220
-
221
-
222
-
223
-
224
-
225
-
226
-
227
-
228
-
229
-
230
-
231
-
232
-
233
-
234
-
235
-
236
-
237
-
238
-
239
-
240
-
241
-
242
-
243
-
244
-
245
-
246
-
247
-
248
-
249
-
250
-
251
-
252
-
253
-
254
-
255
-
256
-
257
-
258
-
259
-
260
-
261
-
262
-
263
-
264
-
265
-
266
-
267
-
268
-
269
-
270
-
271
-
272
-
273
-
274
-
275
-
276
-
277
-
278
-
279
-
280
-
281
-
282
-
283
-
284
-
285
-
286
-
287
-
288
-
289
-
290
-
291
-
292
-
293
-
294
-
295
-
296
-
297
-
298
-
299
-
300
-
301
-
302
-
303
-
304
-
305
-
306
-
307
-
308
-
309
-
310
-
311
-
312
-
313
-
314
-
315
-
316
-
317
-
318
-
319
-
320
-
321
-
322
-
323
-
324
-
325
-
326
-
327
-
328
-
329
-
330
-
331
-
332
-
333
-
334
-
335
-
336
-
337
-
338
-
339
-
340
-
341
-
342
-
343
-
344
-
 345
345 -
 346
346 -
 347
347 -
 348
348 -
 349
349 -
 350
350 -
 351
351 -
 352
352 -
 353
353 -
 354
354 -
 355
355 -
356
-
357
-
358
-
359
-
360
-
361
-
362
-
363
-
364
-
365
-
366
-
367
-
368
-
369
-
370
-
371
-
372
-
373
-
374
-
375
-
376
-
377
-
378
-
379
-
380
-
381
-
382
-
383
-
384
-
385
-
386
-
387
-
388
-
389
-
390
-
391
-
392
-
393
-
394
-
395
-
396
-
397
-
398
-
399
-
400
-
401
-
402
-
403
-
404
-
405
-
406
-
407
-
408
-
409
-
410
-
411
-
412
-
413
-
414
-
415
-
416
-
417
-
418
-
419
-
420
-
421
-
422
 |
 |
