1993 Honda Accord Owner's Manual - Page 150
1993 Honda Accord Manual
Page 150 highlights
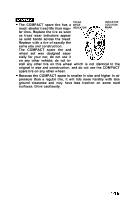
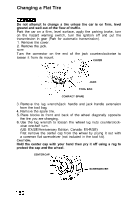
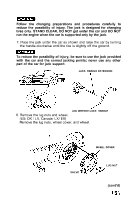
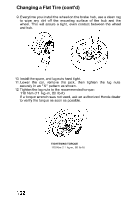
Changing a Flat Tire Do not attempt to change a tire unless the car is on firm, level ground and well out of the flow of traffic. Park the car on a firm, level surface, apply the parking brake, turn on the hazard warning switch, turn the ignition off and put the transmission in gear (Park for automatic transmission). 1. Remove the cover. 2. Remove the jack. NOTE: Turn the connector on the end of the jack counterclockwise to loosen it from its mount. COVER JACK TOOL BAG COMPACT SPARE 3. Remove the lug wrench/jack handle and jack handle extension from the tool bag. 4. Remove the spare tire. 5. Place blocks in front and back of the wheel diagonally opposite the tire you are changing. 6. Use the lug wrench to loosen the wheel lug nuts counterclockwise one-half turn. (US: EX/SE/Anniversary Edition, Canada: EX-R/SE) First remove the center cap from the wheel by prying it out with a common flat screwdriver (not included in the tool kit). CAUTION: Hold the center cap with your hand then pry it off using a rag to protect the cap and the wheel. CENTER CAP. SCREWDRIVER
-
 1
1 -
2
-
3
-
4
-
5
-
6
-
7
-
8
-
9
-
10
-
11
-
12
-
13
-
14
-
15
-
16
-
17
-
18
-
19
-
20
-
21
-
22
-
23
-
24
-
25
-
26
-
27
-
28
-
29
-
30
-
31
-
32
-
33
-
34
-
35
-
36
-
37
-
38
-
39
-
40
-
41
-
42
-
43
-
44
-
45
-
46
-
47
-
48
-
49
-
50
-
51
-
52
-
53
-
54
-
55
-
56
-
57
-
58
-
59
-
60
-
61
-
62
-
63
-
64
-
65
-
66
-
67
-
68
-
69
-
70
-
71
-
72
-
73
-
74
-
75
-
76
-
77
-
78
-
79
-
80
-
81
-
82
-
83
-
84
-
85
-
86
-
87
-
88
-
89
-
90
-
91
-
92
-
93
-
94
-
95
-
96
-
97
-
98
-
99
-
100
-
101
-
102
-
103
-
104
-
105
-
106
-
107
-
108
-
109
-
110
-
111
-
112
-
113
-
114
-
115
-
116
-
117
-
118
-
119
-
120
-
121
-
122
-
123
-
124
-
125
-
126
-
127
-
128
-
129
-
130
-
131
-
132
-
133
-
134
-
135
-
136
-
137
-
138
-
139
-
140
-
141
-
142
-
143
-
144
-
 145
145 -
 146
146 -
 147
147 -
 148
148 -
 149
149 -
 150
150 -
 151
151 -
 152
152 -
 153
153 -
 154
154 -
 155
155 -
156
-
157
-
158
-
159
-
160
-
161
-
162
-
163
-
164
-
165
-
166
-
167
-
168
-
169
-
170
-
171
-
172
-
173
-
174
-
175
-
176
-
177
-
178
 |
 |
