2008 Honda Fit Owner's Manual - Page 203
2008 Honda Fit Manual
Page 203 highlights
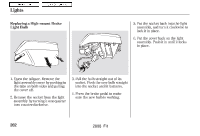
Main Menu Table Of Contents Lights SCREW 5. Insert the new bulb into the hole, and turn it one-quarter turn clockwise to lock it in place. 6. Push the electrical connector back onto the bulb. Make sure it is on all the way. 7. Turn on the fog lights to test the new bulb. ELECTRICAL CONNECTOR 8. Reinstall the fog light assembly, then tighten the screw. 1. Use a Phillips-head screwdriver to remove the screw. 2. To remove the fog light assembly, slide it inward, then carefully pull it out of the bumper. 3. Remove the electrical connector from the bulb by squeezing the connector to unlock the tab, then slide the connector off the bulb. 4. Remove the bulb by turning it about one-quarter turn counterclockwise. 200 2008 Fit
-
 1
1 -
2
-
3
-
4
-
5
-
6
-
7
-
8
-
9
-
10
-
11
-
12
-
13
-
14
-
15
-
16
-
17
-
18
-
19
-
20
-
21
-
22
-
23
-
24
-
25
-
26
-
27
-
28
-
29
-
30
-
31
-
32
-
33
-
34
-
35
-
36
-
37
-
38
-
39
-
40
-
41
-
42
-
43
-
44
-
45
-
46
-
47
-
48
-
49
-
50
-
51
-
52
-
53
-
54
-
55
-
56
-
57
-
58
-
59
-
60
-
61
-
62
-
63
-
64
-
65
-
66
-
67
-
68
-
69
-
70
-
71
-
72
-
73
-
74
-
75
-
76
-
77
-
78
-
79
-
80
-
81
-
82
-
83
-
84
-
85
-
86
-
87
-
88
-
89
-
90
-
91
-
92
-
93
-
94
-
95
-
96
-
97
-
98
-
99
-
100
-
101
-
102
-
103
-
104
-
105
-
106
-
107
-
108
-
109
-
110
-
111
-
112
-
113
-
114
-
115
-
116
-
117
-
118
-
119
-
120
-
121
-
122
-
123
-
124
-
125
-
126
-
127
-
128
-
129
-
130
-
131
-
132
-
133
-
134
-
135
-
136
-
137
-
138
-
139
-
140
-
141
-
142
-
143
-
144
-
145
-
146
-
147
-
148
-
149
-
150
-
151
-
152
-
153
-
154
-
155
-
156
-
157
-
158
-
159
-
160
-
161
-
162
-
163
-
164
-
165
-
166
-
167
-
168
-
169
-
170
-
171
-
172
-
173
-
174
-
175
-
176
-
177
-
178
-
179
-
180
-
181
-
182
-
183
-
184
-
185
-
186
-
187
-
188
-
189
-
190
-
191
-
192
-
193
-
194
-
195
-
196
-
197
-
 198
198 -
 199
199 -
 200
200 -
 201
201 -
 202
202 -
 203
203 -
 204
204 -
 205
205 -
 206
206 -
 207
207 -
 208
208 -
209
-
210
-
211
-
212
-
213
-
214
-
215
-
216
-
217
-
218
-
219
-
220
-
221
-
222
-
223
-
224
-
225
-
226
-
227
-
228
-
229
-
230
-
231
-
232
-
233
-
234
-
235
-
236
-
237
-
238
-
239
-
240
-
241
-
242
-
243
-
244
-
245
-
246
-
247
-
248
-
249
-
250
-
251
-
252
-
253
-
254
-
255
-
256
-
257
-
258
-
259
-
260
-
261
-
262
-
263
-
264
-
265
-
266
-
267
-
268
-
269
-
270
-
271
-
272
-
273
-
274
-
275
-
276
-
277
-
278
-
279
-
280
 |
 |

Insert the new bulb into the hole,
and turn it one-quarter turn
clockwise to lock it in place.
Push the electrical connector back
onto the bulb. Make sure it is on
all the way.
Turn on the fog lights to test the
new bulb.
Reinstall the fog light assembly,
then tighten the screw.
Use a Phillips-head screwdriver to
remove the screw.
To remove the fog light assembly,
slide it inward, then carefully pull
it out of the bumper.
Remove the electrical connector
from the bulb by squeezing the
connector to unlock the tab, then
slide the connector off the bulb.
Remove the bulb by turning it
about one-quarter turn
counterclockwise.
1.
2.
3.
4.
5.
6.
7.
8.
Lights
200
ELECTRICAL CONNECTOR
SCREW
2008
Fit