2011 Jeep Liberty UConnect Manual - Page 74
2011 Jeep Liberty Manual

Page 74 highlights
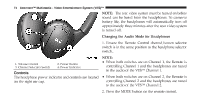
Uconnect™ Multimedia - Video Entertainment System (VES)™ 73 Locking the Remote Control • Replace the batteries, making sure to orient them All remote control functionality can be disabled as a according to the polarity diagram shown. parental control feature. • Replace the battery compartment cover. • To disable the Remote Control from making any changes, press the Video Lock button on the DVD HEADPHONES OPERATION player (if equipped). If the vehicle is not equipped The headphones receive two separate channels of audio with a DVD player, follow the radio's instructions to using an infrared transmitter from the video screen. turn Video Lock on. The radio and the video screen(s) Front seat occupants receive some headphone audio indicate when Video Lock is active. coverage to allow them to adjust the headphone volume • Pressing the Video Lock again or turning the ignition for the young rear seat occupants that may not be able to OFF turns Video Lock OFF and allows remote control do so for themselves. operation of the VES™. If no audio is heard after increasing the volume control, verify that the screen is turned on and in the down Replacing The Batteries The remote control requires two AAA batteries for op- position and that the channel is not muted and the headphone channel selector switch is on the desired eration. To replace the batteries: channel. If audio is still not heard, check that fully • Locate the battery compartment on the back of the charged batteries are installed in the headphones. remote, then slide the battery cover downward. 3
-
 1
1 -
2
-
3
-
4
-
5
-
6
-
7
-
8
-
9
-
10
-
11
-
12
-
13
-
14
-
15
-
16
-
17
-
18
-
19
-
20
-
21
-
22
-
23
-
24
-
25
-
26
-
27
-
28
-
29
-
30
-
31
-
32
-
33
-
34
-
35
-
36
-
37
-
38
-
39
-
40
-
41
-
42
-
43
-
44
-
45
-
46
-
47
-
48
-
49
-
50
-
51
-
52
-
53
-
54
-
55
-
56
-
57
-
58
-
59
-
60
-
61
-
62
-
63
-
64
-
65
-
66
-
67
-
68
-
 69
69 -
 70
70 -
 71
71 -
 72
72 -
 73
73 -
 74
74 -
 75
75 -
 76
76 -
 77
77 -
 78
78 -
 79
79 -
80
-
81
-
82
-
83
-
84
-
85
-
86
-
87
-
88
-
89
-
90
-
91
-
92
-
93
-
94
-
95
-
96
-
97
-
98
-
99
-
100
-
101
-
102
 |
 |
