2003 Nissan Xterra Owner's Manual - Page 210
2003 Nissan Xterra Manual

Page 210 highlights
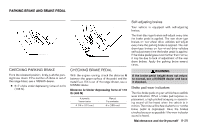
WDI0316 WDI0317 WDI0318 1. 2. 3. 4. Reinforcement panel Cooling unit Screws Clip 1. 2. Colling unit Clip 1. 2. Cooling unit Filter 3. Remove the clip securing the filters in the intake unit. 4. Remove the filters. NOTE: The filters must be aligned with the plastic hook at the bottom. 5. Insert the first filter in the bottom position. Slide it up to the top position and insert the second filter in the bottom position. 6. Secure the filter with the clip. 7. Install the glove box frame. 8. Install the glove box. 2. Remove the 7 screws and 1 clip from the glove box frame. Remove the glove box frame. 8-24 Maintenance and do-it-yourself
-
 1
1 -
2
-
3
-
4
-
5
-
6
-
7
-
8
-
9
-
10
-
11
-
12
-
13
-
14
-
15
-
16
-
17
-
18
-
19
-
20
-
21
-
22
-
23
-
24
-
25
-
26
-
27
-
28
-
29
-
30
-
31
-
32
-
33
-
34
-
35
-
36
-
37
-
38
-
39
-
40
-
41
-
42
-
43
-
44
-
45
-
46
-
47
-
48
-
49
-
50
-
51
-
52
-
53
-
54
-
55
-
56
-
57
-
58
-
59
-
60
-
61
-
62
-
63
-
64
-
65
-
66
-
67
-
68
-
69
-
70
-
71
-
72
-
73
-
74
-
75
-
76
-
77
-
78
-
79
-
80
-
81
-
82
-
83
-
84
-
85
-
86
-
87
-
88
-
89
-
90
-
91
-
92
-
93
-
94
-
95
-
96
-
97
-
98
-
99
-
100
-
101
-
102
-
103
-
104
-
105
-
106
-
107
-
108
-
109
-
110
-
111
-
112
-
113
-
114
-
115
-
116
-
117
-
118
-
119
-
120
-
121
-
122
-
123
-
124
-
125
-
126
-
127
-
128
-
129
-
130
-
131
-
132
-
133
-
134
-
135
-
136
-
137
-
138
-
139
-
140
-
141
-
142
-
143
-
144
-
145
-
146
-
147
-
148
-
149
-
150
-
151
-
152
-
153
-
154
-
155
-
156
-
157
-
158
-
159
-
160
-
161
-
162
-
163
-
164
-
165
-
166
-
167
-
168
-
169
-
170
-
171
-
172
-
173
-
174
-
175
-
176
-
177
-
178
-
179
-
180
-
181
-
182
-
183
-
184
-
185
-
186
-
187
-
188
-
189
-
190
-
191
-
192
-
193
-
194
-
195
-
196
-
197
-
198
-
199
-
200
-
201
-
202
-
203
-
204
-
 205
205 -
 206
206 -
 207
207 -
 208
208 -
 209
209 -
 210
210 -
 211
211 -
 212
212 -
 213
213 -
 214
214 -
 215
215 -
216
-
217
-
218
-
219
-
220
-
221
-
222
-
223
-
224
-
225
-
226
-
227
-
228
-
229
-
230
-
231
-
232
-
233
-
234
-
235
-
236
-
237
-
238
-
239
-
240
-
241
-
242
-
243
-
244
-
245
-
246
-
247
-
248
-
249
-
250
-
251
-
252
-
253
-
254
-
255
-
256
-
257
-
258
-
259
-
260
-
261
-
262
-
263
-
264
-
265
-
266
-
267
-
268
-
269
-
270
-
271
-
272
 |
 |

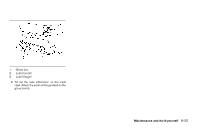
1.
Reinforcementpanel
2.
Coolingunit
3.
Screws
4.
Clip
2. Remove the 7 screws and 1 clip from the
glove box frame. Remove the glove box
frame.
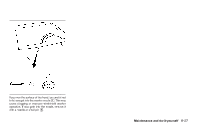
1.
Collingunit
2.
Clip
3. Remove the clip securing the filters in the
intakeunit.
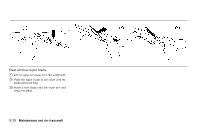
1.
Coolingunit
2.
Filter
4. Removethefilters.
NOTE:
Thefiltersmustbealignedwiththeplastic
hookatthebottom.
5. Insert the first filter in the bottom position.
Slideituptothetoppositionandinsertthe
secondfilterinthebottomposition.
6. Securethefilterwiththeclip.
7. Installthegloveboxframe.
8. Installtheglovebox.
WDI0316
WDI0317
WDI0318
8-24
Maintenanceanddo-it-yourself