2003 Nissan Xterra Owner's Manual - Page 221
2003 Nissan Xterra Manual

Page 221 highlights
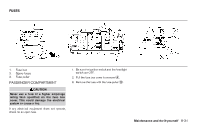
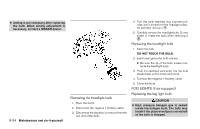
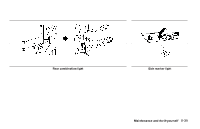
● When handling the bulb, do not touch the glass envelope. 1. Disconnect the negative (-) battery cable. 2. Unclip the two metal clips on the side of the fog light. 3. Pull out and support the fog light assembly. 4. Disconnect the fog light bulb connector. 5. Lift the spring retainer. 6. Remove the fog light bulb from housing. ● The fog light bulb cannot be separated from the wire and is serviced as an assembly. 7. Install the new bulb in the reverse order of removal. DO NOT TOUCH THE BULB. WDI0204 Maintenance and do-it-yourself 8-35
-
 1
1 -
2
-
3
-
4
-
5
-
6
-
7
-
8
-
9
-
10
-
11
-
12
-
13
-
14
-
15
-
16
-
17
-
18
-
19
-
20
-
21
-
22
-
23
-
24
-
25
-
26
-
27
-
28
-
29
-
30
-
31
-
32
-
33
-
34
-
35
-
36
-
37
-
38
-
39
-
40
-
41
-
42
-
43
-
44
-
45
-
46
-
47
-
48
-
49
-
50
-
51
-
52
-
53
-
54
-
55
-
56
-
57
-
58
-
59
-
60
-
61
-
62
-
63
-
64
-
65
-
66
-
67
-
68
-
69
-
70
-
71
-
72
-
73
-
74
-
75
-
76
-
77
-
78
-
79
-
80
-
81
-
82
-
83
-
84
-
85
-
86
-
87
-
88
-
89
-
90
-
91
-
92
-
93
-
94
-
95
-
96
-
97
-
98
-
99
-
100
-
101
-
102
-
103
-
104
-
105
-
106
-
107
-
108
-
109
-
110
-
111
-
112
-
113
-
114
-
115
-
116
-
117
-
118
-
119
-
120
-
121
-
122
-
123
-
124
-
125
-
126
-
127
-
128
-
129
-
130
-
131
-
132
-
133
-
134
-
135
-
136
-
137
-
138
-
139
-
140
-
141
-
142
-
143
-
144
-
145
-
146
-
147
-
148
-
149
-
150
-
151
-
152
-
153
-
154
-
155
-
156
-
157
-
158
-
159
-
160
-
161
-
162
-
163
-
164
-
165
-
166
-
167
-
168
-
169
-
170
-
171
-
172
-
173
-
174
-
175
-
176
-
177
-
178
-
179
-
180
-
181
-
182
-
183
-
184
-
185
-
186
-
187
-
188
-
189
-
190
-
191
-
192
-
193
-
194
-
195
-
196
-
197
-
198
-
199
-
200
-
201
-
202
-
203
-
204
-
205
-
206
-
207
-
208
-
209
-
210
-
211
-
212
-
213
-
214
-
215
-
 216
216 -
 217
217 -
 218
218 -
 219
219 -
 220
220 -
 221
221 -
 222
222 -
 223
223 -
 224
224 -
 225
225 -
 226
226 -
227
-
228
-
229
-
230
-
231
-
232
-
233
-
234
-
235
-
236
-
237
-
238
-
239
-
240
-
241
-
242
-
243
-
244
-
245
-
246
-
247
-
248
-
249
-
250
-
251
-
252
-
253
-
254
-
255
-
256
-
257
-
258
-
259
-
260
-
261
-
262
-
263
-
264
-
265
-
266
-
267
-
268
-
269
-
270
-
271
-
272
 |
 |

●
When handling the bulb, do not touch
theglassenvelope.
1. Disconnectthenegative(-)batterycable.
2. Unclipthetwometalclipsonthesideofthe
foglight.
3. Pulloutandsupportthefoglightassembly.
4. Disconnectthefoglightbulbconnector.
5. Liftthespringretainer.
6. Removethefoglightbulbfromhousing.
●
The fog light bulb cannot be separated
from the wire and is serviced as an as-
sembly.
7. Install the new bulb in the reverse order of
removal.DONOTTOUCHTHEBULB.
WDI0204
Maintenance and do-it-yourself
8-35