2014 Polaris 600 Switchback Assault Owners Manual - Page 88
2014 Polaris 600 Switchback Assault Manual

Page 88 highlights
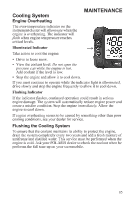
MAINTENANCE Cooling System Bleeding the Cooling System CAUTION! Steam and hot liquids will cause burns to your skin. Never bleed the cooling system or remove the pressure cap when the engine is warm or hot. Use of a non-standard pressure cap will not allow the recovery system to function properly. If the pressure cap needs replacement, contact your dealer for the correct part. NOTICE: If coolant flow becomes restricted or plugged, coolant loss, air lock or engine damage may result. 1. Position the vehicle so that the top of the tunnel is level. Elevate the front of the vehicle slightly if necessary. 2. Make sure the engine is cold before continuing. 3. Remove the right side panel. 4. Fill the coolant bottle with properly mixed coolant to the maximum mark. Do not install the pressure cap at this time. 5. Remove the bleed screw from the water outlet manifold and/or the thermostat housing. Allow the coolant to bleed through the system until it runs out the bleed holes. Reinstall the bleed screw into the manifold. 6. Add coolant to the coolant bottle to the maximum mark. 7. Reinstall the side panel. Always ensure that the hood and side panels are securely in place before starting the engine. 8. Start the engine and run at a fast idle for two to three minutes. Loosen the bleed screw occasionally to purge any trapped air. 9. Stop the engine and check the coolant bottle level. Add coolant as needed. Reinstall the side panel. 10. Carefully and briefly touch the top of the tunnel cooler under the seat. If the system is bled properly, the cooler will be warm to the touch. If not, repeat step 8. Lift the front of the snowmobile slightly to assist in the bleeding. 11. Remove the side panel. Reinstall the pressure cap. Reinstall the side panel. 12. Carefully lower the front end of the snowmobile. 86
-
 1
1 -
2
-
3
-
4
-
5
-
6
-
7
-
8
-
9
-
10
-
11
-
12
-
13
-
14
-
15
-
16
-
17
-
18
-
19
-
20
-
21
-
22
-
23
-
24
-
25
-
26
-
27
-
28
-
29
-
30
-
31
-
32
-
33
-
34
-
35
-
36
-
37
-
38
-
39
-
40
-
41
-
42
-
43
-
44
-
45
-
46
-
47
-
48
-
49
-
50
-
51
-
52
-
53
-
54
-
55
-
56
-
57
-
58
-
59
-
60
-
61
-
62
-
63
-
64
-
65
-
66
-
67
-
68
-
69
-
70
-
71
-
72
-
73
-
74
-
75
-
76
-
77
-
78
-
79
-
80
-
81
-
82
-
 83
83 -
 84
84 -
 85
85 -
 86
86 -
 87
87 -
 88
88 -
 89
89 -
 90
90 -
 91
91 -
 92
92 -
 93
93 -
94
-
95
-
96
-
97
-
98
-
99
-
100
-
101
-
102
-
103
-
104
-
105
-
106
-
107
-
108
-
109
-
110
-
111
-
112
-
113
-
114
-
115
-
116
-
117
-
118
-
119
-
120
-
121
-
122
-
123
-
124
-
125
-
126
-
127
-
128
-
129
-
130
-
131
-
132
-
133
-
134
-
135
 |
 |
