2016 Polaris Vegas 8-Ball Owners Manual - Page 55
2016 Polaris Vegas 8-Ball Manual

Page 55 highlights
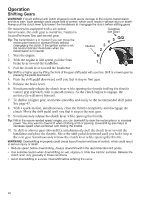
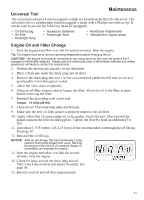
Maintenance Universal Tool The universal tool and a 4 mm hexagonal wrench are located under the left side cover. The universal tool is a combination 6 mm hexagonal wrench with a Phillips screwdriver tip. It can be used to service the following items (if equipped): • Oil drain plug • Air filter • Headlight lamp • Accessory fasteners • Passenger Seat • Handlebar Adjustments • Indicator/turn signal lamps Engine Oil and Filter Change 1. Start the engine and allow it to idle for several minutes. Stop the engine. Tip: The engine must be at normal operating temperature before changing the oil. CAUTION! Hot engine and exhaust components can cause burns to skin and can ignite a fire if exposed to flammable materials. Always park the motorcycle clear of flammable materials and where people are not likely to contact hot components. 2. Position the motorcycle securely on the sidestand. 3. Place a drain pan under the drain plug and oil filter. 4. Remove the drain plug and seal. Use the universal tool (under the left side cover) or a good quality 6-mm hexagonal socket. 5. Allow the oil to drain completely. 6. Using an oil filter wrench, slowly loosen the filter. Allow the oil in the filter to drain before removing the filter. 7. Reinstall the drain plug with a new seal. Torque: 15 ft-lbs (20 Nm) 8. Clean the oil filter mounting plate and threads. 9. Make sure the new oil filter gasket is properly seated in the oil filter. 10. Apply a thin film of clean engine oil to the gasket. Screw the new filter on until the gasket contacts the filter mounting plate. Tighten the filter by hand an additional 3/4 turn. 11. Add about 8.75-9.0 pints (4.0-4.25 liters) of the recommended oil through the oil fill cap. See page 36. 12. Reinstall the oil fill cap. NOTICE: After an oil change, the low oil pressure display remains illuminated longer than usual. Revving the engine while the low oil pressure display is illuminated can damage the engine. 13. Start the engine and allow it to idle for several minutes. Stop the engine. 14. Check for leaks around the drain plug and oil filter. Check the oil level and adjust if needed. See page 36. 15. Recycle used oil and oil filter appropriately. 53
-
 1
1 -
2
-
3
-
4
-
5
-
6
-
7
-
8
-
9
-
10
-
11
-
12
-
13
-
14
-
15
-
16
-
17
-
18
-
19
-
20
-
21
-
22
-
23
-
24
-
25
-
26
-
27
-
28
-
29
-
30
-
31
-
32
-
33
-
34
-
35
-
36
-
37
-
38
-
39
-
40
-
41
-
42
-
43
-
44
-
45
-
46
-
47
-
48
-
49
-
 50
50 -
 51
51 -
 52
52 -
 53
53 -
 54
54 -
 55
55 -
 56
56 -
 57
57 -
 58
58 -
 59
59 -
 60
60 -
61
-
62
-
63
-
64
-
65
-
66
-
67
-
68
-
69
-
70
-
71
-
72
-
73
-
74
-
75
-
76
-
77
-
78
-
79
-
80
-
81
-
82
-
83
-
84
-
85
-
86
-
87
-
88
-
89
-
90
-
91
-
92
-
93
-
94
-
95
-
96
-
97
-
98
-
99
-
100
-
101
-
102
-
103
-
104
-
105
-
106
 |
 |
