2016 Polaris Vegas 8-Ball Owners Manual - Page 58
2016 Polaris Vegas 8-Ball Manual

Page 58 highlights
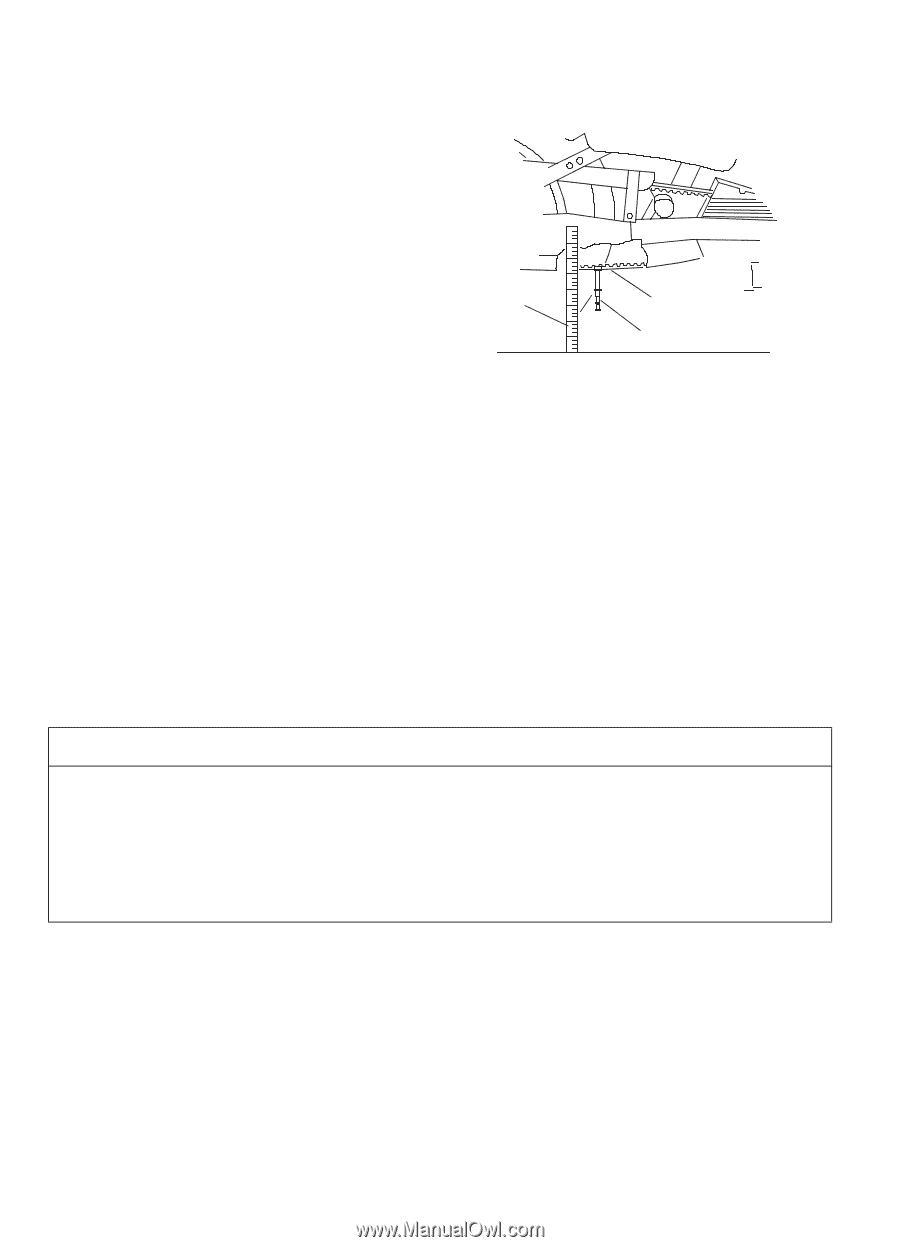
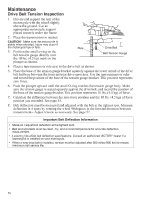
Maintenance Drive Belt Tension Inspection 1. Elevate and support the rear of the motorcycle with the wheel slightly above the ground. Use an appropriate motorcycle support placed securely under the frame. 2. Place the transmission in neutral. CAUTION! Make sure the motorcycle is stable when elevated. Injury may occur if the motorcycle tips or falls. Rule Drive Belt 3. Position the small o-ring on the Belt Tension Gauge belt tension gauge directly over the 10 lbs. (4.5 kg) mark on the plunger as shown. 4. Place a tape measure or rule next to the drive belt as shown. 5. Place the base of the tension gauge bracket squarely against the lower strand of the drive belt halfway between the front and rear drive sprockets. Use the tape measure or ruler and record the position of the base of the tension gauge bracket. This position represents zero force. 6. Push the plunger upward until the small O-ring touches the tension gauge body. Make sure the tension gauge is seated squarely against the drive belt, and record the position of the base of the tension gauge bracket.This position represents 10 lbs. (4.5 kg) of force. 7. Calculate the difference between the zero force position and the 10 lbs. (4.5 kg) of force position you recorded. See page 55. 8. Belt deflection must be measured and adjusted with the belt at the tightest spot. Measure deflection in 4 spots by rotating the wheel 90 degrees in the forward direction between measurements. Adjust tension as necessary. See page 57. Important Belt Deflection Information • Measure / adjust belt deflection at the tightest spot. • Belt and sprockets must be clean, dry, and at room temperature for accurate deflection measurement. • Lowering kits affect belt deflection specifications. Consult an authorized VICTORY dealer if a lowering kit is installed on your motorcycle. • When a new drive belt is installed, tension must be adjusted after 500 miles (800 km) to ensure maximum belt service life. 56
-
 1
1 -
2
-
3
-
4
-
5
-
6
-
7
-
8
-
9
-
10
-
11
-
12
-
13
-
14
-
15
-
16
-
17
-
18
-
19
-
20
-
21
-
22
-
23
-
24
-
25
-
26
-
27
-
28
-
29
-
30
-
31
-
32
-
33
-
34
-
35
-
36
-
37
-
38
-
39
-
40
-
41
-
42
-
43
-
44
-
45
-
46
-
47
-
48
-
49
-
50
-
51
-
52
-
 53
53 -
 54
54 -
 55
55 -
 56
56 -
 57
57 -
 58
58 -
 59
59 -
 60
60 -
 61
61 -
 62
62 -
 63
63 -
64
-
65
-
66
-
67
-
68
-
69
-
70
-
71
-
72
-
73
-
74
-
75
-
76
-
77
-
78
-
79
-
80
-
81
-
82
-
83
-
84
-
85
-
86
-
87
-
88
-
89
-
90
-
91
-
92
-
93
-
94
-
95
-
96
-
97
-
98
-
99
-
100
-
101
-
102
-
103
-
104
-
105
-
106
 |
 |