2002 Saab 9-3 Owner's Manual - Page 105
2002 Saab 9-3 Manual

Page 105 highlights
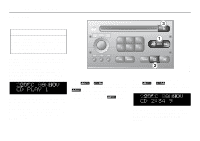
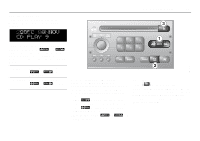
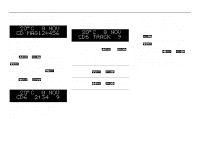
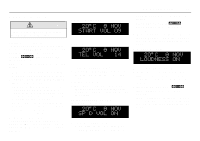
Saab 9-3 Audio System 105 General functions WARNING These functions should only be carried out when the car is stationary. • Maximum START VOL Volume-preset mode To select the volume-preset mode, press and hold the BAND button at the same time as you switch the Audio System on. Use the button to select the required function. The following volume settings can be preselected: • START VOL - maximum volume level when the Audio System is switched on. • TEL VOL - preset volume level when an in-car phone is activated. • SP D VOL - speed-dependent volume. The Audio System will automatically adjust the volume level to suit the background noise, such as road noise, occurring while the car is in motion. • LOUDNESS ON/OFF - boosting of the highest and lowest frequency ranges to enhance the sound image when the volume is set to a low level. • TEL VOL same time as you switch on the Audio System. - Select SP D VOL using . - Select ON/OFF by turning the VOL control. - Wait 10 seconds or touch one of the buttons on the bottom row of the Audio System, e.g. RADIO, to save the new volume setting. Loudness ON/OFF To change the volume setting: - Press and hold the BAND button at the same time as you switch on the Audio System. - Adjust the volume. - Wait 10 seconds or touch one of the buttons on the bottom row of the Audio System, e.g. RADIO, to save the new volume setting. Speed-dependent volume (SP D VOL) ON/OFF To change the loudness setting: The default setting for this function is ON. - Press and hold the BAND button at the same time as you switch on the Audio System. - Select LOUDNESS using . - Select ON/OFF by turning the VOL control. - Wait 10 seconds or touch one of the buttons on the bottom row of the Audio System, e.g. RADIO, to save the new volume setting. Adjusting the volume The default setting for START VOL is volume setting 9, and that for TEL VOL is volume setting 14 (the highest volume setting is 30). To change the volume setting: The default setting for this function is ON. - Press and hold the BAND button at the
-
 1
1 -
2
-
3
-
4
-
5
-
6
-
7
-
8
-
9
-
10
-
11
-
12
-
13
-
14
-
15
-
16
-
17
-
18
-
19
-
20
-
21
-
22
-
23
-
24
-
25
-
26
-
27
-
28
-
29
-
30
-
31
-
32
-
33
-
34
-
35
-
36
-
37
-
38
-
39
-
40
-
41
-
42
-
43
-
44
-
45
-
46
-
47
-
48
-
49
-
50
-
51
-
52
-
53
-
54
-
55
-
56
-
57
-
58
-
59
-
60
-
61
-
62
-
63
-
64
-
65
-
66
-
67
-
68
-
69
-
70
-
71
-
72
-
73
-
74
-
75
-
76
-
77
-
78
-
79
-
80
-
81
-
82
-
83
-
84
-
85
-
86
-
87
-
88
-
89
-
90
-
91
-
92
-
93
-
94
-
95
-
96
-
97
-
98
-
99
-
 100
100 -
 101
101 -
 102
102 -
 103
103 -
 104
104 -
 105
105 -
 106
106 -
 107
107 -
 108
108 -
 109
109 -
 110
110 -
111
-
112
-
113
-
114
-
115
-
116
-
117
-
118
-
119
-
120
-
121
-
122
-
123
-
124
-
125
-
126
-
127
-
128
-
129
-
130
-
131
-
132
-
133
-
134
-
135
-
136
-
137
-
138
-
139
-
140
-
141
-
142
-
143
-
144
-
145
-
146
-
147
-
148
-
149
-
150
-
151
-
152
-
153
-
154
-
155
-
156
-
157
-
158
-
159
-
160
-
161
-
162
-
163
-
164
-
165
-
166
-
167
-
168
-
169
-
170
-
171
-
172
-
173
-
174
-
175
-
176
-
177
-
178
-
179
-
180
-
181
-
182
-
183
-
184
-
185
-
186
-
187
-
188
-
189
-
190
-
191
-
192
-
193
-
194
-
195
-
196
-
197
-
198
-
199
-
200
-
201
-
202
-
203
-
204
-
205
-
206
-
207
-
208
-
209
-
210
-
211
-
212
-
213
-
214
-
215
-
216
-
217
-
218
-
219
-
220
-
221
-
222
-
223
-
224
-
225
-
226
-
227
-
228
-
229
-
230
-
231
-
232
-
233
-
234
-
235
-
236
-
237
-
238
-
239
-
240
-
241
-
242
-
243
-
244
-
245
-
246
-
247
-
248
-
249
-
250
-
251
-
252
-
253
-
254
-
255
-
256
 |
 |
