2009 Volvo S60 Owner's Manual - Page 73
2009 Volvo S60 Manual
Page 73 highlights
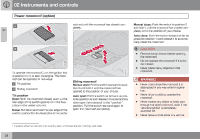
02 Instruments and controls Power windows NOTE To reduce buffeting wind noise if the rear windows are opened, also open the front windows slightly. WARNING Always remove the ignition key when the vehicle is unattended. Make sure that the windows are completely unobstructed before they are operated. Never leave children unattended in the vehicle. 02 Auto up/down function (front doors only) Either front door window can be opened or closed automatically. Auto down G029582 Press the front part of the button as far down as possible and release it immediately. To stop the window at any time, pull the button up. Cutout switch for rear windows Auto up A. Front windows. B. Rear windows. The power windows are controlled by buttons in the arm rests. The ignition switch must be ON1 (ignition key in position I, II or the engine running) for the electrically operated windows to function. To lower: Press down the front edge of the button to the first detent ("stop"). To raise: Lightly pull up the front edge of the button to the first detent ("stop"). Pull the front part of the button up as far as possible and release it immediately. To stop the window at any time, press the button down. NOTE The front power windows have an overload protecting circuit breaker that reverses movement of these windows to their starting points if they are obstructed in any way. Thereafter the windows will operate normally again. Cutout switch for rear windows The electrically operated rear door windows can be disabled by a switch located on the driver's door (see illustration). 1 The power windows will also function after the ignition has been switched off as long as neither of the front doors has been opened. G029583 73
-
 1
1 -
2
-
3
-
4
-
5
-
6
-
7
-
8
-
9
-
10
-
11
-
12
-
13
-
14
-
15
-
16
-
17
-
18
-
19
-
20
-
21
-
22
-
23
-
24
-
25
-
26
-
27
-
28
-
29
-
30
-
31
-
32
-
33
-
34
-
35
-
36
-
37
-
38
-
39
-
40
-
41
-
42
-
43
-
44
-
45
-
46
-
47
-
48
-
49
-
50
-
51
-
52
-
53
-
54
-
55
-
56
-
57
-
58
-
59
-
60
-
61
-
62
-
63
-
64
-
65
-
66
-
67
-
 68
68 -
 69
69 -
 70
70 -
 71
71 -
 72
72 -
 73
73 -
 74
74 -
 75
75 -
 76
76 -
 77
77 -
 78
78 -
79
-
80
-
81
-
82
-
83
-
84
-
85
-
86
-
87
-
88
-
89
-
90
-
91
-
92
-
93
-
94
-
95
-
96
-
97
-
98
-
99
-
100
-
101
-
102
-
103
-
104
-
105
-
106
-
107
-
108
-
109
-
110
-
111
-
112
-
113
-
114
-
115
-
116
-
117
-
118
-
119
-
120
-
121
-
122
-
123
-
124
-
125
-
126
-
127
-
128
-
129
-
130
-
131
-
132
-
133
-
134
-
135
-
136
-
137
-
138
-
139
-
140
-
141
-
142
-
143
-
144
-
145
-
146
-
147
-
148
-
149
-
150
-
151
-
152
-
153
-
154
-
155
-
156
-
157
-
158
-
159
-
160
-
161
-
162
-
163
-
164
-
165
-
166
-
167
-
168
-
169
-
170
-
171
-
172
-
173
-
174
-
175
-
176
-
177
-
178
-
179
-
180
-
181
-
182
-
183
-
184
-
185
-
186
-
187
-
188
-
189
-
190
-
191
-
192
-
193
-
194
-
195
-
196
-
197
-
198
-
199
-
200
-
201
-
202
-
203
-
204
-
205
-
206
-
207
-
208
-
209
-
210
-
211
-
212
-
213
-
214
-
215
-
216
-
217
-
218
-
219
-
220
-
221
-
222
-
223
-
224
-
225
-
226
-
227
-
228
-
229
-
230
-
231
-
232
-
233
-
234
-
235
-
236
-
237
-
238
-
239
-
240
-
241
-
242
-
243
-
244
-
245
-
246
-
247
-
248
-
249
-
250
-
251
-
252
-
253
-
254
 |
 |
