3M DB565 Safety Guide - Page 7
© 3M 2005. All Rights Reserved.
 |
View all 3M DB565 manuals
Add to My Manuals
Save this manual to your list of manuals |
Page 7 highlights
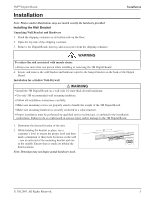
3M™ Digital Board 4. Remove the "L" brackets from the bottom of the Digital Board, and rotate them so that the halfround portion is flat against the wall. Align the brackets with the mounting holes, and mark the bracket hole locations on the wall. Installation 5. Using a Phillips screw driver, screw the supplied anchors into the wall until they are flush with the wall surface for each identified hole location. 6. Secure the unit to the wall by attaching the "L" brackets to the unit and wall using the provided washers and anchor screws. © 3M 2005. All Rights Reserved. 7
-
 1
1 -
 2
2 -
 3
3 -
 4
4 -
 5
5 -
 6
6 -
 7
7 -
 8
8
 |
 |

7
3M™ Digital Board
© 3M 2005. All Rights Reserved.
Installation
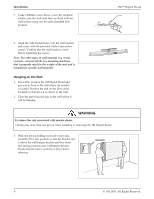
4.
Remove the “L” brackets from the bottom of the
Digital Board, and rotate them so that the half-
round portion is flat against the wall. Align the
brackets with the mounting holes, and mark the
bracket hole locations on the wall.
�±²³´µ¶·
¸¹º³»µ¶¼½±¾
5.
Using a Phillips screw driver, screw the supplied
anchors into the wall until they are flush with the
wall surface for each identified hole location.
6.
Secure the unit to the wall by attaching the
“L”
brackets to the unit and wall using the provided
washers and anchor screws.