3M EM500GPL-AM Owners Manual
3M EM500GPL-AM - Ergonomic Mouse Large Manual
 |
UPC - 021200418334
View all 3M EM500GPL-AM manuals
Add to My Manuals
Save this manual to your list of manuals |
3M EM500GPL-AM manual content summary:
- 3M EM500GPL-AM | Owners Manual - Page 1
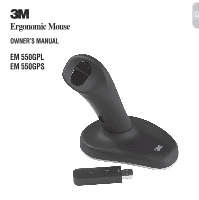
Ergonomic Mouse OWNER'S MANUAL EM 550GPL EM 550GPS - 3M EM500GPL-AM | Owners Manual - Page 2
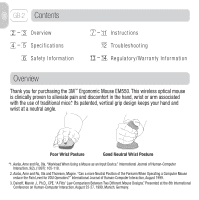
GB-2 Contents 2 - 3 Overview 4 - 5 Specifications 6 Safety Information 7 - 11 Instructions 12 Troubleshooting 13 - 14 Regulator y/Warranty Information Overview Thank you for purchasing the 3M™ Ergonomic Mouse EM550. This wireless optical mouse is clinically proven to alleviate pain and discomfort - 3M EM500GPL-AM | Owners Manual - Page 3
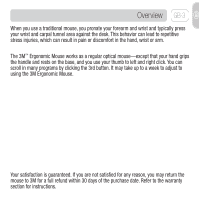
clicking the 3rd button. It may take up to a week to adjust to using the 3M Ergonomic Mouse. Your satisfaction is guaranteed. If you are not satisfied for any reason, you may return the mouse to 3M for a full refund within 30 days of the purchase date. Refer to the warranty section for instructions. - 3M EM500GPL-AM | Owners Manual - Page 4
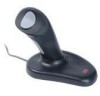
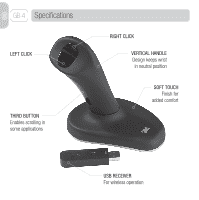
GB-4 Specifications LEFT CLICK THIRD BUTTON Enables scrolling in some applications RIGHT CLICK VERTICAL HANDLE Design keeps wrist in neutral position SOFT TOUCH Finish for added comfort USB RECEIVER For wireless operation - 3M EM500GPL-AM | Owners Manual - Page 5
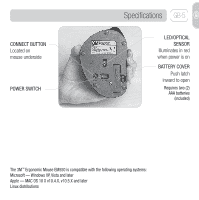
LED/OPTICAL SENSOR Illuminates in red when power is on BATTERY COVER Push latch inward to open Requires two (2) AAA batteries (included) The 3M™ Ergonomic Mouse EM550 is compatible with the following operating systems: Microsoft - Windows XP, Vista and later Apple - MAC OS 10 X v10.4.X, v10.5.X and - 3M EM500GPL-AM | Owners Manual - Page 6
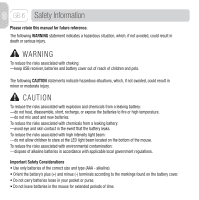
GB-6 Safety Information Please retain this manual for future reference. The following WARNING statement indicates a hazardous children to stare at the LED light beam located on the bottom of the mouse. To reduce the risks associated with environmental contamination: -dispose of alkaline batteries in - 3M EM500GPL-AM | Owners Manual - Page 7
Installing the Batteries. 1 Turn the mouse 1A over and remove the battery cover. Instructions GB-7 - 3M EM500GPL-AM | Owners Manual - Page 8
GB-8 Instructions 1B Slide the batteries into the battery compartment as shown in the illustration on the battery cover and replace cover. 1C To check if batteries are installed properly, turn the power switch to ON. The optical lens will illuminate in red. Turn the power switch to OFF. - 3M EM500GPL-AM | Owners Manual - Page 9
Connecting the Mouse to Your Computer. 2 Instructions GB-9 2A Turn off your computer. Turn off your mouse. Plug USB receiver into an open USB port on your computer. - 3M EM500GPL-AM | Owners Manual - Page 10
GB-10 Instructions 2B Turn on your computer. Turn on your mouse. The optical lens will illuminate in red. Press CONNECT button on USB receiver. Green light will slowly blink. 2C Press CONNECT button on mouse. Green light on USB receiver will quickly blink for a short time, then stop. - 3M EM500GPL-AM | Owners Manual - Page 11
Instructions GB-11 2D Move your mouse. Basic mouse functionality will activate. While moving the mouse, the green light on USB receiver will quickly blink. While the mouse is idle, the green light will not blink. Your mouse is now ready for use. You can customize your mouse settings through your - 3M EM500GPL-AM | Owners Manual - Page 12
GB-12 Troubleshooting Symptom Mouse Not Detected If lens is not illuminated red: If green help. Resolve any conflicts among devices connected to your computer. Compatible operating systems for the 3M Ergonomic Mouse EM550 are listed on page 2. Make sure the power switch is ON. Use fresh batteries - 3M EM500GPL-AM | Owners Manual - Page 13
consent of 3M Company. the instructions, may mouse, or remove the batteries, turn the computer off and then on again. If the interference stopped when the computer was off, check to see if one of the input/ output (I/O) devices or one of the computer's internal accessory boards is causing the problem - 3M EM500GPL-AM | Owners Manual - Page 14
Information Limited Two-Year Warranty for 3M™ Ergonomic Mouse EM550 3M warrants to the owner of this new product that it is free from defects in material and workmanship under normal use and service for two years from the original date of purchase. The warranty does not include normal wear and - 3M EM500GPL-AM | Owners Manual - Page 15
Souris ergonomique MANUEL D'UTILISATION EM 550GPL EM 550GPS - 3M EM500GPL-AM | Owners Manual - Page 16
Instructions 12 Dépannage 13 - 14 Information réglementaire/garantie Vue générale Nous vous remercions d'avoir choisi la souris ergonomique EM550 3M Can a more Neutral Position of the Forearm When Operating a Computer Mouse reduce the Pain Level for VDU Operators?" International Journal of Human- - 3M EM500GPL-AM | Owners Manual - Page 17
des douleurs dans la main, le poignet et l'avant bras. La souris ergonomique 3M™ fonctionne comme une souris optique classique à la différence que votre main attrape pas satisfait, vous pouvez retourner la souris à 3M pour un remboursement dans les 30 jours suivants la date d'achat. Réferrez - 3M EM500GPL-AM | Owners Manual - Page 18
FR-4 Description CLIC GAUCHE LE TROISIÈME BOUTON Permet le défilement et la navigation dans certaines applications CLIC DROIT POIGNÉE VERTICALE L'ergonomie de la souris permet une position naturelle du poignet UN TOUCHER AGRÉABLE Une finition soignée pour un meilleur confort PORT USB Pour l' - 3M EM500GPL-AM | Owners Manual - Page 19
est rouge quand elle fonctionne COUVERCLE DES PILES Pousser le loquet vers l'intérieur pour ouvrir Nécessite 2 piles AAA (incluses) La souris ergonomique 3M™ EM550 est compatible avec les systèmes d'exploitation suivants: Microsoft - Windows XP, Vista et plus tard Apple - MAC OS 10 X v10.4.X, v10 - 3M EM500GPL-AM | Owners Manual - Page 20
FR-6 Informations de sécurité Merci de conserver ce manuel pour les futures références. L'avertissement suivant concerne une situation qui, si elle n'est pas évitée, peut entrainer la mort ou de graves blessures. ATTENTION Pour réduire les risques d'étouffement: -gardez le connecteur USB, les piles - 3M EM500GPL-AM | Owners Manual - Page 21
Installation des piles. 1 Soulevez la 1A souris, et ouvrir le couvercle du compartiment des piles. Instructions FR-7 - 3M EM500GPL-AM | Owners Manual - Page 22
FR-8 Instructions 1B Placez les piles dans le compartiment prévu pour cet effet comme indiqué sur l'illustration ci-contre. 1C Vérifiez que les piles sont bien installées correctement et allumez le bouton de la souris. La lentille optique sera rouge. Eteignez alors la souris à nouveau. - 3M EM500GPL-AM | Owners Manual - Page 23
Instructions FR-9 Connection de la souris avec l'ordinateur. 2 2A Eteignez votre ordinateur. Eteignez votre souris. Connectez le port USB de la souris, dans le port USB de l'ordinateur. - 3M EM500GPL-AM | Owners Manual - Page 24
FR-10 Instructions 2B Allumez votre ordinateur. Allumez votre souris. Le voyant optique doit être rouge. Pressez le bouton CONNECT sur le port USB. Une lumière verte - 3M EM500GPL-AM | Owners Manual - Page 25
Instructions FR-11 2D Bougez votre souris. Les fonctions de base de la souris sont activées. Pendant le mouvement de la souris, la lumière - 3M EM500GPL-AM | Owners Manual - Page 26
qu'il n'existe pas de conflits entre les périphériques connectés à votre ordinateur. Les systèmes d'exploitation compatibles avec la souris ergonomique 3M EM550 sont listés en page 2. Vérifiez que la souris est bien allumée. Utilisez des nouvelles piles et installez les correctement. Assurez-vous que - 3M EM500GPL-AM | Owners Manual - Page 27
ne peut être effectuée sans l'autorisation écrite de la compagnie 3M. Toute modification non autorisée rendra caduque l'autorisation régie par les , et si il n'est pas installé et utilisé selon les instructions d'utilisation, il peut causer des interférences nuisibles pour les communications radio - 3M EM500GPL-AM | Owners Manual - Page 28
pour un remboursement du montant du prix d'achat. Ne le retournez pas dans le lieu d'achat. Appelez le service client 1-800-332-7483 pour avoir les instructions pour le retour du produit. 3M France Bd de l'Oise, 95006 Cergy Pontoise Cedex Tél. : 33 (1) 30.31.61.61 N° Azur 0 810 331 300 http://www - 3M EM500GPL-AM | Owners Manual - Page 29
Ergonomische Maus BENUTZERHANDBUCH EM 550GPL EM 550GPS - 3M EM500GPL-AM | Owners Manual - Page 30
12 Problembehandlung 6 Sicherheitsinformationen 13 - 14 Regelung bei Garantieansprüchen Übersicht Danke für den Kauf der 3M™ Ergonomic Mouse EM550. Diese schnurlose optische Mouse verringert die durch traditionelle Mäuse entstehenden Beschwerden und Schmerzen in Hand, Handgelenk oder Arm, was - 3M EM500GPL-AM | Owners Manual - Page 31
Hilfe des dritten Knopfes durch mehrere Programme scrollen. Es kann bis zu einer Woche dauern bis Sie sich mit dem Umgang der 3M™ Ergonomic Mouse vertraut gemacht haben. Ihre Zufriedenheit ist garantiert. Falls Sie aus irgendwelchen Gründen nicht zufrieden sein sollten, können Sie die Maus innerhalb - 3M EM500GPL-AM | Owners Manual - Page 32
DE-4 Spezifikationen LINKE MAUSTASTE DRITTE MAUSTASTE Erlaubt Srcollen in verschiedenen Anwendungen RECHTE MAUSTASTE VERTIKALER GRIFF Design hält das Handgelenk in einer neutralen Position SOFT TOUCH Ausführung für zusätzlichen Komfort USB EMPFÄNGER Für kabelloses Arbeiten - 3M EM500GPL-AM | Owners Manual - Page 33
DE-5 LED/OPTISCHER SENSOR Leuchtet im Betrieb rot BATTERIEABDECKUNG Zum öffnen Lasche eindrücken Benötigt zwei (2) AAA Batterien (beiliegend) Die 3M™ Ergonomic Mouse EM550 ist kompatibel mit den folgenden Betriebssystemen: Microsoft - Windows XP, Vista und später Apple - MAC OS 10 X v10.4.X, v10 - 3M EM500GPL-AM | Owners Manual - Page 34
DE-6 Sicherheitsinformationen Bitte bewahren Sie die Anleitung für zukünftige Fragen auf. Die folgende WARNUNG weist auf eine gefährliche Situation hin, welche, falls nicht vermieden, den Tod oder schwerwiegende Verletzungen zur Folge haben kann. WARNUNG Um das Erstickungsrisiko zu verringern: - - 3M EM500GPL-AM | Owners Manual - Page 35
Einsetzen der Batterien. 1 Drehen Sie die 1A Maus um und entfernen Sie die Batterieabdeckung. Anleitung DE-7 - 3M EM500GPL-AM | Owners Manual - Page 36
DE-8 Anleitung 1B Lassen Sie die Batterien in das Batteriefach gleiten wie in der Beschreibung auf der Batterieabdeckung zu sehen ist und schließen Sie das Fach. 1C Zum Prüfen der Batterien den Powerschalter auf on stellen. Der optische Sensor sollte rot leuchten. Schalten Sie den Power Schalter - 3M EM500GPL-AM | Owners Manual - Page 37
Verbinden Sie die Maus mit dem Computer. 2 Anleitung DE-9 2A Schalten Sie den Computer aus. Schalten Sie die Maus aus. Stecken Sie den USB-Empfänger in einen freien USB Port an Ihrem Computer ein. - 3M EM500GPL-AM | Owners Manual - Page 38
DE-10 Anleitung 2B Schalten Sie den Computer ein. Schalten Sie die Maus ein. Der optische Sensor sollte rot leuchten. Drücken Sie den CONNECT button am USB-Empfänger. Das grüne Licht sollte langsam blinken. 2C Drücken Sie den CONNECT button auf der Maus. Grünes Licht am USB-Empfänger blinkt für - 3M EM500GPL-AM | Owners Manual - Page 39
Anleitung DE-11 2D Bewegen Sie die Maus. Die Basisfunktion wird sich aktivieren. Während Sie die Maus bewegen, sollte das grüne Licht am USB-Empfänger schnell aufblinken. Während die Maus ruht, sollte das grüne Licht nicht blinken. Ihre Maus kann nun benutzt werden. Sie können die - 3M EM500GPL-AM | Owners Manual - Page 40
ändler oder den Hersteller. Beheben Sie alle Konflikte zwischen Geräten welche an Ihrem Computer angeschlossen sind. Kompatible Betriebssysteme für die 3M Ergonomic Mouse EM550 sind auf Seite 2 aufgelistet. Prüfen Sie, ob der Power Schalter auf On steht. Benutzen Sie neue Batterien und legen - 3M EM500GPL-AM | Owners Manual - Page 41
-MS9101 Veränderungen dürfen nicht ohne schriftliche Einwilligung der 3M Company gemacht werden. Unbefugte Veränderungen können nach dem der Eingabe- bzw. Ausgabegeräte (I/O) oder ob eines der internen Zubehörteile das Problem verursacht. Trennen Sie alle I/O-Geräte und prüfen Sie, ob die Störung - 3M EM500GPL-AM | Owners Manual - Page 42
DE-14 Garantie Informationen 2 Jahre eingeschränkte Garantie für 3M™ Ergonomic Mouse EM550 3M garantiert dem Eigentümer dieses neuen Produktes, dass es frei von Material- und Verarbeitungsfehlern ist. Im Rahmen der vorgesehenen Verwendung und Bedienung übernimmt 3M eine Garantie von 2 Jahren ab dem - 3M EM500GPL-AM | Owners Manual - Page 43
Ergonomische muis GEBRUIKSAANWIJZING EM 550GPL EM 550GPS - 3M EM500GPL-AM | Owners Manual - Page 44
dank voor het aanschaffen van de EM550 ergonomische muis van 3M™. Uit klinisch onderzoek is gebleken dat deze draadloze optische muis van de pols *1. Aaràs, Arne and Ro, Ola. "Workload When Using a Mouse as an Input Device." International Journal of Human-Computer Interaction, 9(2), (1997): 105 - 3M EM500GPL-AM | Owners Manual - Page 45
in hand, pols of arm als mogelijk gevolg. De ergonomische muis van 3M™ werkt als een gewone optische muis. U pakt hem alleen bij de handgreep te drukken. Het kost u misschien een week om aan de ergonomische muis van 3M te wennen. Uw tevredenheid is gegarandeerd. Als u om welke reden dan ook niet - 3M EM500GPL-AM | Owners Manual - Page 46
NL-4 Specificaties LINKS KLIKKEN DERDE KNOP Voor scrollen in sommige programma's RECHTS KLIKKEN VERTICALE HANDGREEP Houdt de pols in een neutrale stand ZACHTE AFWERKING Voor meer comfort USB-ONTVANGER Voor draadloos werken - 3M EM500GPL-AM | Owners Manual - Page 47
licht wanneer de muis aanstaat BATTERIJDEKSEL Druk het lipje naar binnen om het batterijvak openen Werkt op twee (2) AAA-batterijen (bijgeleverd) De 3M™ ergonomische muis EM550 is geschikt voor de volgende besturingssystemen: Microsoft - Windows XP, Vista en later Apple - MAC OS 10 X v10.4.X, v10 - 3M EM500GPL-AM | Owners Manual - Page 48
NL-6 Veiligheidsinformatie Bewaar deze handleiding als naslagwerk. Onder LET OP waarschuwen wij voor situaties waarin ernstig of zelfs dodelijk letsel kan ontstaan. LET OP Voorkom verstikkingsgevaar: -de USB-ontvanger, de batterijen en het deksel van het batterijvak buiten bereik van kinderen en - 3M EM500GPL-AM | Owners Manual - Page 49
Batterijen plaatsen. 1 Houd de muis 1A op zijn kop en verwijder het deksel van het batterijvak. Aanwijzingen NL-7 - 3M EM500GPL-AM | Owners Manual - Page 50
NL-8 Aanwijzingen 1B Steek de batterijen in het batterijvak zoals is te zien in de illustratie op het deksel van het batterijvak en plaats dan het deksel weer terug. 1C Controleer of u de batterijen goed hebt geplaatst door de AAN/UITknop van de muist op ON te zetten. De optische lens wordt nu - 3M EM500GPL-AM | Owners Manual - Page 51
De muis op uw computer aansluiten. 2 Aanwijzingen NL-9 2A Zet uw computer uit. Zet de muis uit. Steek de USB-ontvanger in een vrije USB-opening van uw computer. - 3M EM500GPL-AM | Owners Manual - Page 52
NL-10 Aanwijzingen 2B Zet uw computer aan. Zet de muis aan. De optische lens kleurt nu rood. Druk op de CONNECTknop op de USBontvanger. Het groene lampje gaat langzaam knipperen. 2C Druk op de CONNECT-knop op de muis. Het groene lampje op de USB-ontvanger gaat even sneller knipperen en gaat - 3M EM500GPL-AM | Owners Manual - Page 53
Aanwijzingen NL-11 2D Beweeg uw muis. De basisfuncties van de muis werken nu. Als u de muis beweegt, knippert het groene lampje op de USB-ontvanger snel. Het groene lampje knippert niet als u de muis niet gebruikt. Uw muis is nu klaar voor gebruik. U kunt de instellingen van uw muis aanpassen met - 3M EM500GPL-AM | Owners Manual - Page 54
van uw computer om advies. Verhelp conflicten met andere randapparatuur van uw computer. De besturingssystemen die geschikt zijn voor de ergonomische muis van 3M staan op blz. 2. Controleer of de AAN/UIT-knop op ON staat. Gebruik nieuwe batterijen en zorg dat ze goed zijn geplaatst. Controleer of - 3M EM500GPL-AM | Owners Manual - Page 55
Wettelijke informatie NL-13 FCC ID: F4Z44K3FDP-MS9101 Voor wijzigingen aan dit apparaat is in alle gevallen de schriftelijke toestemming van 3M vereist. Wanneer het apparaat zonder toestemming wordt gewijzigd, kan de toelating op grond van de Federal Communication Rules vervallen en het toepassen - 3M EM500GPL-AM | Owners Manual - Page 56
het terugbrengen van het product te 3M voor een volledige teruggave van uw 3M Nederland BV Industrieweg 24 NL-2382 NW Zoeterwoude Tel. 071-5450450 http://www.3M.com/ergo We zijn bereikbaar op: 071-5450450 © 3M 2008 Alle rechten voorbehouden. 3M is een handelsmerk van 3M. Onder licentie in Canada - 3M EM500GPL-AM | Owners Manual - Page 57
Mouse Ergonomico MANUALE DI ISTRUZIONI EM 550GPL EM 550GPS - 3M EM500GPL-AM | Owners Manual - Page 58
4 - 5 Dettagli 6 Informazioni di sicurezza 12 Problemi 13 - 14 Informazioni sulla garanzia Sommario Grazie per aver acquistato il mouse ergonomico EM550. E'stato clinicamente testato che questo wireless mouse possa alleviare stress e problemi alla mano, al polso e al braccio connessi all'uso dei - 3M EM500GPL-AM | Owners Manual - Page 59
noiose lesioni da stress e quindi danni e dolore alla mano, al braccio ed al polso. Il Mouse Ergonomico 3M lavora come un mouse ottico tradizionale con la differenza che con il Mouse Ergonomico 3M la vostra mano impugna la manopola e appoggia sulla base e voi usate il pollice per cliccare il - 3M EM500GPL-AM | Owners Manual - Page 60
IT-4 Dettagli TASTO SINISTRO IL TERZO TASTO Abilita allo scorrimento in alcune applicazioni TASTO DESTRO IMPUGNATURA VERTICALE Il Design del prodotto consente di mantenere il polso in posizione di scarico SOFT TOUCH Finitura per un maggior comfort RICEVITORE USB Per connessione wireless - 3M EM500GPL-AM | Owners Manual - Page 61
Si illumina di rosso quando è acceso COPERCHIO BATTERIA Spingere verso l'interno per aprire Richiede due batterie AAA (incluse) Il mouse ergonomico 3M EM550 è compatibile con i seguenti sistemi operativi: Microsoft - Windows XP, Vista e più successivamente Apple - MAC OS 10 X v10.4.X, v10.5.X e pi - 3M EM500GPL-AM | Owners Manual - Page 62
IT-6 Informazioni di sicurezza Prego conservare questo manuale per futura referenza e consultazione. La seguente sezione indica situazioni di pericolo batterie. • Non tenere batterie sparse in borse, tasche o portafoglio. • Non lasciare le batterie nel mouse se non lo si utilizza per lungo tempo. - 3M EM500GPL-AM | Owners Manual - Page 63
Installare le batterie. 1 Capovolgere il 1A mouse e aprire il coperchio batterie. Istruzioni IT-7 - 3M EM500GPL-AM | Owners Manual - Page 64
IT-8 Istruzioni 1B Inserire le batterie nell'alloggiamento come mostrato dall'illustrazione sul coperchio delle batterie e poi richiudere il coperchio. 1C Controllare che le batterie siano installate corettamente, accendendo l'interruttore (ON). Il sensore ottico si illuminerà di rosso. Girare - 3M EM500GPL-AM | Owners Manual - Page 65
Connettere il mouse al vostro PC. 2 2A Spegnere il PC. Spegnere il Mouse. Inserire il ricevitore USB in una porta USB libera. Istruzioni IT-9 - 3M EM500GPL-AM | Owners Manual - Page 66
IT-10 Istruzioni 2B Accendere il PC. Accendere il Mouse. La lente ottica si illumina in rosso. Premere il bottone CONNECT sul ricevitore USB. La luce verde lampeggerà lentamente. 2C Premere il bottone CONNECT sul mouse. La luce verde sul ricevitore USB lampeggerà velocemente per breve tempo e - 3M EM500GPL-AM | Owners Manual - Page 67
muove la luce verde del ricevitore USB lampeggia velocemente, se il mouse è fermo la luce verde non lampeggia. Il mouse è ora pronto per l'uso. Potete personalizzare i settaggi attraverso la sezione mouse settings utility inclusa nel vostro sistema operativo (Windows, Mac, Linux). Operare muovendo - 3M EM500GPL-AM | Owners Manual - Page 68
ricevere specifico aiuto. Risolvere alcuni conflitti fra altri hardware connessi al PC. I sistemi operativi compatibili per il Mouse Ergonomico 3M EM550 sono elencati a pagina 2. Assicurarsi che l'interruttore sia acceso. Usare batterie nuove e installale correttamente. Assicurarsi che il ricevitore - 3M EM500GPL-AM | Owners Manual - Page 69
fica può essere apportata al prodotto senza consenso scritto di 3M Company. Modifiche non consentite al prodotto possono determinare la cessazione assenza di interferenze in particolari installazioni. Per determinare se il mouse sta causando interferenze radio, sconnettere lo strumento e rimuovere le - 3M EM500GPL-AM | Owners Manual - Page 70
mouse Ergonomico 3M™ EM550 3M 3M Italia S.p.a. Divsione Prodotti Ufficio Via San Bovio, 3 20090 Segrate (MI) Tél.: 02-7035000 http://www.3M.com/ergo Siamo a vostra disposizione: 02-7035000 © 3M 2008 Tutti i diritti sono riservati. 3M è un marchio registrato di 3M. Usato sotto licenza in Canada - 3M EM500GPL-AM | Owners Manual - Page 71
Ratón Ergonómico MANUAL DE USUARIO EM 550GPL EM 550GPS - 3M EM500GPL-AM | Owners Manual - Page 72
problemas 13 - 14 Información de garantía Introducción Gracias por comprar el 3M™ Ratón Ergonómico EM550. Este ratón óptico inalámbrico está muñeca *1. Aaràs, Arne and Ro, Ola. "Workload When Using a Mouse as an Input Device." International Journal of Human-Computer Interaction, 9(2), (1997): - 3M EM500GPL-AM | Owners Manual - Page 73
contra la superficie de trabajo. Esta posición puede ocasionar lesiones por esfuerzos repetitivos, produciendo dolor y molestias en la mano, muñeca o brazo. El 3M™ Ratón Ergonómico funciona como un ratón óptico normal - excepto que la mano agarra el mango y descansa sobre la base, y el dedo pulgar es - 3M EM500GPL-AM | Owners Manual - Page 74
ES-4 Especificaciones BOTÓN IZQUIERDO TERCER BOTÓN Permite el desplazamiento en algunas aplicaciones BOTÓN DERECHO MANGO VERTICAL Su diseño mantiene la muñeca en una posición neutral TACTO SUAVE Acabado suave para un mayor confort RECEPTOR USB Para funcionamiento inalámbrico - 3M EM500GPL-AM | Owners Manual - Page 75
en rojo cuando está encendido COMPARTIMENTO PARA LAS PILAS Presione la lengüeta hacia dentro para abrirlo Necesita 2 pilas AAA (incluídas) El 3M™ Ratón Ergonómico es compatible con los siguientes sistemas operativos: Microsoft - Windows XP, Vista y más adelante Apple - MAC OS 10 X v10.4.X, v10 - 3M EM500GPL-AM | Owners Manual - Page 76
ES-6 Información de seguridad Por favor conserve este manual para una consulta futura. Los siguientes AVISOS indican una situación de peligro, la cual si no se evita, puede causar la muerte o lesiones graves. AVISO - 3M EM500GPL-AM | Owners Manual - Page 77
Instalación de las pilas. 1 Localice en la 1A parte posterior del ratón el compartimento para las pilas y retire la tapa. Instrucciones ES-7 - 3M EM500GPL-AM | Owners Manual - Page 78
ES-8 Instrucciones 1B Deslice las pilas en el compartimento para las mismas como se muestra en la imagen y cierre el compartimento con la tapa. 1C Para comprobar si las pilas se han colocado correctamente, desplace el interruptor a la posición ON. La lente óptica se iluminará en rojo. Ponga el - 3M EM500GPL-AM | Owners Manual - Page 79
Instrucciones ES-9 Conectando el ratón con su ordenador. 2 2A Apague el ordenador. Apague el ratón. Inserte el receptor USB en un puerto USB de su ordenador. - 3M EM500GPL-AM | Owners Manual - Page 80
ES-10 Instrucciones 2B Encienda su ordenador. Encienda el ratón. La lente óptica se iluminará en rojo. Presione el botón CONNECT del receptor USB. Una luz verde comenzará a parpadear. 2C Presione el botón CONNECT del ratón. Una luz verde en el receptor USB parpadeará por un corto espacio de - 3M EM500GPL-AM | Owners Manual - Page 81
Instrucciones ES-11 2D Mueva su ratón. Las funcionalidades básicas del ratón se activarán. Mientras mueve su ratón, la luz verde del receptor USB parpadeará. Mientras el ratón está parado, la luz verde no parpadeará. Su ratón está ahora listo para usarse. Puede personalizar la configuración de su - 3M EM500GPL-AM | Owners Manual - Page 82
USB no se reconoce. Pida ayuda al distribuidor o fabricante del ordenador. Resuelva los problemas entre estos dispositivos. Los sistemas operativos compatibles con el 3M™ Ratón Ergonómico EM550 están citados en la página 2. Asegúrese que el interruptor está en la posición ON. Use pilas nuevas - 3M EM500GPL-AM | Owners Manual - Page 83
Información de garantía ES-13 FCC ID: F4Z44K3FDP-MS9101 Modificaciones a este dispositivo no se hizo sin el consentimiento por escrito de 3M Company. Modificaciones no autorizadas pueden anular la autorización concedida en virtud del Reglamento Federal de Comunicación que permita el funcionamiento de - 3M EM500GPL-AM | Owners Manual - Page 84
de la factura de compra original. Todas las reclamaciones se presentarán en el periodo de garantía o en otro plazo razonable. Si así lo solicita 3M, el producto será enviado a la empresa por cuenta del comprador. Si se demuestra que el producto es defectuoso, el remedio se limitará, a discreción de - 3M EM500GPL-AM | Owners Manual - Page 85
Rato Ergonómico Manual do utilizador EM 550GPL EM 550GPS - 3M EM500GPL-AM | Owners Manual - Page 86
o rato ergonómico EM550 da 3M. Está clínicamente comprovado que os Ratos Ergonómicos 3M aliviam a dor e o desconforto da Magne. "Can a more Neutral Position of the Forearm When Operating a Computer Mouse reduce the Pain Level for VDU Operators?" International Journal of Human-Computer Interaction, - 3M EM500GPL-AM | Owners Manual - Page 87
no antebraço e no próprio pulso. Este movimento e esforço repetidos podem conduzir a diversas lesões e dores na mão, pulso e braço. O rato ergonómico 3M™ trabalha como qualquer rato óptico tradicional, excepto no que respeita ao movimento pois este permite que tenha a sua mão, pulso e antebraço numa - 3M EM500GPL-AM | Owners Manual - Page 88
PT-4 Especificações BOTÃO ESQUERDO TERCEIRO BOTÃO Para aceder e trabalhar com mais aplicações BOTÃO DIREITO COMANDO VERTICAL Com um design que mantém o pulso numa posição neutra e ângulo correcto TOQUE SUAVE Conforto acrescido RECEPTOR USB Para trabalhar sem fios - 3M EM500GPL-AM | Owners Manual - Page 89
LOCAL DE CARREGAMENTO DE BATERIAS Pressione e empurre para abrir Este rato requere 2 pilhas alcalinas AAA. (Este rato já vem com pilhas incluídas.) O Rato Ergonómico 3M é compatível com os seguintes sistemas operativos: Microsoft - Windows XP, Vista Apple - MAC OS 10 X v10.4.X, v10.5.X Linux - 3M EM500GPL-AM | Owners Manual - Page 90
locais próprios onde depositar as mesmas. Procure um Pilhão. Recomendações de Segurança • Use apenas pilhas do tamanho e tipo indicado neste manual: AAA - alcalino. • Oriente a pilha de acordo com os pólos mais (+) e menos (-). Também encontra estes sinais na tampa da bateria para o ajudar a coloc - 3M EM500GPL-AM | Owners Manual - Page 91
Instalação das Baterias (pilhas). 1 Vire o rato e 1A remova a tampa da bateria. Instruções PT-7 - 3M EM500GPL-AM | Owners Manual - Page 92
PT-8 Instruções 1B Deslize as pilhas no compartimento de carregamento segundo as indicações ilustradas na tampa da bateria e feche-a de seguida. 1C Para verificar se as pilhas estão correctamente instaladas, ligue o interruptor até ficar "ON" (ligado). O sensor óptico iluminado a vermelho indica - 3M EM500GPL-AM | Owners Manual - Page 93
Ligue o rato ao computador. 2 2A Desligue o computador. Desligue o rato. Ligue o Receptor USB do Rato a uma porta USB livre no seu computador. Instruções PT-9 - 3M EM500GPL-AM | Owners Manual - Page 94
PT-10 Instruções 2B Ligue o computador. Ao ligar o Rato Ergonómico, uma luz vermelha se iluminará. Clique em "conectar" no receptor USB. Uma luz verde piscará suave e lentamente. 2C Clique em "conectar/ligar" no rato. A luz verde no receptor USB piscará rapidamente por um curto período de tempo. - 3M EM500GPL-AM | Owners Manual - Page 95
. Ao mover o rato, a luz verde no receptor USB piscará rapidamente. Quando o rato estiver inactivo, a luz verde deixará de piscar. O Rato Ergonómico 3M está agora operacional. Deverá ajustá-lo de acordo com o sistema operativo instalado no seu computador (Windows, Mac, linux). Trabalhe com o rato - 3M EM500GPL-AM | Owners Manual - Page 96
sobre superfícies transparentes como vidro ou superfícies reflectoras como espelhos. UTILIZE em superfícies ásperas ou porosas que não sejam completamente lisas. A 3M tem uma vasta gama de tapetes de rato que permitem trabalhar com maior eficiência e tirar mais partido do seu Rato Ergonómico. Em pouco - 3M EM500GPL-AM | Owners Manual - Page 97
-13 FCC ID: F4Z44K3FDP-MS9101 Não serão realizadas quaisquer modificações a este dispositivo, sem o consentimento por escrito, da empresa 3M. Estão completamente desautorizadas quaisquer modificações que possam anular a autorização de funcionamento deste dispositivo. Nota: Este equipamento foi testado - 3M EM500GPL-AM | Owners Manual - Page 98
Este produto tem a garantia de 2 anos. Se não desejar comprar ou utilizar este produto de acordo com as condições descritas, deverá devolver o produto à 3M e requisitar o seu reembolso de acordo com o preço de aquisição (mediante apresentação de comprovativo de compra) e dentro de um prazo máximo de
-
 1
1 -
 2
2 -
 3
3 -
 4
4 -
 5
5 -
 6
6 -
 7
7 -
8
-
9
-
10
-
11
-
12
-
13
-
14
-
15
-
16
-
17
-
18
-
19
-
20
-
21
-
22
-
23
-
24
-
25
-
26
-
27
-
28
-
29
-
30
-
31
-
32
-
33
-
34
-
35
-
36
-
37
-
38
-
39
-
40
-
41
-
42
-
43
-
44
-
45
-
46
-
47
-
48
-
49
-
50
-
51
-
52
-
53
-
54
-
55
-
56
-
57
-
58
-
59
-
60
-
61
-
62
-
63
-
64
-
65
-
66
-
67
-
68
-
69
-
70
-
71
-
72
-
73
-
74
-
75
-
76
-
77
-
78
-
79
-
80
-
81
-
82
-
83
-
84
-
85
-
86
-
87
-
88
-
89
-
90
-
91
-
92
-
93
-
94
-
95
-
96
-
97
-
98
 |
 |
Ergonomic Mouse
OWNER’S MANUAL
EM 550GPL
EM 550GPS