3M MP8747 Operation Guide - Page 12
Remote Control Transmitter Identification
 |
View all 3M MP8747 manuals
Add to My Manuals
Save this manual to your list of manuals |
Page 12 highlights
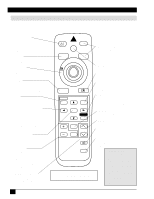
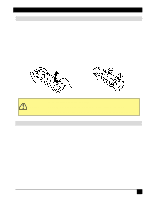
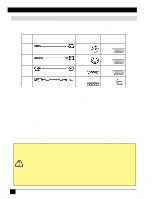
Section 2: Product Description Remote Control Transmitter Identification Use the remote control transmitter within a distance of approximately 3 meters (or 9.8 feet) from the sensor of the front of the projector, and within a range of 30° to the left and right. Strong light and obstacles may interfere with operation of the remote control transmitter. STANDBY/ON Press STANDBY/ON button to begin projection mode (lamp on) or press and hold button for one second to switch to standby mode (lamp off). STANDBY/ON VIDEO LASER BLANK RGB VIDEO and RGB Press to select the input source. Press again to select the next source. BLANK Press to turn ON/OFF the screen blanking function. DISK PAD Press to operate the mouse shift function and left-click function. LASER Press to turn ON/OFF laser beam pointer. MOUSE / RIGHT Press to click the right mouse button. *AUTO Press to make projector automatically adjust 4 items (V. POSIT, H. POSIT, H. PHASE, and H. SIZE) for RGB input signal. (Please see note at bottom right.) AUTO *POSITION Press this and any menu directional arrows for corresponding movement of the picture (with RGB signal only). MENU Press to turn ON/OFF the menu screen display. MENU directional arrows Press to select menu items when the menu screen is displayed. Press to operate the mouse shift function. After the POSITION button has been pressed, press these buttons to move the picture upward, downward, and to the left and right. *MENU SELECT MENU POSITION MENU SELECT RESET FREEZE MAGNIFY OFF VOLUME RESET Press to return a displayed menu item to its default setting. Press to click right mouse button. Press after scrolling with POSITION to return picture to original position. *FREEZE Press to turn ON/OFF the freeze (still) image display. VOLUME Press to adjust loudness of sound. MUTE Press to stop audio output. Press again to resume audio output. Press to display individual menu items. Can also be used to click the left mouse function. *MAGNIFY Press to magnify the displayed image. Press (+) to enlarge the center of the image. Press again to enlarge up to 4x magnification. Press (-) to reduce display magnification. (Can also be used with POSITION to select image area to be magnified.) VOLUME and MUTE Pressing these at the same time will operate the page-up or page-down function of the USB mouse. MUTE TIMER TIMER Press to turn ON/OFF the Timer on the Menu screen. (Timer cannot be displayed during Freeze function.) *This button will not function if the messages "NO INPUT IS DETECTED" or "SYNC IS OUT OF RANGE" are displayed. Figure 2.4 Basic Remote Control Transmitter AUTO ADJUST Notes: Requires several tens of seconds. May not operate correctly in some cases, depending on the connected computer and its signal and type of image. Execute auto adjust with display of the running application set at maximum. After auto adjust, image may be slightly darker due to automatic adjustment of signal level. 12 3M™ Personal Projector MP8746/MP8747 © 3M IPC 2000
-
 1
1 -
2
-
3
-
4
-
5
-
6
-
 7
7 -
 8
8 -
 9
9 -
 10
10 -
 11
11 -
 12
12 -
 13
13 -
 14
14 -
 15
15 -
 16
16 -
 17
17 -
18
-
19
-
20
-
21
-
22
-
23
-
24
-
25
-
26
-
27
-
28
-
29
-
30
-
31
-
32
-
33
-
34
-
35
-
36
-
37
-
38
-
39
-
40
-
41
-
42
-
43
-
44
 |
 |
