ASRock H110 Pro BTC User Manual - Page 28
PCIe Power Connector Installation Guide, PSU's 4-pin power connector
 |
View all ASRock H110 Pro BTC manuals
Add to My Manuals
Save this manual to your list of manuals |
Page 28 highlights
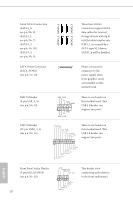
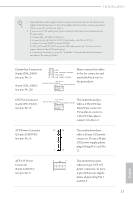
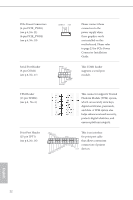
H110 Pro BTC+ 2.7 PCIe Power Connector Installation Guide The two extra 4-pin power connectors on this motherboard offer more power for your graphics cards. They provide stable voltages and greatly reduce the risks of burning your motherboard or graphics cards. When more than three graphics cards are installed, be sure to install the PSU's 4-pin power cables to the 4-pin power connectors (PCIE_PWR) on your motherboard; otherwise, the cards may be damaged. Please MUST install TWO PSU's 4-pin power cables to your MB's TWO 4-pin power connectors. Plug one of the PSU's 4-pin power connector ( 1 ) to the 4-pin power connector closer to the PCIe x16 slot ( A PCIE_PWR1) . Then plug another PSU's 4-pin power connector ( 2 ) to the other 4-pin power connector ( B PCIE_PWR2) . A 1 2 B If your PSU only provides ONE, then please MUST install it to the 4-pin power connector (PCIE_ PWR1) closer to the PCIe x16 slot. English Important: Besides the two PCIe power connectors, please connect the SATA power connector as well when you install more then three graphics cards. Make sure all the connected power connectors (4-pin, 24-pin and SATA) are on the same PSU; otherwise, the motherboard may be damaged. *The diagrams shown here are for reference only. Please refer to the user manual that comes with your motherboard for the accurate location of the 4-pin power connectors. 23
-
 1
1 -
2
-
3
-
4
-
5
-
6
-
7
-
8
-
9
-
10
-
11
-
12
-
13
-
14
-
15
-
16
-
17
-
18
-
19
-
20
-
21
-
22
-
 23
23 -
 24
24 -
 25
25 -
 26
26 -
 27
27 -
 28
28 -
 29
29 -
 30
30 -
 31
31 -
 32
32 -
 33
33 -
34
-
35
-
36
-
37
-
38
-
39
-
40
-
41
-
42
-
43
-
44
-
45
-
46
-
47
-
48
-
49
-
50
-
51
-
52
-
53
-
54
-
55
-
56
-
57
-
58
-
59
-
60
-
61
-
62
-
63
-
64
-
65
-
66
-
67
-
68
-
69
-
70
-
71
-
72
-
73
 |
 |
