ASRock H110 Pro BTC User Manual - Page 4
Contents, Introduction, Installation, Software and Utilities Operation
 |
View all ASRock H110 Pro BTC manuals
Add to My Manuals
Save this manual to your list of manuals |
Page 4 highlights
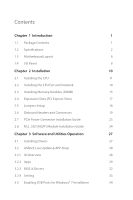
Contents Chapter 1 Introduction 1 1.1 Package Contents 1 1.2 Specifications 2 1.3 Motherboard Layout 6 1.4 I/O Panel 8 Chapter 2 Installation 10 2.1 Installing the CPU 11 2.2 Installing the CPU Fan and Heatsink 14 2.3 Installing Memory Modules (DIMM) 15 2.4 Expansion Slots (PCI Express Slots) 17 2.5 Jumpers Setup 18 2.6 Onboard Headers and Connectors 19 2.7 PCIe Power Connector Installation Guide 23 2.8 M.2_SSD (NGFF) Module Installation Guide 24 Chapter 3 Software and Utilities Operation 27 3.1 Installing Drivers 27 3.2 ASRock Live Update & APP Shop 28 3.2.1 UI Overview 28 3.2.2 Apps 29 3.2.3 BIOS & Drivers 32 3.2.4 Setting 33 3.3 Enabling USB Ports for Windows® 7 Installation 34
-
 1
1 -
 2
2 -
 3
3 -
 4
4 -
 5
5 -
 6
6 -
 7
7 -
 8
8 -
 9
9 -
 10
10 -
11
-
12
-
13
-
14
-
15
-
16
-
17
-
18
-
19
-
20
-
21
-
22
-
23
-
24
-
25
-
26
-
27
-
28
-
29
-
30
-
31
-
32
-
33
-
34
-
35
-
36
-
37
-
38
-
39
-
40
-
41
-
42
-
43
-
44
-
45
-
46
-
47
-
48
-
49
-
50
-
51
-
52
-
53
-
54
-
55
-
56
-
57
-
58
-
59
-
60
-
61
-
62
-
63
-
64
-
65
-
66
-
67
-
68
-
69
-
70
-
71
-
72
-
73
 |
 |

Contents
Chapter
1
Introduction
1
1.1
Package Contents
1
1.2
Specifications
2
1.3
Motherboard Layout
6
1.4
I/O Panel
8
Chapter
2
Installation
10
2.1
Installing the CPU
11
2.2
Installing the CPU Fan and Heatsink
14
2.3
Installing Memory Modules (DIMM)
15
2.4
Expansion Slots (PCI Express Slots)
17
2.5
Jumpers Setup
18
2.6
Onboard Headers and Connectors
19
2.7
PCIe Power Connector Installation Guide
23
2.8
M.2_SSD (NGFF) Module Installation Guide
24
Chapter
3
Software and Utilities Operation
27
3.1
Installing Drivers
27
3.2
ASRock Live Update & APP Shop
28
3.2.1
UI Overview
28
3.2.2
Apps
29
3.2.3
BIOS & Drivers
32
3.2.4
Setting
33
3.3
Enabling USB Ports for Windows® 7 Installation
34