Aastra 5370ip User Manual Aastra 5370/5370ip (Office 70/Office 70ip) - Page 85
Expansion key module Aastra M530⁄M535 (optional), Connections
 |
View all Aastra 5370ip manuals
Add to My Manuals
Save this manual to your list of manuals |
Page 85 highlights
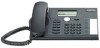
Installation and First-Time Operation Expansion key module Aastra M530⁄M535 (optional) You can connect 1 Aastra M530 expansion key module with 20 configurable keys or 1 Aastra M535expansion key module with 3 x 15 configurable keys to your phone. Each key has an LED for visual signalling. ■ Connections Connecting the Aastra M530⁄M535 expansion key module Connecting further Aastra M530⁄M535 expansion key modules (symbol on Aastra M530) Connecting further Aastra M530⁄M535 expansion key modules or power supply (symbol on Aastra M535) ■ Connecting the Aastra M530⁄M535 expansion key module Note: Always disconnect the phone from the mains first before you connect/disconnect an Aastra M530⁄M535 expansion key module. • Unplug the phone cord from the socket on the underside of the phone. • Attach Aastra M530⁄M535 expansion key module to the right of the phone until you feel and hear it snap into place, as indicated in the following figure. • Plug the cord into the supplementary equipment sockets on the underside of the phone and the Aastra M530⁄M535 expansion key module. • Feed the connecting cable through the strain relief on the underside of the Aastra M530⁄M535 expansion key module. • Plug the phone cord back into the socket on the underside of the phone. The expansion key module Aastra M530⁄M535 is now ready for operation. • Depending on the type of power supply, you may need an additional power supply unit for your expansion key module. If there is an under supply of power, a message appears on the display. Contact your system administrator for more information. 85 eud-0830/2.1 - I7.7 - 10.2008
-
 1
1 -
2
-
3
-
4
-
5
-
6
-
7
-
8
-
9
-
10
-
11
-
12
-
13
-
14
-
15
-
16
-
17
-
18
-
19
-
20
-
21
-
22
-
23
-
24
-
25
-
26
-
27
-
28
-
29
-
30
-
31
-
32
-
33
-
34
-
35
-
36
-
37
-
38
-
39
-
40
-
41
-
42
-
43
-
44
-
45
-
46
-
47
-
48
-
49
-
50
-
51
-
52
-
53
-
54
-
55
-
56
-
57
-
58
-
59
-
60
-
61
-
62
-
63
-
64
-
65
-
66
-
67
-
68
-
69
-
70
-
71
-
72
-
73
-
74
-
75
-
76
-
77
-
78
-
79
-
 80
80 -
 81
81 -
 82
82 -
 83
83 -
 84
84 -
 85
85 -
 86
86 -
 87
87 -
 88
88 -
 89
89 -
 90
90
 |
 |
