Acer Aspire 9520 User Manual - Page 58
Enabling RAID on your system - service manual
 |
View all Acer Aspire 9520 manuals
Add to My Manuals
Save this manual to your list of manuals |
Page 58 highlights
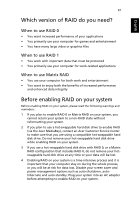
English 42 5 If your system supports Acer GraviSense, disable it before enabling RAID. 6 Before enabling RAID on your system, back up important data and applications using Acer eRecovery Management or another appropriate backup tool. 7 Enabling RAID may change how your hard disk drives are ordered, and Acer eRecovery Management may not function properly if your system does not have the needed drive ordering. 8 You cannot use Acer eRecovery Management to revert your system to a non-RAID configuration after enabling RAID. 9 The HDD password feature will not function once RAID has been enabled. 10 Using the Intel Matrix Storage Manager option ROM (accessed by pressing Ctrl-I when starting your computer) is not recommended. Use the Intel Matrix Storage Console in Windows for most RAID functions. 11 Please contact an Acer Customer Service Center if you have further questions about enabling RAID on your Acer computer. Enabling RAID on your system To enable RAID 0, 1 or Intel Matrix RAID on your system: 1 Install the Intel Matrix Storage Console from the software CD that comes with your Acer computer. Insert the CD and the installation program will automatically launch. If AutoRun is disabled, run the installation program manually by opening the CD/DVD drive from My Computer and clicking on the Setup icon. 2 Follow the onscreen instructions to install the Intel Matrix Storage Console. 3 Run the Intel Matrix Storage Console from Start > Programs > Intel Matrix Storage Manager. 4 Select Advanced from the View menu. This will display a list of the hard disk drives installed on your system. 5 Select the hard disk drive you want to enable RAID on. 6 Select Create RAID Volume from Existing Hard Drive from the Actions menu. 7 The Create RAID Volume from Existing Hard Drive wizard will start.
-
 1
1 -
2
-
3
-
4
-
5
-
6
-
7
-
8
-
9
-
10
-
11
-
12
-
13
-
14
-
15
-
16
-
17
-
18
-
19
-
20
-
21
-
22
-
23
-
24
-
25
-
26
-
27
-
28
-
29
-
30
-
31
-
32
-
33
-
34
-
35
-
36
-
37
-
38
-
39
-
40
-
41
-
42
-
43
-
44
-
45
-
46
-
47
-
48
-
49
-
50
-
51
-
52
-
 53
53 -
 54
54 -
 55
55 -
 56
56 -
 57
57 -
 58
58 -
 59
59 -
 60
60 -
 61
61 -
 62
62 -
 63
63 -
64
-
65
-
66
-
67
-
68
-
69
-
70
-
71
-
72
-
73
-
74
-
75
-
76
-
77
-
78
-
79
-
80
-
81
-
82
-
83
-
84
-
85
-
86
-
87
-
88
-
89
-
90
-
91
-
92
-
93
-
94
-
95
-
96
-
97
-
98
-
99
-
100
-
101
-
102
-
103
-
104
-
105
-
106
-
107
-
108
-
109
-
110
-
111
-
112
-
113
-
114
-
115
-
116
-
117
-
118
-
119
-
120
-
121
-
122
-
123
 |
 |
