Acer Aspire E1-432 User Manual - Page 12
Information on USB 3.0, Right view - specification
 |
View all Acer Aspire E1-432 manuals
Add to My Manuals
Save this manual to your list of manuals |
Page 12 highlights
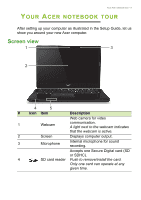
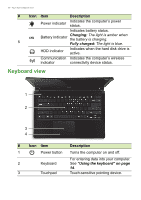
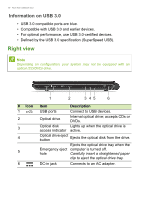
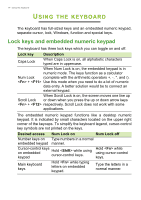
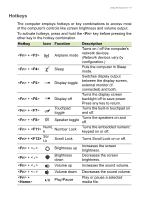
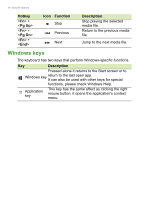
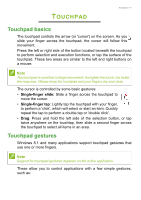
12 - Your Acer notebook tour Information on USB 3.0 • USB 3.0 compatible ports are blue. • Compatible with USB 3.0 and earlier devices. • For optimal performance, use USB 3.0-certified devices. • Defined by the USB 3.0 specification (SuperSpeed USB). Right view Note Depending on configuration, your system may not be equipped with an optical (CD/DVD) drive. # Icon 1 2 3 4 5 6 1 2 3 45 6 Item Description USB ports Connect to USB devices. Optical drive Internal optical drive; accepts CDs or DVDs. Optical disk Lights up when the optical drive is access indicator active. Optical drive eject button Ejects the optical disk from the drive. Ejects the optical drive tray when the Emergency eject computer is turned off. hole Carefully insert a straightened paper clip to eject the optical drive tray. DC-in jack Connects to an AC adapter.
-
 1
1 -
2
-
3
-
4
-
5
-
6
-
 7
7 -
 8
8 -
 9
9 -
 10
10 -
 11
11 -
 12
12 -
 13
13 -
 14
14 -
 15
15 -
 16
16 -
 17
17 -
18
-
19
-
20
-
21
-
22
-
23
-
24
-
25
-
26
-
27
-
28
-
29
-
30
-
31
-
32
-
33
-
34
-
35
-
36
-
37
-
38
-
39
-
40
-
41
-
42
-
43
-
44
-
45
-
46
-
47
-
48
-
49
-
50
-
51
-
52
-
53
-
54
-
55
-
56
-
57
-
58
-
59
-
60
-
61
-
62
-
63
-
64
-
65
-
66
-
67
-
68
-
69
-
70
-
71
-
72
-
73
-
74
-
75
-
76
-
77
-
78
-
79
-
80
-
81
-
82
-
83
-
84
-
85
 |
 |
