Acer Aspire G7700 Aspire G7700 Series User's Guide - Page 83
To create a bootable RAID array using RAID BIOS, From the Select a Task
 |
View all Acer Aspire G7700 manuals
Add to My Manuals
Save this manual to your list of manuals |
Page 83 highlights
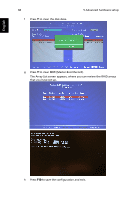
English 71 (1) Start the nForce Setup program to open the NVIDIA Windows nForce Drivers page. (2) Select the modules you want to install, then follow the onscreen instructions to finish installation. b Open the NVIDIA Control Panel by right-clicking on the desktop and selecting NVIDIA Control Panel. c From the Select a Task pane under the Storage category, select Create array to start the Create Array Wizard and follow the onscreen instructions to complete disk array creation. Press F1 to access the online help for more information on array creation process. 3 Perform steps 5 and 6 of the "To create a non-bootable RAID array using the RAID BIOS" section. To create a bootable RAID array using RAID BIOS: 1 Perform steps 1 through 4 of the "To create a non-bootable RAID array using the RAID BIOS" section. 2 Create a bootable array. a Use the arrow keys to select the array that you want to set up as a bootable disk. b Press B to specify the array as bootable. c Press Enter to view and verify details for the selected array. The Array Detail screen shows various information about the array that you selected, such as Stripe block, RAID mode, Stripe width, Disk model name, and Disk capacity. From the Array Detail screen, you can do the following:
-
 1
1 -
2
-
3
-
4
-
5
-
6
-
7
-
8
-
9
-
10
-
11
-
12
-
13
-
14
-
15
-
16
-
17
-
18
-
19
-
20
-
21
-
22
-
23
-
24
-
25
-
26
-
27
-
28
-
29
-
30
-
31
-
32
-
33
-
34
-
35
-
36
-
37
-
38
-
39
-
40
-
41
-
42
-
43
-
44
-
45
-
46
-
47
-
48
-
49
-
50
-
51
-
52
-
53
-
54
-
55
-
56
-
57
-
58
-
59
-
60
-
61
-
62
-
63
-
64
-
65
-
66
-
67
-
68
-
69
-
70
-
71
-
72
-
73
-
74
-
75
-
76
-
77
-
 78
78 -
 79
79 -
 80
80 -
 81
81 -
 82
82 -
 83
83 -
 84
84 -
 85
85 -
 86
86 -
 87
87 -
 88
88 -
89
-
90
-
91
-
92
-
93
-
94
-
95
-
96
-
97
-
98
-
99
-
100
-
101
-
102
-
103
-
104
-
105
-
106
-
107
-
108
-
109
-
110
-
111
-
112
-
113
-
114
-
115
-
116
-
117
-
118
-
119
-
120
-
121
-
122
-
123
-
124
-
125
-
126
-
127
-
128
-
129
-
130
-
131
-
132
-
133
-
134
-
135
-
136
 |
 |
