Acer Aspire G7700 Aspire G7700 Series User's Guide - Page 84
Installing the RAID drivers, To install a RAID driver under Windows Vista
 |
View all Acer Aspire G7700 manuals
Add to My Manuals
Save this manual to your list of manuals |
Page 84 highlights
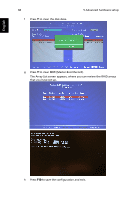
English 72 5 Advanced hardware setup • Rebuild the array - Press R then use the arrow keys to select the disk to rebuild and then press F7. • Delete the array - Press D then press Y at the prompt. • Clear the MBR - Press C then press Y at the prompt. • Remove the volume - Press V, then use the arrow keys to select the disk volume to remove and then press F7. For Mirroring (RAID 1), single-disk Stripe (RAID 0), and single-disk Spanning arrays, removing a volume is a way to remove a disk from an array and convert it to a basic disk without deleting any data. In Mirroring array, the array becomes degraded (if there are still disks in the array) and must be rebuilt. The Remove Vol option is not available with systems that do not support NVIDIA's RAID pass-through disk management. d Press Enter to go back to the previous screen. e Press F10 to save the configuration and exit. 3 Install the RAID drivers. See page 72. 4 Initialize the RAID array. Perform step 5 of the "To create a non-bootable RAID array using the RAID BIOS" section. Installing the RAID drivers To install a RAID driver under Windows Vista: 1 After you complete the RAID BIOS setup, boot from the Windows CD. 2 Click Install Now then continue the installation process until you get to the Which type of installation do you want screen. 3 Click Custom (advanced). 4 Click Load Driver. 5 At the Load Driver dialog box, click Browse then navigate to the folder containing the installation files. 6 Select NVIDIA nForce RAID Controller, then click Next. 7 Click Load Driver. 8 At the Load Driver dialog box, click Browse then navigate to the folder containing the installation files. 9 Select NVIDIA nForce Serial ATA Controller, then click Next. Note: You do not need to install the nForce RAID Device. Windows handles it automatically as part of the RAID and SATA controller installation process.
-
 1
1 -
2
-
3
-
4
-
5
-
6
-
7
-
8
-
9
-
10
-
11
-
12
-
13
-
14
-
15
-
16
-
17
-
18
-
19
-
20
-
21
-
22
-
23
-
24
-
25
-
26
-
27
-
28
-
29
-
30
-
31
-
32
-
33
-
34
-
35
-
36
-
37
-
38
-
39
-
40
-
41
-
42
-
43
-
44
-
45
-
46
-
47
-
48
-
49
-
50
-
51
-
52
-
53
-
54
-
55
-
56
-
57
-
58
-
59
-
60
-
61
-
62
-
63
-
64
-
65
-
66
-
67
-
68
-
69
-
70
-
71
-
72
-
73
-
74
-
75
-
76
-
77
-
78
-
 79
79 -
 80
80 -
 81
81 -
 82
82 -
 83
83 -
 84
84 -
 85
85 -
 86
86 -
 87
87 -
 88
88 -
 89
89 -
90
-
91
-
92
-
93
-
94
-
95
-
96
-
97
-
98
-
99
-
100
-
101
-
102
-
103
-
104
-
105
-
106
-
107
-
108
-
109
-
110
-
111
-
112
-
113
-
114
-
115
-
116
-
117
-
118
-
119
-
120
-
121
-
122
-
123
-
124
-
125
-
126
-
127
-
128
-
129
-
130
-
131
-
132
-
133
-
134
-
135
-
136
 |
 |
