Acer Chromebook Spin 713 CP713-3W Lifecycle Extension Guide - Page 23
Mainboard Removal
 |
View all Acer Chromebook Spin 713 CP713-3W manuals
Add to My Manuals
Save this manual to your list of manuals |
Page 23 highlights
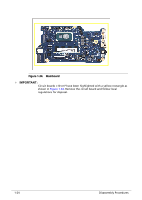
Mainboard Removal 0 Prerequisite: Ensure that the Heatsink and Fan have been disassembled prior removing the mainboard. 1. Remove three (3) screws (A) securing the right side of LCD hinge in place (Figure 1-28). A Figure 1-28. Mainboard Removal 2. Lift the top assembly until it is fully open (Figure 1-29). Figure 1-29. Mainboard Removal Disassembly Procedures 1-21
-
 1
1 -
2
-
3
-
4
-
5
-
6
-
7
-
8
-
9
-
10
-
11
-
12
-
13
-
14
-
15
-
16
-
17
-
 18
18 -
 19
19 -
 20
20 -
 21
21 -
 22
22 -
 23
23 -
 24
24 -
 25
25 -
 26
26 -
 27
27 -
 28
28 -
29
-
30
-
31
-
32
-
33
-
34
-
35
-
36
-
37
 |
 |

Disassembly Procedures
1-21
Mainboard Removal
0
Prerequisite:
Ensure that the
Heatsink
and
Fan
have been disassembled prior removing
the mainboard.
1.
Remove three (3) screws (A) securing the right side of LCD hinge in place
(
Figure 1-28
).
Figure 1-28.
Mainboard Removal
2.
Lift the top assembly until it is fully open (
Figure 1-29
).
Figure 1-29.
Mainboard Removal
A