Acer H7550ST User Manual - Page 32
Screen Capture, Source Lock, Closed Caption, VGA OUT, Standby, DC 5V Out, Reset, Acer to User.
 |
View all Acer H7550ST manuals
Add to My Manuals
Save this manual to your list of manuals |
Page 32 highlights
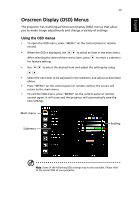
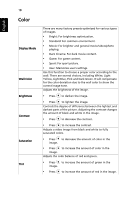
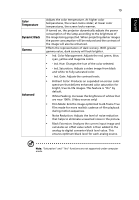
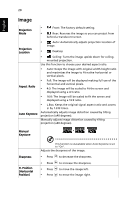
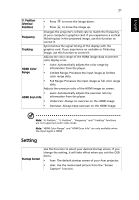
22 English Screen Capture Source Lock Closed Caption VGA OUT (Standby) Use this function to customize the startup screen. To capture the image that you want to use as the startup screen, follow the instructions below. Notice Before proceeding with the following steps, make sure that the "Keystone" is set to the default value "0", and the "Aspect Ratio" is set to "4:3". For details, refer to the "Image" section. • Change the "Startup Screen" from the default setting "Acer" to "User". • Select "Screen Capture" to customize the startup screen. • A dialog box appears to confirm the action. Choose "Yes" to use the current image as your customized startup screen. Choose "No" to cancel the screen capture and exist the Onscreen Display (OSD). • A message appears stating that the screen capture is in progress. • When the screen capture is finished, the message disappears and the original display is shown. Selecting "On" enables the function and when switching input signals, you need to press "SOURCE" on the control panel or remote control, or the direct source key on the remote control. When this function is disabled, the projector will detect your source automatically. Selects a preferred closed captioning mode from CC1, CC2, CC3, CC4 (CC1 displays captions in the primary language in your area). Select "Off" to turn off the captioning feature. This function is only available when a composite video or SVideo input signal is selected and its system format is NTSC. Selecting "On" enables the function. The projector can output a VGA signal when it is in standby mode and the VGA IN (or VGA IN 1) and VGA OUT sockets are correctly connected to the devices. DC 5V Out (Standby) Enabling this function slightly increases the standby power consumption. Selecting "On" enables the function. Both micro USB cable inside the projector and the DC 5V out port on the back of the projector can output 5V power when it is in standby mode. Reset Enabling this function slightly increases the standby power consumption. Press after choosing "Yes" to return the display parameters on all menus to the factory default settings.
-
 1
1 -
2
-
3
-
4
-
5
-
6
-
7
-
8
-
9
-
10
-
11
-
12
-
13
-
14
-
15
-
16
-
17
-
18
-
19
-
20
-
21
-
22
-
23
-
24
-
25
-
26
-
 27
27 -
 28
28 -
 29
29 -
 30
30 -
 31
31 -
 32
32 -
 33
33 -
 34
34 -
 35
35 -
 36
36 -
 37
37 -
38
-
39
-
40
-
41
-
42
-
43
-
44
-
45
-
46
-
47
-
48
-
49
-
50
-
51
-
52
-
53
-
54
-
55
-
56
-
57
-
58
-
59
 |
 |
